跳转到内容

AppsFlyer Tracking

此内容尚不支持你的语言。

1. Setting Up an Install Postback and View Through Attribution

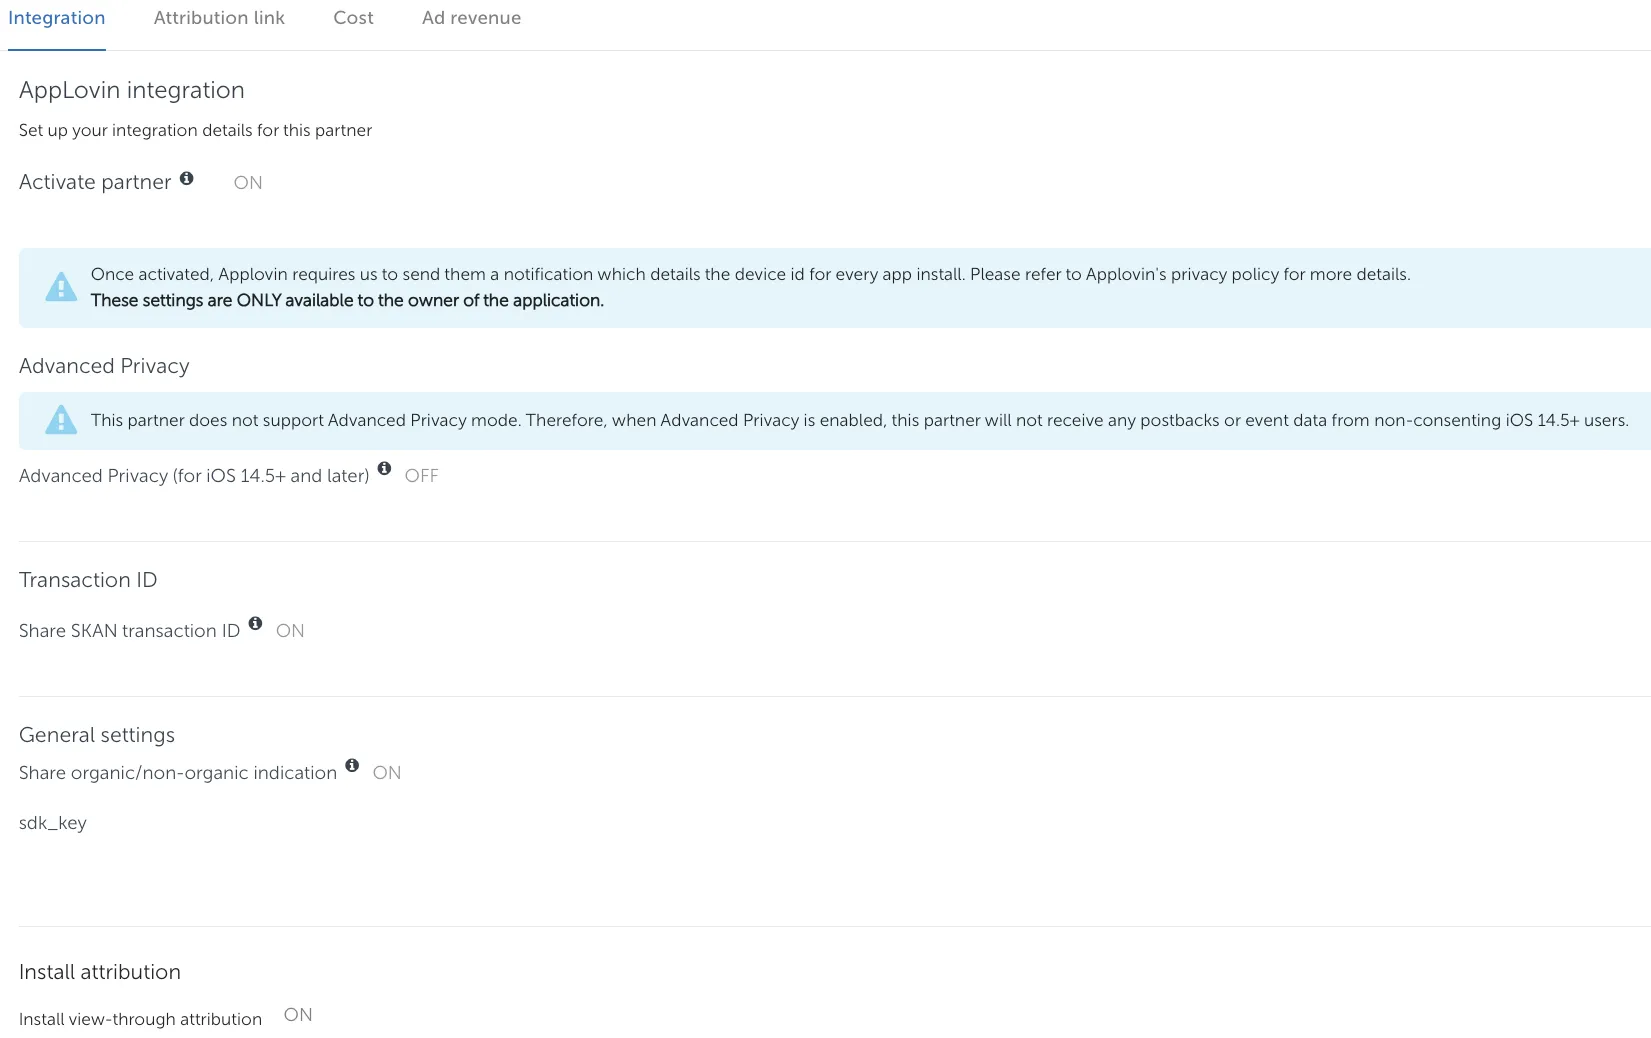
  1. Navigate to AppLovin Configuration and select the Integration tab.

  2. For iOS, toggle Advanced Privacy (for iOS 14.5+ and later) to OFF.

  3. For iOS apps, toggle Share SKAN transaction ID to ON.

  4. Input your SDK Key in the sdk_key field in the General Settings section (obtained from the the AppLovin dashboard under Accounts > Keys).

  5. Toggle Share organic/non-organic indication to ON.

  6. Toggle Install view-through attribution to ON.

    Android:
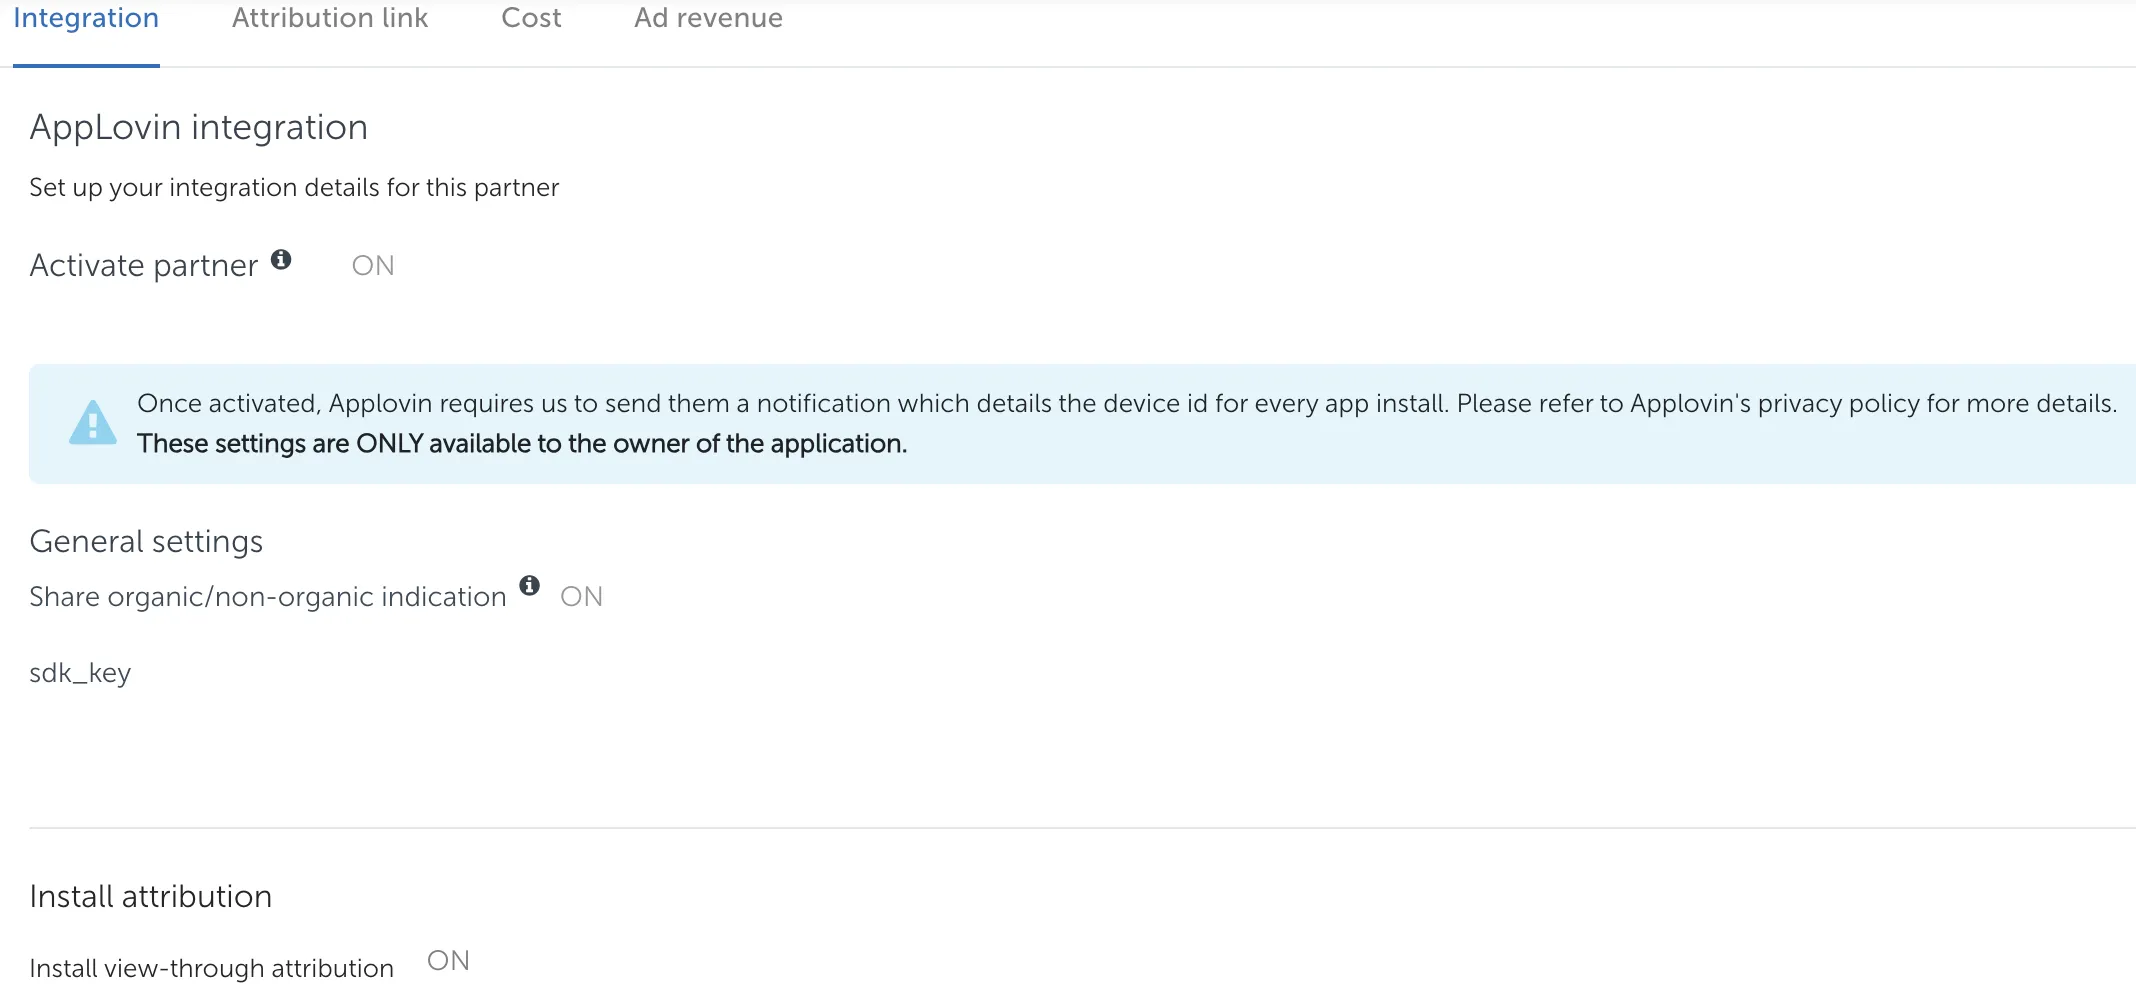
    Integration tab. AppLovin integration: Set up your integration details for this partner. Activate partner (on). Once activated, Applovin requires us to send them a notification which details the device id for every app install. Please refer to Applovin’s privacy policy for more details. These settings are ONLY available to the owner of the application. General settings. Share organic/non-organic indication (on). sdk_key. Install attribution: Install view-through attribution (on).

    iOS:

    Integration tab. AppLovin integration: Set up your integration details for this partner. Activate partner (on). Once activated, Applovin requires us to send them a notification which details the device id for every app install. Please refer to Applovin’s privacy policy for more details. These settings are ONLY available to the owner of the application. Advanced Privacy. This partner does not support Advanced Privacy mode. Therefore, when Advanced Privacy is enabled, this partner will not receive any postbacks or event data from non-consenting iOS 14.5+ users. Advanced Privacy (for iOS 14.5+ and later) off. Transaction ID: Share SKAN transaction ID (on). General settings. Share organic/non-organic indication (on). sdk_key. Install attribution: Install view-through attribution (on).

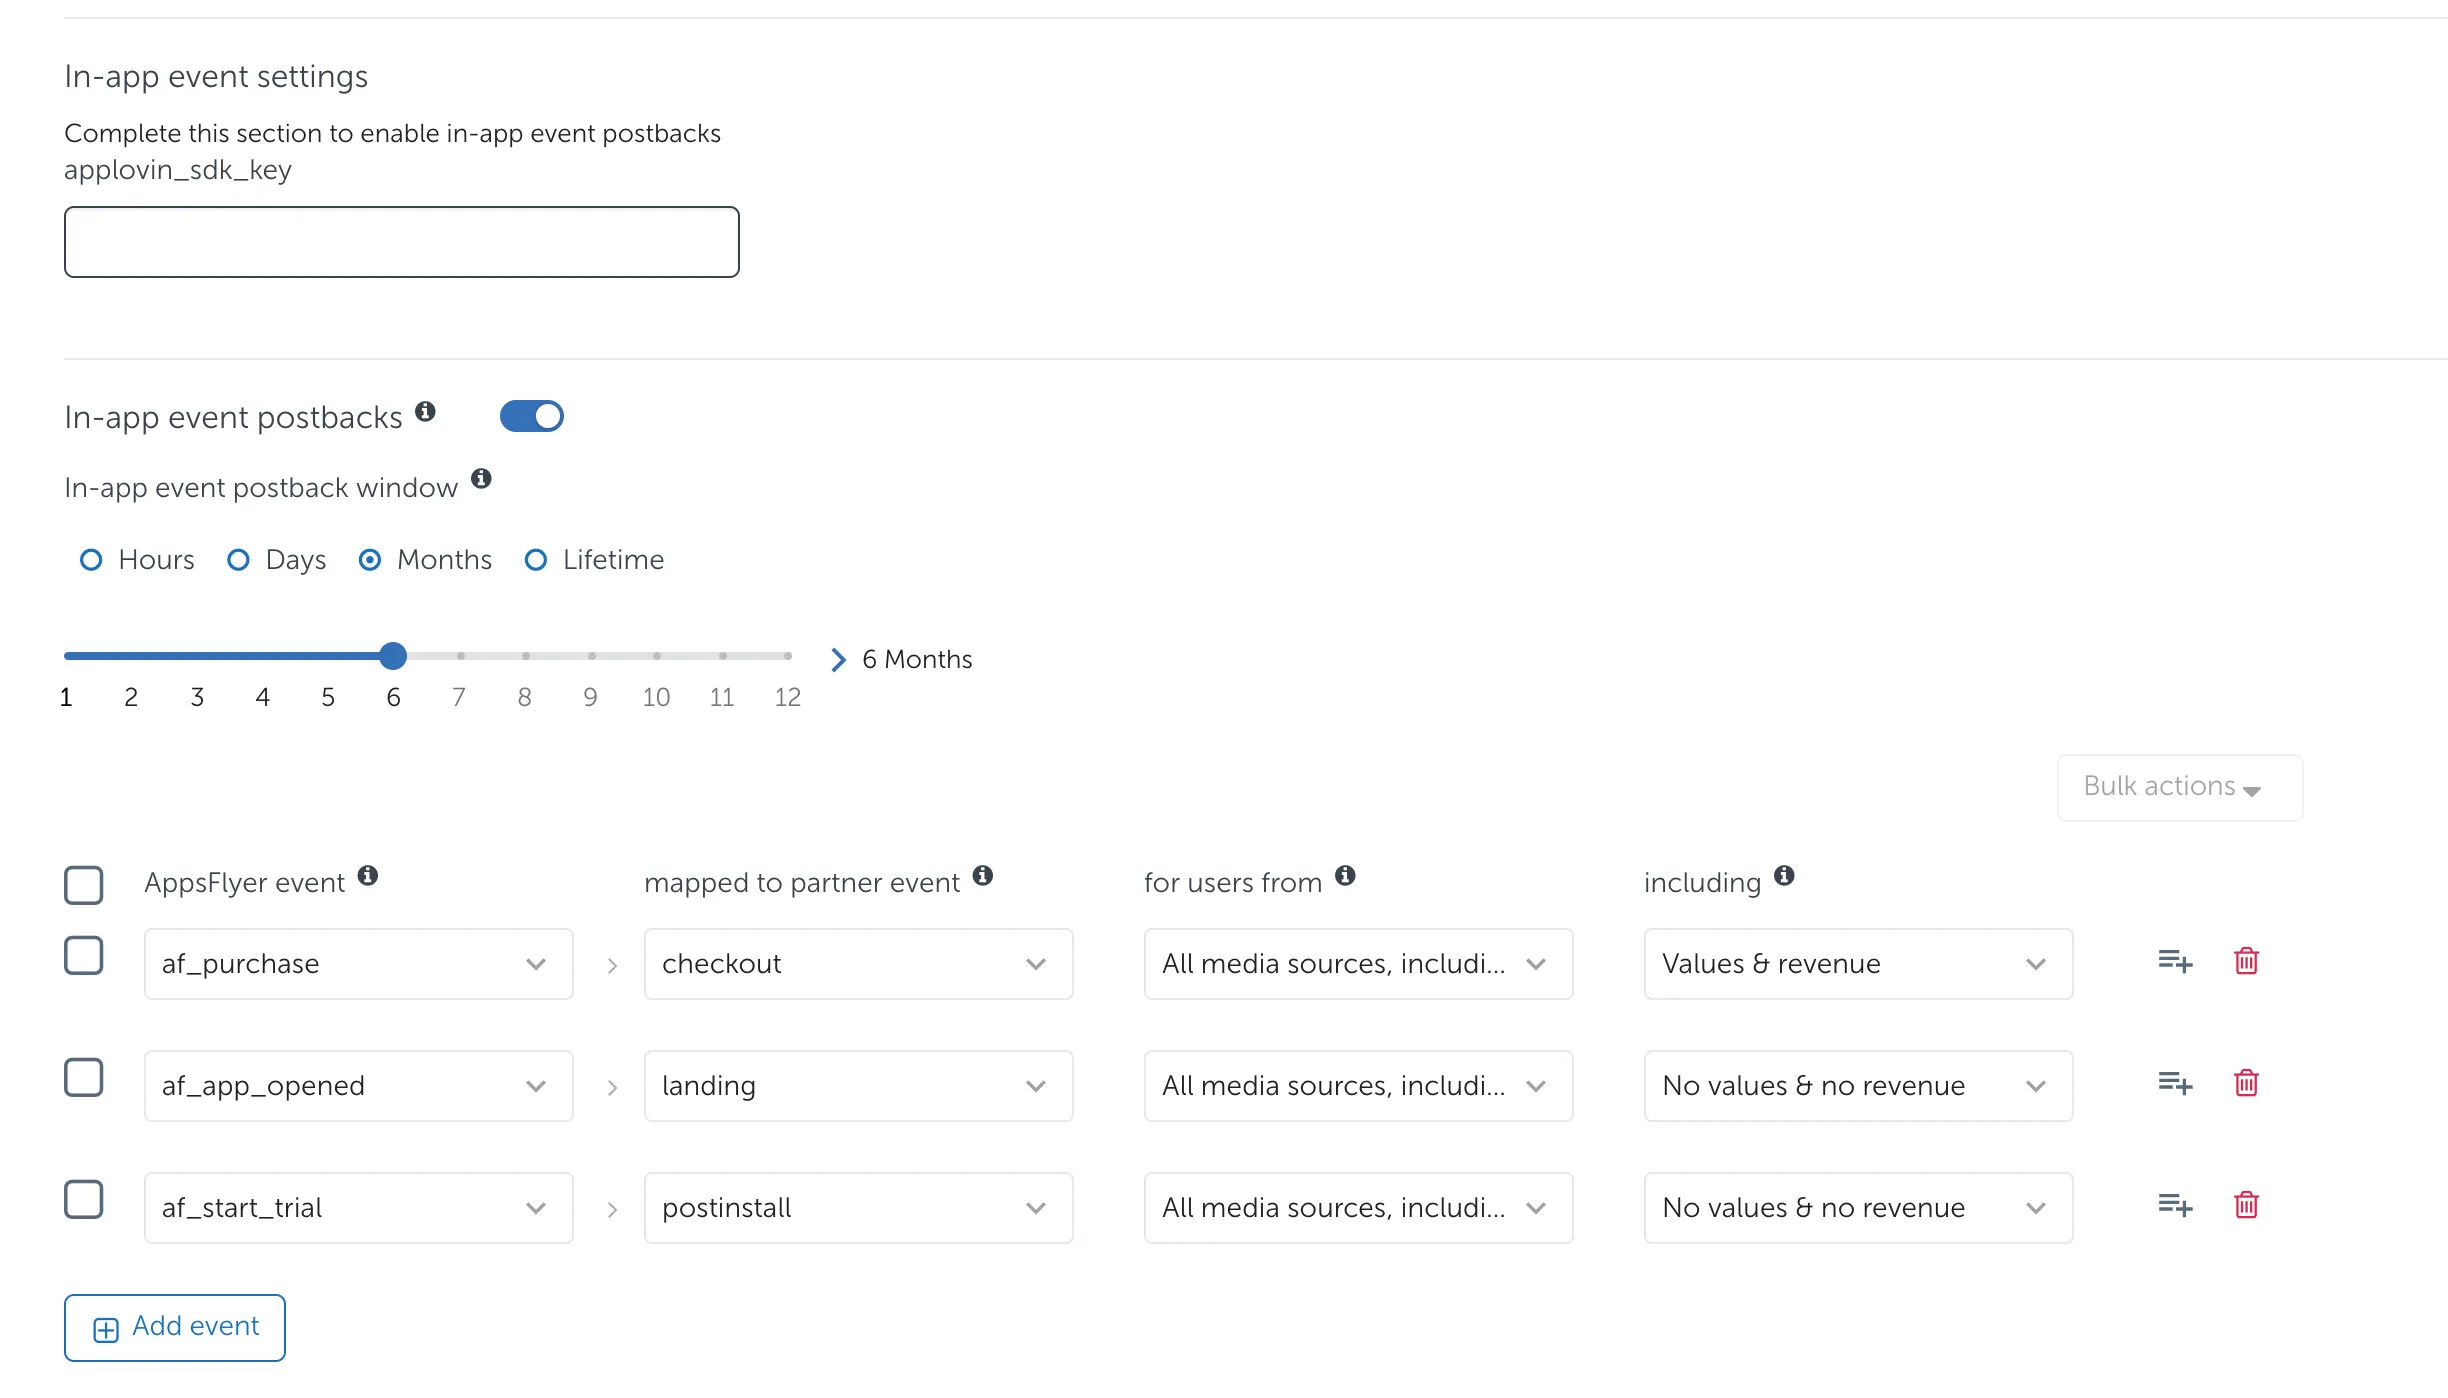
  7. In the In-app event settings section, enter the applovin_sdk_key. This is the same as the sdk_key in step 4 (obtained from the AppLovin dashboard under Accounts > Keys).

  8. Toggle In-app event postbacks to ON.

  9. Set the In-app event postback window to at least six months.

  10. Select AppsFlyer event and mapped to partner event.

    • App opens → landing
    • Revenue events → checkout (select Values and revenue in the including column)
    • All other events → postinstall
  11. Set the for users from field to All media sources, including organic for all events, including Installs and In-app event postbacks.

  12. Click Save Integration.

    In-app event settings: Complete this section to enable in-app event postabcks. applovin_sdk_key field. In-app event postbacks toggle. In-app event postback window: hours/days/months/lifetime radio buttons. Quantity sliter. Table: AppsFlyer event, mapped to partner event, for users from, including. Add event button

2. Configure Attribution Window Settings

  1. Click on the Integration tab.

  2. Toggle Enable View-Through attribution to ON.

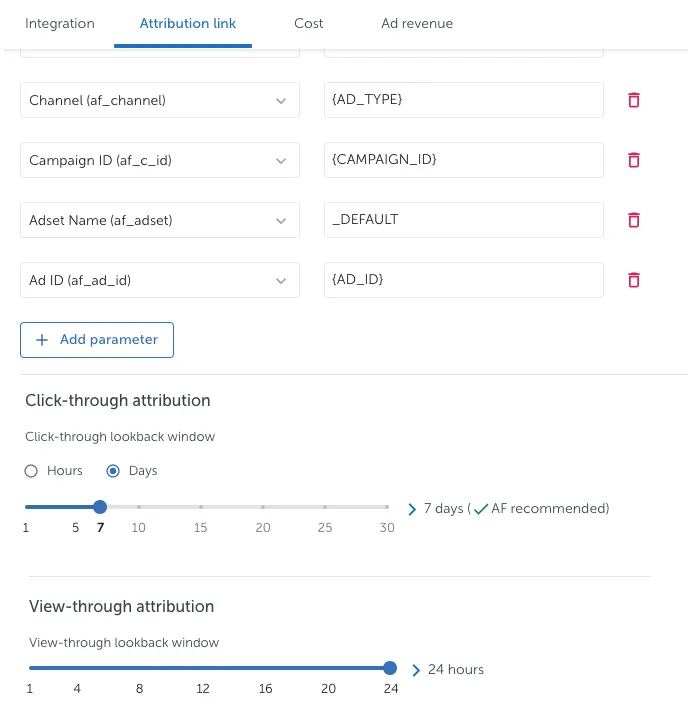
  3. Click on the Attribution link tab.

  4. Set Click-through attribution to seven days.

  5. Set the View-through lookback window window to 24 hours.

  6. Select Save Attribution Link.

    Attribution link tab. Channel, AD_TYPE macro; Campaign ID, CAMPAIGN_ID macro; Adset Name; _DEFAULT; Ad ID, AD_ID macro; Add parameter button. Click-through attribution: Click-through loopback window. Hours/Days toggle. Number slider. View-through attribution: View-through lookback window. Hours slider.

3. URL Formats

A. Click URL Format

The tracking URL should be generated automatically in the Click Tracking section of the Tracking Link tab.

B. Impression URL Format

When View-Through attribution is enabled, the AppsFlyer UI generates Impression Tracking URLs in the Impressions Tracking Link section of the Tracking Link tab.

4. Importing Cost Data into AppsFlyer

AppsFlyer can pull AppLovin cost data directly from AppLovin’s reporting API. To set this up:

  1. Make sure all AppsFlyer tracking URLs contain “&af_c_id={CAMPAIGN_ID}”.
  2. Navigate to the Cost tab.
  3. Toggle Get cost data to ON.
  4. Enter your AppLovin Reporting API Key in the API Credentials section. You can find your AppLovin Reporting API Key in the AppLovin dashboard under Accounts > Keys.
  5. Enter the Android Package Name or iOS Bundle ID. Note that the package name must be in the com.example.PackageExample format for both iOS and Android.
  6. Select Save Cost.

Android

Cost tab. AppLovin cost. Enhance your integration to receive cost data. Exact cost data will be reported if both campaign names (c) and campaign IDs (af_c_id) are sent by AppLovin to AppsFlyer on the click. For exact cost reporting AppsFlyer recommends not to change existing campaign names as well as not to add additional dynamic macros to the campaign name parameter. Get cost data toggle. API Credentials. Connect to this partner with the following information to receive data. API Key field. Android Package Name field. Test Connection button

iOS

Cost tab. AppLovin cost. Enhance your integration to receive cost data. Exact cost data will be reported if both campaign names (c) and campaign IDs (af_c_id) are sent by AppLovin to AppsFlyer on the click. For exact cost reporting AppsFlyer recommends not to change existing campaign names as well as not to add additional dynamic macros to the campaign name parameter. Get cost data toggle. API Credentials. Connect to this partner with the following information to receive data. API Key field. iOS Bundle ID field. Test Connection button.