原生广告
原生广告可让您以与现有设计一致的方式通过应用获利。 AppLovin MAX SDK 让您可以访问广告的各个资产。 这样,您就可以设计与应用的外观和感觉一致的广告布局。 SDK 自动处理图像缓存和指标跟踪。 您可以关注如何、何时以及在何处展示广告。
手动
如果您有自定义视图并且想要手动将原生广告资源加载到这些视图中,请使用此 API。 这种集成方法主要涉及三个步骤:
- 绑定 UI 组件。
- 加载原生广告。
- 销毁原生广告。
要使用手动 API,请在 Create New Ad Unit 界面中选择 Manual:

绑定 UI 组件
您可以将自定义 UI 组件绑定到 MAX SDK,并将原生广告资源渲染到这些组件中。 此示例通过使用 xibs 和唯一标签 ID 创建的自定义视图的方式进行演示。 但是,如果您以编程方式或使用 Storyboard 创建视图,也可以使用此方法。
根据 AppLovin 的政策,您的广告必须包含隐私信息图标。
此图标链接至重要隐私声明。
您可以通过 -[MANativeAdViewBinderBuilder setOptionsContentViewTag:] 进行绑定。
包含要绑定的 UI 组件的自定义视图必须从 MANativeAdView 生成子类。
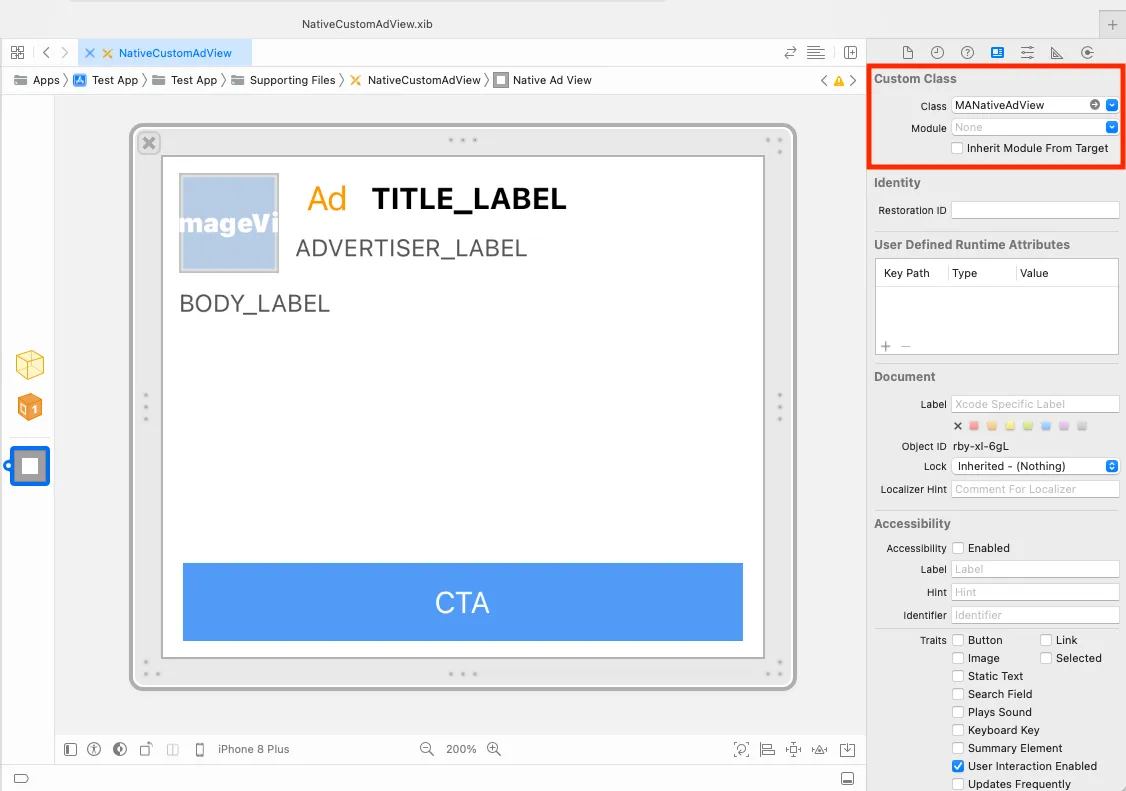
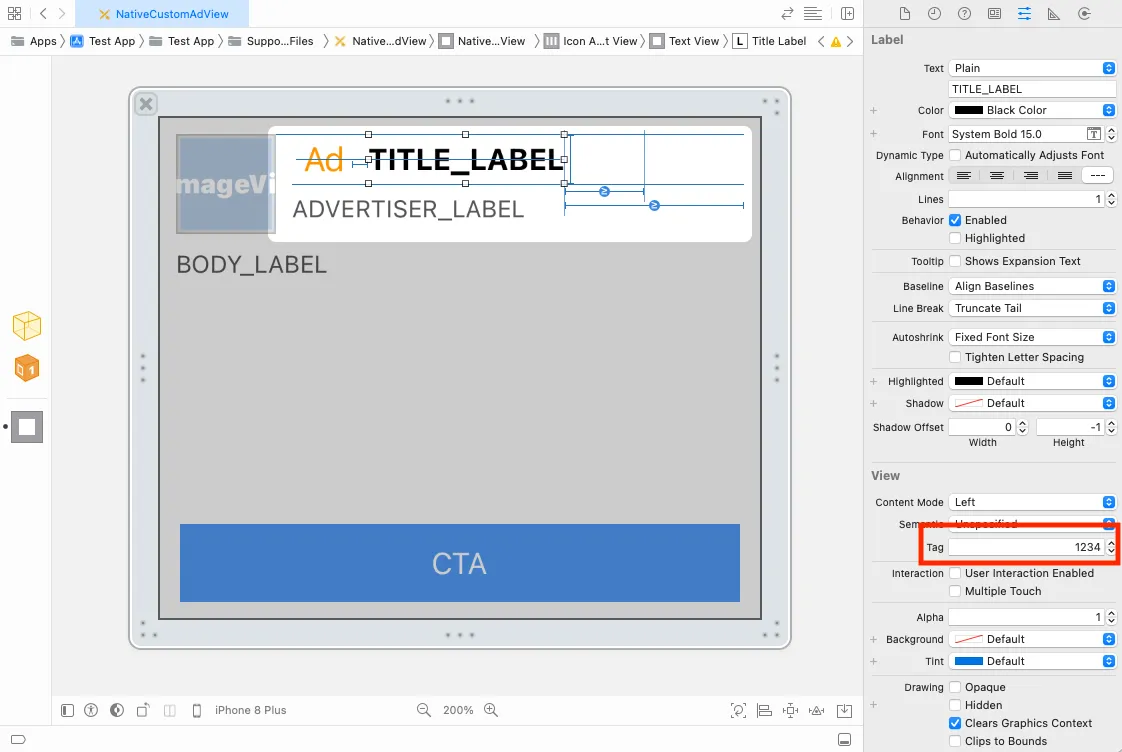
为自定义视图的子视图分配唯一的标签 ID。
这些 ID 用于下一步的集成。
下面的示例图片将标题标签的 ID 设置为 1234。
下一步,使用实例为 MANativeAdViewBinder 的唯一标签 ID 绑定子视图。AppLovin 并不保证某个广告平台会返回特定资源。
#import "ExampleViewController.h"#import <AppLovinSDK/AppLovinSDK.h>
⋮
@implementation ExampleViewController
⋮
- (MANativeAdView *)createNativeAdView{  UINib *nativeAdViewNib = [UINib nibWithNibName: @"NativeCustomAdView" bundle: NSBundle.mainBundle];  MANativeAdView *nativeAdView = [nativeAdViewNib instantiateWithOwner: nil options: nil].firstObject;  MANativeAdViewBinder *binder = [[MANativeAdViewBinder alloc] initWithBuilderBlock:^(MANativeAdViewBinderBuilder *builder) {    builder.titleLabelTag = «title-label-tag»;    builder.bodyLabelTag = «body-lable-tag»;    builder.callToActionButtonTag = «call-to-action-label-tag»;    builder.iconImageViewTag = «icon-image-view-taG»;    builder.mediaContentViewTag = «media-view-content-view-tag»;    builder.starRatingContentViewTag = «star-rating-content-view-tag»;    builder.advertiserLabelTag = «advertiser-label-tag»;    builder.optionsContentViewTag = «options-content-view-tag»;  }];  [nativeAdView bindViewsWithAdViewBinder: binder];  return nativeAdView;}
⋮
@end
import Foundationimport UIKitimport AppLovinSDK
class ExampleViewController : UIViewController{ func createNativeAdView() -> MANativeAdView { let nativeAdViewNib = UINib(nibName: "NativeCustomAdView", bundle: Bundle.main) let nativeAdView = nativeAdViewNib.instantiate(withOwner: nil, options: nil).first! as! MANativeAdView?
let adViewBinder = MANativeAdViewBinder.init(builderBlock: { (builder) in builder.titleLabelTag = «title-label-tag»; builder.bodyLabelTag = «body-lable-tag»; builder.callToActionButtonTag = «call-to-action-label-tag»; builder.iconImageViewTag = «icon-image-view-tag»; builder.mediaContentViewTag = «media-view-content-view-tag»; builder.starRatingContentViewTag = «star-rating-content-view-tag»; builder.advertiserLabelTag = «advertiser-label-tag»; builder.optionsContentViewTag = «options-content-view-tag»; }) nativeAdView?.bindViews(with: adViewBinder) }}Google Bidding 和 Google AdMob/Google Ad Manager 的额外集成步骤
从 Google Bidding 和 Google AdMob 适配器版本 9.11.0.6 以及 Google Ad Manager 适配器版本 9.11.0.5 开始,请按照这些额外步骤绑定 UI 组件。 这可确保自定义原生广告视图中任何不关联的视图对于这些网络来说仍可点击:
-
在包含所有广告资源的
MANativeAdView内添加包装器视图。将其 Custom Class 设置为GADNativeAdView。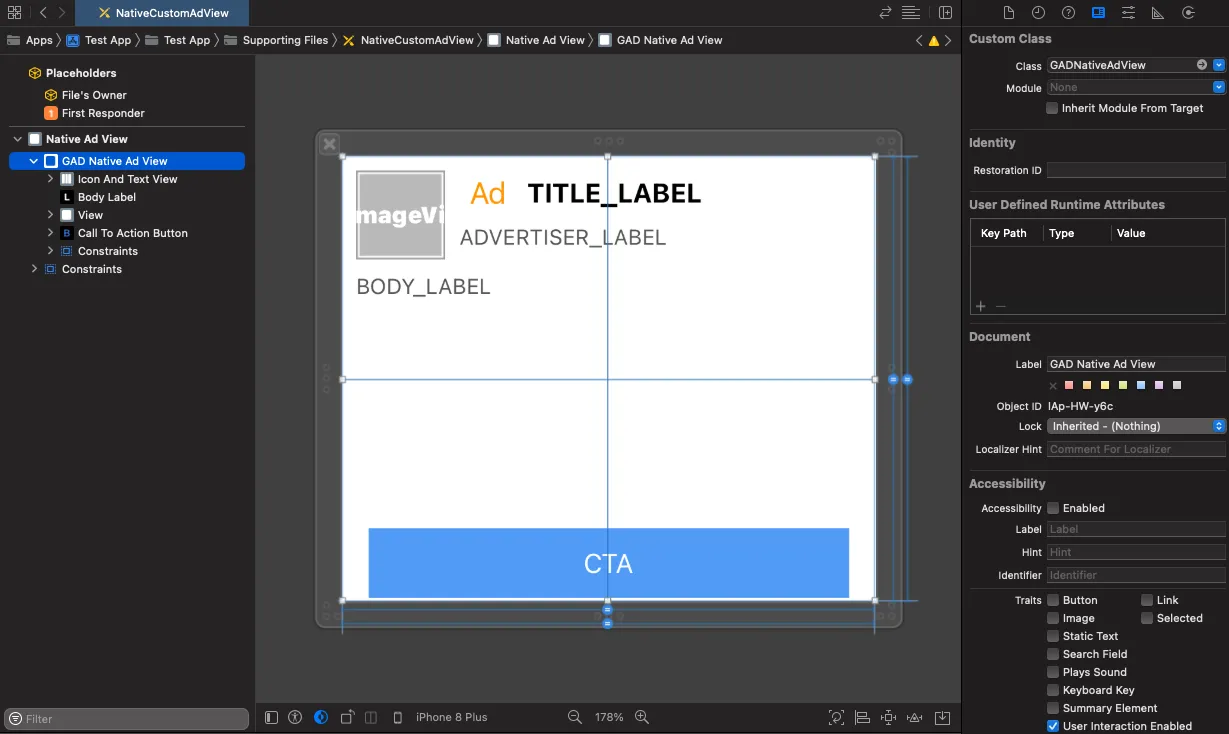
-
赋予此包装器视图一个唯一的、其他视图未使用的Tag。
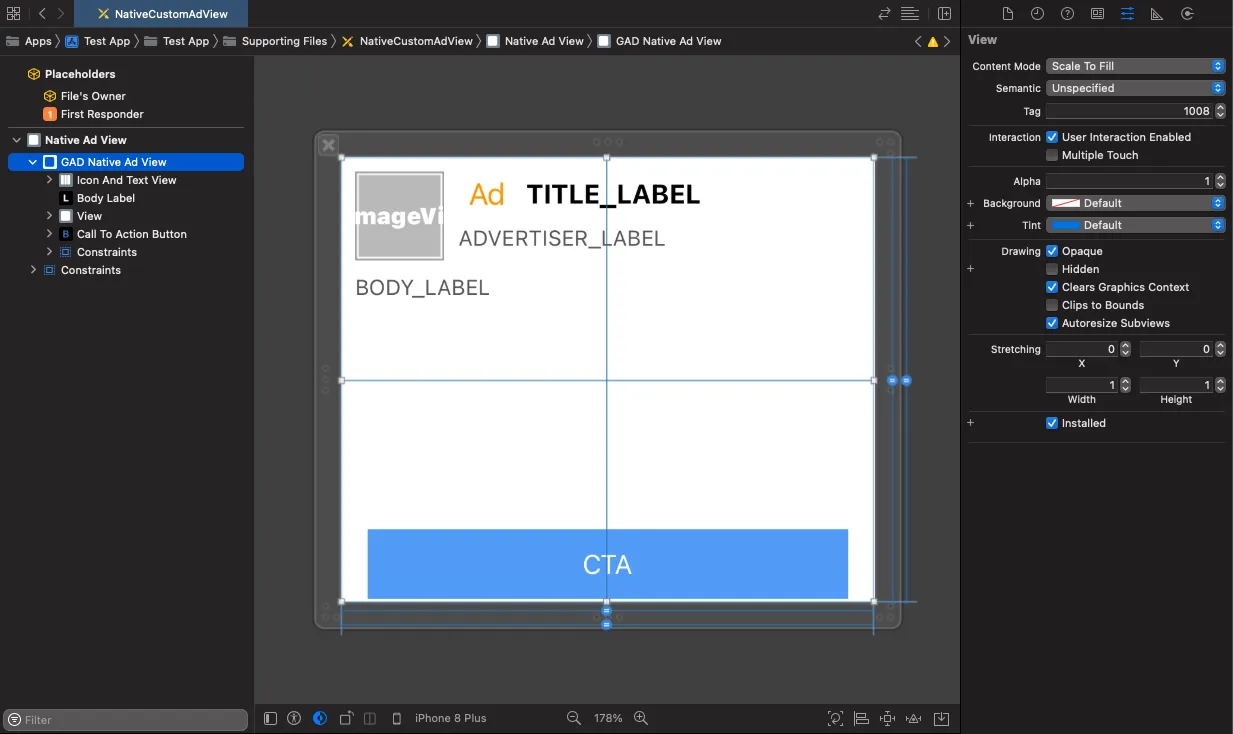
-
为包含此标签值的原生广告加载器设置一个本地额外参数,以及相应的键
google_native_ad_view_tag。 例如,如果视图的标签是 1008:-[setLocalExtraParameterForKey: "google_native_ad_view_tag" value: 1008]setLocalExtraParameterForKey("google_native_ad_view_tag", value: 1008)
加载原生广告
加载预渲染广告
要加载预渲染原生广告,请创建一个对应您广告单元 ID 的 MANativeAdLoader 实例对象,并调用其 loadAdIntoAdView 方法。
实现并设置 MANativeAdDelegate,以便在原生广告的加载状态发生变化时获得通知。
广告加载与渲染分离
要加载原生广告,创建一个与您的广告单元 ID 相对应的 MANativeAdLoader 实例对象,并调用其 loadAd 方法。
实现并设置 MANativeAdDelegate,以便在原生广告的加载状态发生变化时获得通知。然后使用 didLoadNativeAd:forAd: 中返回的 MAAd 来呈现广告视图。您可以通过调用 MANativeAdLoader 的 renderNativeAdView:withAd: 方法来完成此操作。
销毁原生广告
如果您不再使用某个原生广告,就必须清理其资源。
您可以通过调用 destroy() 方法来完成此操作。否则应用的性能就会下降。
以下是在绑定上一步中的 UI 组件后,如何加载和销毁原生广告的示例:
#import "ExampleViewController.h"#import <AppLovinSDK/AppLovinSDK.h>
@interface ExampleViewController()<MANativeAdDelegate, MAAdRevenueDelegate>@property (nonatomic, strong) UIView *nativeAdContainerView;@property (nonatomic, strong) MANativeAdLoader *nativeAdLoader;@property (nonatomic, strong) MAAd *loadedNativeAd;@end
@implementation ExampleViewController
⋮
- (void)createNativeAdLoader{  self.nativeAdLoader = [[MANativeAdLoader alloc] initWithAdUnitIdentifier: @"«ad-unit-ID»"];  self.nativeAdLoader.nativeAdDelegate = self;  self.nativeAdLoader.revenueDelegate = self;}
- (void)loadNativeAd{  [self.nativeAdLoader loadAdIntoAdView: [self createNativeAdView]];}
- (void)didLoadNativeAd:(MANativeAdView *)nativeAdView forAd:(MAAd *)ad{  // Cleanup any pre-existing native ad to prevent memory leaks.  if ( self.loadedNativeAd )  {    [self.nativeAdLoader destroyAd: self.loadedNativeAd];  }
  // Save ad for cleanup.  self.loadedNativeAd = ad;
  // Set to false if modifying constraints after adding the ad view to your layout  self.nativeAdContainerView.translatesAutoresizingMaskIntoConstraints = NO;
  // Add the native ad view to your layout  [self.nativeAdContainerView addSubview: nativeAdView];
  // Set ad view to span width and height of container and center the ad  [self.nativeAdContainerView addConstraint: [NSLayoutConstraint constraintWithItem: nativeAdView attribute: NSLayoutAttributeWidth r elatedBy: NSLayoutRelationEqual toItem: self.nativeAdContainerView attribute: NSLayoutAttributeWidth multiplier: 1 constant: 0]];  [self.nativeAdContainerView addConstraint: [NSLayoutConstraint constraintWithItem: nativeAdView attribute: NSLayoutAttributeHeight relatedBy: NSLayoutRelationEqual toItem: self.nativeAdContainerView attribute: NSLayoutAttributeHeight multiplier: 1 constant: 0]];  [self.nativeAdContainerView addConstraint: [NSLayoutConstraint constraintWithItem: nativeAdView attribute: NSLayoutAttributeCenterX relatedBy: NSLayoutRelationEqual toItem: self.nativeAdContainerView attribute: NSLayoutAttributeCenterX multiplier: 1 constant: 0]];  [self.nativeAdContainerView addConstraint: [NSLayoutConstraint constraintWithItem: nativeAdView attribute: NSLayoutAttributeCenterY relatedBy: NSLayoutRelationEqual toItem: self.nativeAdContainerView attribute: NSLayoutAttributeCenterY multiplier: 1 constant: 0]];}
- (void)didFailToLoadNativeAdForAdUnitIdentifier:(NSString *)adUnitIdentifier withError:(MAError *)error{  // Native ad load failed  // AppLovin recommends that you retry with exponentially higher delays up to a maximum delay}
- (void)didClickNativeAd:(MAAd *)ad { }
- (void)didPayRevenueForAd:(MAAd *)ad { }
@end
import Foundationimport UIKitimport AppLovinSDK
class ExampleViewController : UIViewController{ private var nativeAdContainerView: UIView! private var nativeAdLoader: MANativeAdLoader? private var loadedNativeAd: MAAd?
⋮
func createNativeAdLoader() { nativeAdLoader = MANativeAdLoader(adUnitIdentifier: "«ad-unit-ID»") nativeAdLoader?.nativeAdDelegate = self; nativeAdLoader?.revenueDelegate = self; }
func loadNativeAd() { nativeAdLoader?.loadAd(into: createNativeAdView()); }}
extension ExampleViewController: MANativeAdDelegate{ func didLoadNativeAdView(_ nativeAdView: MANativeAdView?, for ad: MAAd) { if let nativeAd = loadedNativeAd { nativeAdLoader?.destroy(nativeAd) }
loadedNativeAd = ad;
// Set to false if modifying constraints after adding the ad view to your layout nativeAdContainerView.translatesAutoresizingMaskIntoConstraints = false
// Add the native ad view to your layout guard let nativeAdView = nativeAdView else { return } nativeContainerView.addSubview(nativeAdView)
// Set ad view to span width and height of container and center the ad nativeAdContainerView.addConstraint(NSLayoutConstraint(item: nativeAdView, attribute: .width, relatedBy: .equal, toItem: nativeAdContainerView, attribute: .width, multiplier: 1, constant: 0)) nativeAdContainerView.addConstraint(NSLayoutConstraint(item: nativeAdView, attribute: .height, relatedBy: .equal, toItem: nativeAdContainerView, attribute: .height, multiplier: 1, constant: 0)) nativeAdContainerView.addConstraint(NSLayoutConstraint(item: nativeAdView, attribute: .centerX, relatedBy: .equal, toItem: nativeAdContainerView, attribute: .centerX, multiplier: 1, constant: 0)) nativeAdContainerView.addConstraint(NSLayoutConstraint(item: nativeAdView, attribute: .centerY, relatedBy: .equal, toItem: nativeAdContainerView, attribute: .centerY, multiplier: 1, constant: 0)) }
func didFailToLoadNativeAd(forAdUnitIdentifier adUnitIdentifier: String, withError error: MAError) { // Native ad load failed // AppLovin recommends that you retry with exponentially higher delays up to a maximum delay }
func didClickNativeAd(_ ad: MAAd) { }}
extension ExampleViewController: MAAdRevenueDelegate{ func didPayRevenue(for ad: MAAd) { }}资源规模
对于 AppLovin Exchange 广告需求,标题、描述和 CTA 所允许的最大字符数如下:
| 资源 | 最大字符数 |
|---|---|
| 标题 | 50 个字符 |
| 描述 | 150 个字符。可以在第 149 个字符后添加省略号 (...)作为第 150 个字符。 |
| CTA | 15 个字符 |
对于 SDK 聚合的广告平台,最大字符数由广告平台设置。
如何获取媒体内容长宽比
以下代码片段展示了如何获取原生广告的媒体内容宽高比:
- (void)didLoadNativeAd:(MANativeAdView *)nativeAdView forAd:(MAAd *)ad{ CGFloat aspectRatio = ad.nativeAd.mediaContentAspectRatio;}func didLoadNativeAd(_ nativeAdView: MANativeAdView?, for ad: MAAd){ if let nativeAd = ad.nativeAd { var aspectRatio = nativeAd.mediaContentAspectRatio }}星级评分
使用 AppLovin MAX SDK,您可以访问并显示所推广应用的星级。在可用情况下,该值是 [0.0, 5.0] 范围内的浮点数。
MAX SDK 会自动在您指定为星级评定容器的容器视图中渲染星星。 如果网络没有提供星级评定,或者星级评定 < 3,则 SDK 不会填充星级评定容器视图。 您有责任相应地调整您的布局。
要检索当前广告的星级:
- (void)didLoadNativeAd:(MANativeAdView *)nativeAdView forAd:(MAAd *)ad{  if ( ad.nativeAd.starRating < 3 )  {    // Star rating not available, or < 3 - hide star rating container view    return;  }
  // Star rating available and >= 3 - show star rating container view}
func didLoadNativeAd(_ nativeAdView: MANativeAdView?, for ad: MAAd){ if let nativeAd = ad.nativeAd { guard let starRating = nativeAd.starRating, starRating >= 3 else { // Star rating not available, or < 3 - hide star rating container view return }
// Star rating available and >= 3 - show star rating container view }}Ad Placer
Ad Placer 会使用 UITableView 或 UICollectionView 自动将原生广告插入您的现有信息流中。
要集成此 API,请进行以下主要步骤:
- 设置原生广告布局。
- 创建 Ad Placer 设置。
- 配置 Ad Placer。
- 配置广告呈现设置。
- (可选)接收回传。
根据 AppLovin 的政策,您的广告必须包含隐私信息图标。
此图标链接至重要隐私声明。
您可以通过 -[MANativeAdViewBinderBuilder setOptionsContentViewTag:] 进行绑定。
包含要绑定的 UI 组件的自定义视图必须从 MANativeAdView 生成子类。
1. 设置原生广告布局
Ad placer 支持手动原生广告布局。请参阅上方的 “Manual” 部分,了解如何配置广告单元。请参阅下方的 配置广告呈现设置,了解如何根据您的布局设置 ad placer。
2. 创建 Ad Placer 设置
使用您的广告单元标识符,创建一个 MAAdPlacerSettings 对象。该对象用于配置您的 Ad Placer,并提供广告在信息流中的定位信息。
MAAdPlacerSettings *settings = [MAAdPlacerSettings settingsWithAdUnitIdentifier: @"«ad-unit-ID»"];let settings = MAAdPlacerSettings(adUnitIdentifier: "«ad-unit-ID»")配置广告位置
Ad Placer 将广告放置在您的信息流中。 它至少基于下列之一来实现这一点:
- 指示广告投放位置的固定索引路径列表
- 定期插入广告的重复间隔
- Ad Placer 会在最后一个固定位置后插入重复广告。 如果您未设置任何固定位置,则 Ad Placer 会在流中的第一个位置后重复添加广告。 该间隔值必须大于或等于2。 小于 2 的间隔值会禁用 Ad Placer。
通过修改 MAAdPlacerSettings 来配置广告位置
- 要添加新的固定广告位置,例如在第 1 行:
[settings addFixedPositions: [NSIndexPath indexPathForRow: 1 inSection: 0]];settings.addFixedPosition(IndexPath(row: 1, section: 0))
- 删除现有的固定位置:
[settings resetFixedPositions];settings.resetFixedPositions()
- 要更改重复间隔;例如,在信息流中每五个位置插入一个广告:
settings.repeatingInterval = 5;settings.repeatingInterval = 5
其他设置
您可以通过调整 MAAdPlacerSettings 中的附加设置来配置您的 Ad Placer:
maximumAdCount- 将其设置为流中的最大广告数量(默认值 = 256)。 如果流包含多个部分,则这将决定每个广告部分的最大广告数量。
maximumPreloadedAdCount- 将其设置为在流中预加载的最大广告数(默认值为 4)。
3. 设置 Ad Placer
配置 Ad Placer 时,请选择以下两个选项之一:
-
如果您的内容流基于
UITableView,MATableViewAdPlacer。 如果基于UICollectionView,请使用MACollectionViewAdPlacer。 辅助类封装了原始适配器,能够自动渲染并将广告插入到内容流中。 -
如果您的内容流使用其他自定义 UI 组件,您可能更愿意使用子类或直接在实现时使用
MAAdPlacer。
使用 MATableViewAdPlacer
要使用 MATableViewAdPlacer 设置 Ad Placer,请按照下列说明操作:
- 使用表格视图和设置对
MATableViewAdPlacer进行初始化:self.adPlacer = [MATableViewAdPlacer placerWithTableView: self.tableView settings: settings];adPlacer = MATableViewAdPlacer(tableView: tableView, settings: settings) - 将以下
UITableView属性和方法替换为 AppLovin 类别的同等属性和方法 (前缀为al_):dataSourcedelegatedeleteRowsAtIndexPaths:withRowAnimation:deleteSections:withRowAnimation:dequeueReusableCellWithIdentifier:forIndexPath:deselectRowAtIndexPath:animated:endUpdatesindexPathForCell:indexPathForRowAtPoint:indexPathForSelectedRowindexPathsForRowsInRect:indexPathsForSelectedRowsindexPathsForVisibleRowsinsertRowsAtIndexPaths:withRowAnimation:insertSections:withRowAnimation:moveRowsAtIndexPaths:withRowAnimation:moveSections:withRowAnimation:performBatchUpdates:completion:rectForRowAtIndexPath:reloadDatareloadRowsAtIndexPaths:withRowAnimation:reloadSections:withRowAnimation:scrollToRowAtIndexPath:atScrollPosition:animated:selectRowAtIndexPath:animated:scrollPosition:visibleCells
- 调用
loadAds开始加载广告。
以下代码展示了如何使用 MATableViewAdPlacer 将广告加载到表格视图中:
- (void)viewDidLoad{  [super viewDidLoad];
  // Configure table view  self.tableView.al_delegate = self;  self.tableView.al_dataSource = self;
  // Configure ad placer and load ads  MAAdPlacerSettings *settings = [MAAdPlacerSettings settingsWithAdUnitIdentifier: @"«ad-unit-ID»"];  self.adPlacer = [MATableViewAdPlacer placerWithTableView: self.tableView settings: settings];  self.adPlacer.delegate = self;  [self.adPlacer loadAds];}
- (NSInteger)tableView:(UITableView *)tableView numberOfRowsInSection:(NSInteger)section{  return self.data.count;}
- (UITableViewCell *)tableView:(UITableView *)tableView cellForRowAtIndexPath:(NSIndexPath *)indexPath{  UITableViewCell *cell = [tableView al_dequeueReusableCellWithIdentifier: @"YourCell" forIndexPath: indexPath];  cell.textLabel.text = self.data[indexPath.row];  return cell;}
override func viewDidLoad(){ super.viewDidLoad()
// Configure table view tableView.al_delegate = self tableView.al_dataSource = self
// Configure ad placer and load ads let settings = MAAdPlacerSettings(adUnitIdentifier: "«ad-unit-ID»") adPlacer = MATableViewAdPlacer(tableView: tableView, settings: settings) adPlacer.delegate = self adPlacer.loadAds()}
override func tableView(_ tableView: UITableView, numberOfRowsInSection section: Int) -> Int{ return data.count}
override func tableView(_ tableView: UITableView, cellForRowAt indexPath: IndexPath) -> UITableViewCell{ let cell = tableView.al_dequeueReusableCell(withIdentifier: "YourCell", for: indexPath) cell.textLabel!.text = data[indexPath.row] return cell}使用 MACollectionViewAdPlacer
要使用 MACollectionViewAdPlacer 设置 Ad Placer,请按照下列说明操作:
- 使用表格视图和设置对
MACollectionViewAdPlacer进行初始化:self.adPlacer = [MACollectionViewAdPlacer placerWithCollectionView: self.collectionView settings: settings];adPlacer = MACollectionViewAdPlacer(collectionView: collectionView, settings: settings) - 将以下
UITableView属性和方法替换为 AppLovin 类别的同等属性和方法 (前缀为al_):cellForItemAtIndexPath:dataSourcedelegatedeleteItemsAtIndexPaths:deleteSections:dequeueReusableCellWithIdentifier:forIndexPath:deselectItemAtIndexPath:animated:indexPathForCell:indexPathForItemAtPoint:indexPathsForSelectedItemsindexPathsForVisibleItemsinsertItemsAtIndexPaths:insertSections:layoutAttributesForItemAtIndexPath:moveItemsAtIndexPaths:moveSections:performBatchUpdates:completion:reloadDatareloadItemsAtIndexPaths:reloadSections:scrollToItemAtIndexPath:atScrollPosition:animated:selectedItemAtIndexPath:animated:scrollPosition:visibleCells
- 如果您在使用 storyboard 来布局集合视图,请将集合视图的 “Estimate Size” 属性设置为 “None”。
- 调用
loadAds开始加载广告。
以下代码展示了如何使用 MACollectionViewAdPlacer 将广告加载到表格视图中:
- (void)viewDidLoad{  [super viewDidLoad];
  // Configure collection view  self.collectionView.al_delegate = self;  self.collectionView.al_dataSource = self;
  // Configure ad placer and load ads  MAAdPlacerSettings *settings = [MAAdPlacerSettings settingsWithAdUnitIdentifier: @"«ad-unit-ID»"];  self.adPlacer = [MACollectionViewAdPlacer placerWithCollectionView: self.collectionView settings: settings];  self.adPlacer.delegate = self;  [self.adPlacer loadAds];}
- (NSInteger)collectionView:(UICollectionView *)collectionView numberOfItemsInSection:(NSInteger)section{  return self.data.count;}
- (UICollectionViewCell *)collectionView:(UICollectionView *)collectionView cellForItemAtIndexPath:(NSIndexPath *)indexPath{  MyCollectionViewCell *cell = (MyCollectionViewCell *)[collectionView al_dequeueReusableCellWithIdentifier: @"YourCell" forIndexPath: indexPath];  cell.textLabel.text = self.data[indexPath.row];  return cell;}
override func viewDidLoad(){ super.viewDidLoad()
// Configure collection view collectionView.al_delegate = self collectionView.al_dataSource = self
// Configure ad placer and load ads let settings = MAAdPlacerSettings(adUnitIdentifier: "«ad-unit-ID»") adPlacer = MACollectionViewAdPlacer(collectionView: collectionView, settings: settings) adPlacer.delegate = self adPlacer.loadAds()}
override func collectionView(_ collectionView: UICollectionView, numberOfItemsInSection section: Int) -> Int{ return data.count}
override func collectionView(_ collectionView: UICollectionView, cellForItemAt indexPath: IndexPath) -> UICollectionViewCell{ let cell = collectionView.al_dequeueReusableCell(withReuseIdentifier: reuseIdentifier, for: indexPath) as! MyCollectionViewCell cell.textLabel.text = data[indexPath.row] return cell}4. 配置广告渲染设置
在加载广告前,设置 ad placer 的 nativeAdViewNib 和 nativeAdViewBinder 属性。AppLovin 建议您同时设置 adSize 属性,以优化渲染。
5. 接收委托回传 (可选)
所有 Ad Placer 都包含可选的回传,你可以使用它来接收事件通知:
didLoadAdAtIndexPath:didRemoveAdsAtIndexPaths:didClickAd:didPayRevenueForAd: