Native Ads
Esta página aún no está disponible en tu idioma.
Native ads let you monetize your app in a way that’s consistent with its existing design. The AppLovin MAX SDK gives you access to an ad’s individual assets. This way, you can design the ad layout to be consistent with the look and feel of your app. The SDK automatically handles image caching and metrics tracking. You can focus on how, when, and where to display ads.
Templates
The easiest way for you to integrate native ads into your app is to use the templates API.
The AppLovin MAX SDK allows you to load a UIView with the assets of the native ads pre-populated for you.
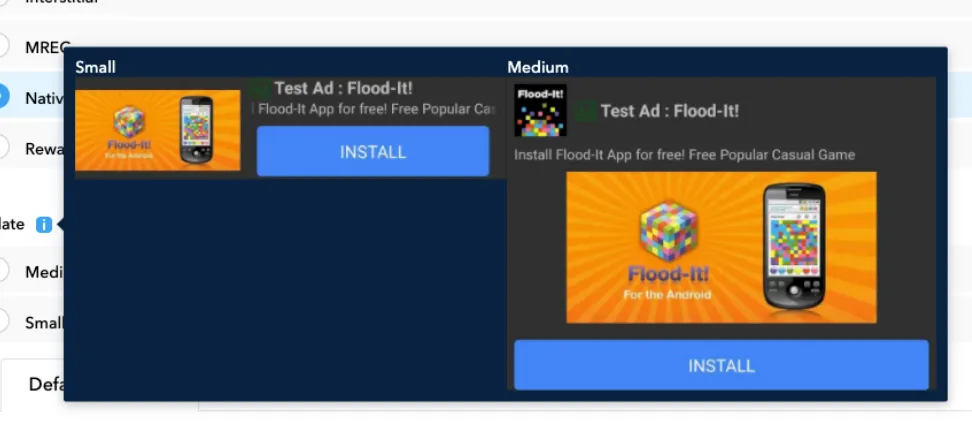
To use the templates API, select either a “Small” (360×120 pts) or “Medium” (300×250 pts) size template in the Create New Ad Unit screen.
The media view for “Small” templates fills one third of the template’s width, and spans the template’s height.
The media view for “Medium” templates spans the media content’s width and height and preserves the content’s aspect ratio.
Make sure to set a height for the native ad’s container view so that the media content can render properly.
Select the size that best suits your needs.
The SDK automatically handles the view layouts for you.
Loading a Native Ad
To load a native ad, instantiate a MANativeAdLoader that corresponds to your ad unit, and call its loadAd() method.
Implement MANativeAdDelegate so that you are notified when your native ad is ready.
@interface ExampleViewController()<MANativeAdDelegate>
@property (nonatomic, weak) IBOutlet UIView *nativeAdContainerView;
@property (nonatomic, strong) MANativeAdLoader *nativeAdLoader;@property (nonatomic, strong) MAAd *nativeAd;@property (nonatomic, strong) UIView *nativeAdView;
@end
@implementation ExampleViewController
- (void)createNativeAd{  self.nativeAdLoader = [[MANativeAdLoader alloc] initWithAdUnitIdentifier: @"«ad-unit-ID»"];  self.nativeAdLoader.nativeAdDelegate = self;  [self.nativeAdLoader loadAd];}
- (void)didLoadNativeAd:(MANativeAdView *)nativeAdView forAd:(MAAd *)ad{  // Clean up any pre-existing native ad to prevent memory leaks  if ( self.nativeAd )  {    [self.nativeAdLoader destroyAd: self.nativeAd];  }
  // Save ad for cleanup  self.nativeAd = ad;
  if ( self.nativeAdView )  {    [self.nativeAdView removeFromSuperview];  }
  // Add ad view to view  self.nativeAdView = nativeAdView;  [self.nativeAdContainerView addSubview: nativeAdView];
  // Set to false if modifying constraints after adding the ad view to your layout  self.nativeAdContainerView.translatesAutoresizingMaskIntoConstraints = NO;
  // Set ad view to span width and height of container and center the ad  [self.nativeAdContainerView addConstraint: [NSLayoutConstraint constraintWithItem: nativeAdView                                                                          attribute: NSLayoutAttributeWidth                                                                          relatedBy: NSLayoutRelationEqual                                                                             toItem: self.nativeAdContainerView                                                                          attribute: NSLayoutAttributeWidth                                                                         multiplier: 1                                                                           constant: 0]];  [self.nativeAdContainerView addConstraint: [NSLayoutConstraint constraintWithItem: nativeAdView                                                                          attribute: NSLayoutAttributeHeight                                                                          relatedBy: NSLayoutRelationEqual                                                                             toItem: self.nativeAdContainerView                                                                          attribute: NSLayoutAttributeHeight                                                                         multiplier: 1                                                                           constant: 0]];  [self.nativeAdContainerView addConstraint: [NSLayoutConstraint constraintWithItem: nativeAdView                                                                          attribute: NSLayoutAttributeCenterX                                                                          relatedBy: NSLayoutRelationEqual                                                                             toItem: self.nativeAdContainerView                                                                          attribute: NSLayoutAttributeCenterX                                                                         multiplier: 1                                                                           constant: 0]];  [self.nativeAdContainerView addConstraint: [NSLayoutConstraint constraintWithItem: nativeAdView                                                                          attribute: NSLayoutAttributeCenterY                                                                          relatedBy: NSLayoutRelationEqual                                                                             toItem: self.nativeAdContainerView                                                                          attribute: NSLayoutAttributeCenterY                                                                         multiplier: 1                                                                           constant: 0]];}
- (void)didFailToLoadNativeAdForAdUnitIdentifier:(NSString *)adUnitIdentifier withError:(MAError *)error{  // AppLovin recommends that you retry with exponentially higher delays up to a maximum delay}
- (void)didClickNativeAd:(MAAd *)ad{  // Optional click callback}
@end
class ExampleViewController2: UIViewController{ @IBOutlet weak var nativeAdContainerView: UIView!
var nativeAdLoader: MANativeAdLoader var nativeAd: MAAd? var nativeAdView: UIView?
func createNativeAd() { nativeAdLoader = MANativeAdLoader(adUnitIdentifier: "«ad-unit-ID»") nativeAdLoader.nativeAdDelegate = self nativeAdLoader.loadAd() }}
extension ExampleViewController2: MANativeAdDelegate{ func didLoadNativeAdView(_ nativeAdView: MANativeAdView?, for ad: MAAd) { // Clean up any pre-existing native ad to prevent memory leaks If let currentNativeAd = nativeAd { nativeAdLoader.destroyAd(currentNativeAd) }
// Save ad for cleanup nativeAd = ad
if let currentNativeAdView = self.nativeAdView { currentNativeAdView.removeFromSuperview() }
// Add ad view to view self.nativeAdView = nativeAdView; guard let nativeAdView = nativeAdView else { return } self.nativeAdContainerView.addSubView(nativeAdView)
// Set to false if modifying constraints after adding the ad view to your layout nativeAdView.translatesAutoresizingMaskIntoConstraints = false
// Add the native ad view to your layout nativeAdContainerView.addSubview(nativeAdView)
// Set ad view to span width and height of container and center the ad nativeAdContainerView.addConstraint(NSLayoutConstraint(item: nativeAdView, attribute: .width, relatedBy: .equal, toItem: nativeAdContainerView, attribute: .width, multiplier: 1, constant: 0)) nativeAdContainerView.addConstraint(NSLayoutConstraint(item: nativeAdView, attribute: .height, relatedBy: .equal, toItem: nativeAdContainerView, attribute: .height, multiplier: 1, constant: 0)) nativeAdContainerView.addConstraint(NSLayoutConstraint(item: nativeAdView, attribute: .centerX, relatedBy: .equal, toItem: nativeAdContainerView, attribute: .centerX, multiplier: 1, constant: 0)) nativeAdContainerView.addConstraint(NSLayoutConstraint(item: nativeAdView, attribute: .centerY, relatedBy: .equal, toItem: nativeAdContainerView, attribute: .centerY, multiplier: 1, constant: 0)) }
func didFailToLoadNativeAd(forAdUnitIdentifier adUnitIdentifier: String, withError error: MAError) { // AppLovin recommends that you retry with exponentially higher delays up to a maximum delay }
func didClickNativeAd(_ ad: MAAd) { // Optional click callback }}Asset Sizes
For AppLovin Exchange demand, the maximum numbers of characters allowed for Title, Description, and CTA are as follows:
| Asset | Maximum Character Count |
|---|---|
| Title | 50 characters |
| Description | 150 characters. You can add an ellipsis (…) after 149 characters, as the 150th character. |
| CTA | 15 characters |
For SDK-mediated networks, the network sets the maximum character counts.
How to Get the Media Content Aspect Ratio
The following code snippet shows you how to get the media content aspect ratio of your native ad:
- (void)didLoadNativeAd:(MANativeAdView *)nativeAdView forAd:(MAAd *)ad{ CGFloat aspectRatio = ad.nativeAd.mediaContentAspectRatio;}func didLoadNativeAd(_ nativeAdView: MANativeAdView?, for ad: MAAd){ if let nativeAd = ad.nativeAd { var aspectRatio = nativeAd.mediaContentAspectRatio }}Supported Adapter Versions
| Ad Network | Adapter Version |
|---|---|
| BidMachine | 1.9.4.1.1 |
| Google Ad Manager | 8.13.0.2 |
| Google Bidding and Google AdMob | 8.13.0.2 |
| InMobi | 10.0.2.2 |
| LINE | 2.4.20211004.2 |
| Meta Audience Network | 6.9.0.2 |
| Mintegral | 7.0.4.0.0 |
| Pangle | 4.2.0.2.1 |
| Smaato | 21.6.19.1 |
| VK Ad Network | 5.14.4.1 |
Manual
Use this API if you have custom views and you want to manually load native ad assets into those views. This integration method involves three high-level steps:
- Bind UI Components.
- Load the Native Ad.
- Destroy the Native Ad.
To use the manual API, select the Manual template in the Create New Ad Unit screen:

Bind UI Components
You can bind custom UI components to the MAX SDK and render native ad assets into those components. This example demonstrates this with custom views created using xibs and unique tag IDs. However, you can also use this method if you create your views programmatically or with the Storyboard.
Per AppLovin’s policy, your ad must contain the Privacy Information icon.
This icon links to an important privacy notice.
You can bind to it via -[MANativeAdViewBinderBuilder setOptionsContentViewTag:].
Your custom view containing the UI components to bind must subclass from MANativeAdView.
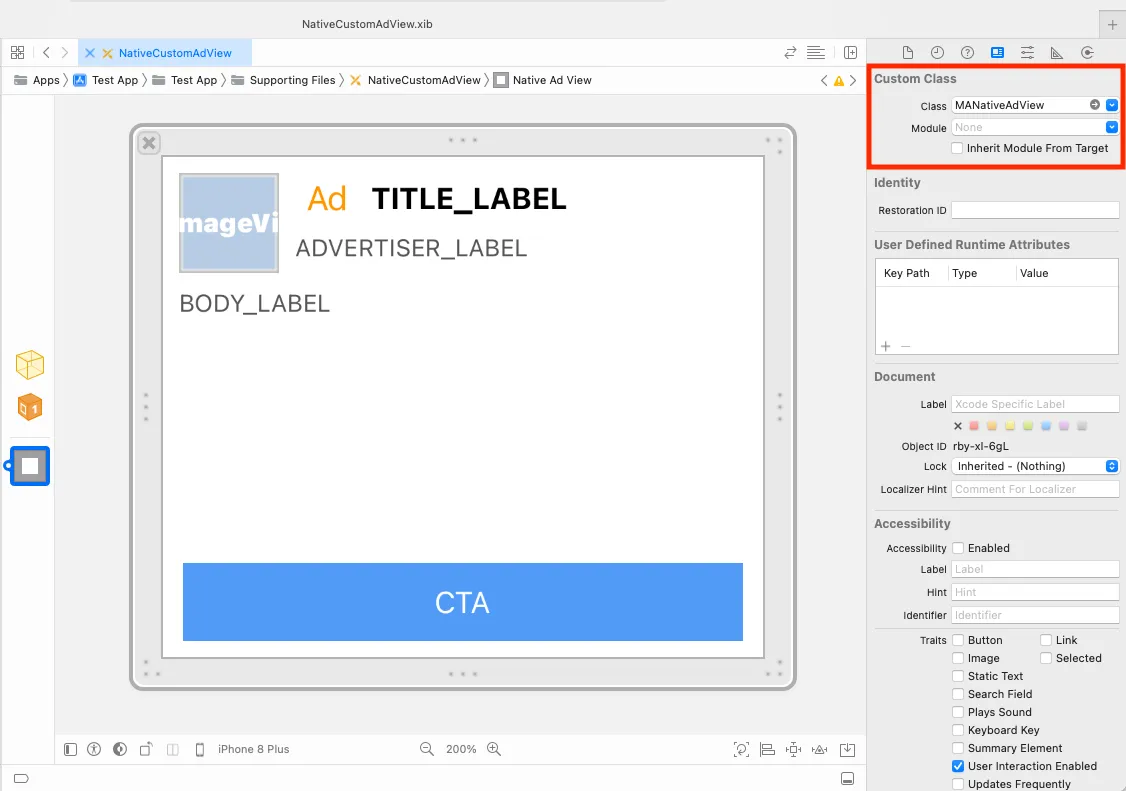
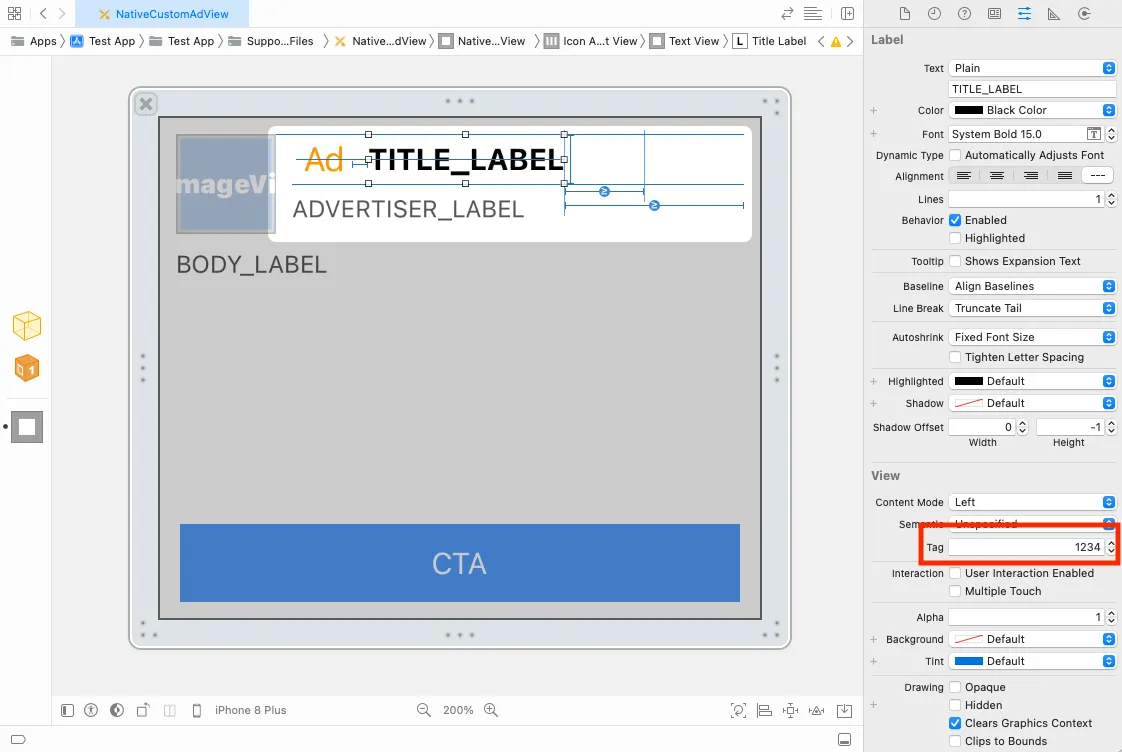
Assign unique tag IDs to the subviews of your custom views.
These IDs are used in the next integration step.
The example image below sets the ID to 1234 for the title label.
Next, bind the subviews using unique tag IDs with an instance of MANativeAdViewBinder.
AppLovin does not guarantee a network will return certain assets.
#import "ExampleViewController.h"#import <AppLovinSDK/AppLovinSDK.h>
⋮
@implementation ExampleViewController
⋮
- (MANativeAdView *)createNativeAdView{  UINib *nativeAdViewNib = [UINib nibWithNibName: @"NativeCustomAdView" bundle: NSBundle.mainBundle];  MANativeAdView *nativeAdView = [nativeAdViewNib instantiateWithOwner: nil options: nil].firstObject;  MANativeAdViewBinder *binder = [[MANativeAdViewBinder alloc] initWithBuilderBlock:^(MANativeAdViewBinderBuilder *builder) {    builder.titleLabelTag = «title-label-tag»;    builder.bodyLabelTag = «body-lable-tag»;    builder.callToActionButtonTag = «call-to-action-label-tag»;    builder.iconImageViewTag = «icon-image-view-taG»;    builder.mediaContentViewTag = «media-view-content-view-tag»;    builder.starRatingContentViewTag = «star-rating-content-view-tag»;    builder.advertiserLabelTag = «advertiser-label-tag»;    builder.optionsContentViewTag = «options-content-view-tag»;  }];  [nativeAdView bindViewsWithAdViewBinder: binder];  return nativeAdView;}
⋮
@end
import Foundationimport UIKitimport AppLovinSDK
class ExampleViewController : UIViewController{ func createNativeAdView() -> MANativeAdView { let nativeAdViewNib = UINib(nibName: "NativeCustomAdView", bundle: Bundle.main) let nativeAdView = nativeAdViewNib.instantiate(withOwner: nil, options: nil).first! as! MANativeAdView?
let adViewBinder = MANativeAdViewBinder.init(builderBlock: { (builder) in builder.titleLabelTag = «title-label-tag»; builder.bodyLabelTag = «body-lable-tag»; builder.callToActionButtonTag = «call-to-action-label-tag»; builder.iconImageViewTag = «icon-image-view-tag»; builder.mediaContentViewTag = «media-view-content-view-tag»; builder.starRatingContentViewTag = «star-rating-content-view-tag»; builder.advertiserLabelTag = «advertiser-label-tag»; builder.optionsContentViewTag = «options-content-view-tag»; }) nativeAdView?.bindViews(with: adViewBinder) }}Additional Google Bidding and Google AdMob/Google Ad Manager Integration Steps
As of Google bidding and Google AdMob adapter version 9.11.0.6 and Google Ad Manager adapter version 9.11.0.5, take these additional steps to bind UI components. This ensures that any unassociated views within your custom native ad view are still clickable for those networks:
-
Add a wrapper view inside of
MANativeAdViewthat contains all of the ad assets. Set its Custom Class toGADNativeAdView.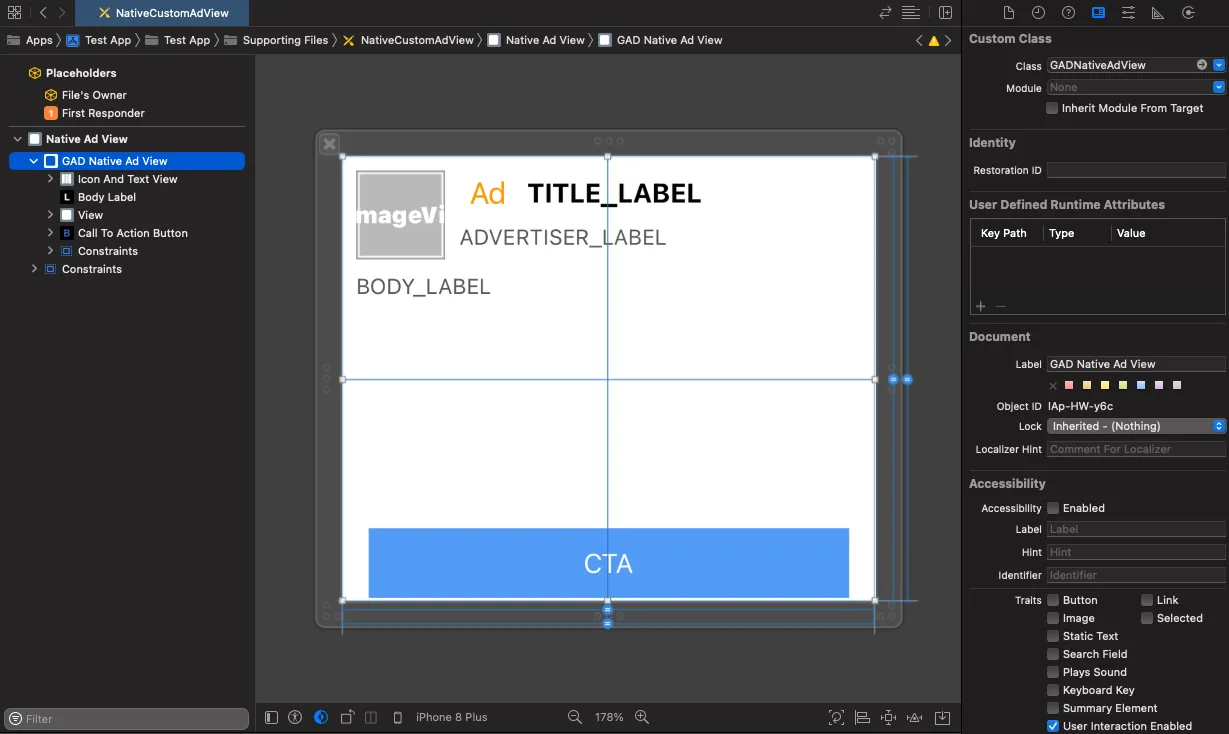
-
Give this wrapper view a unique Tag that is not used by other views.
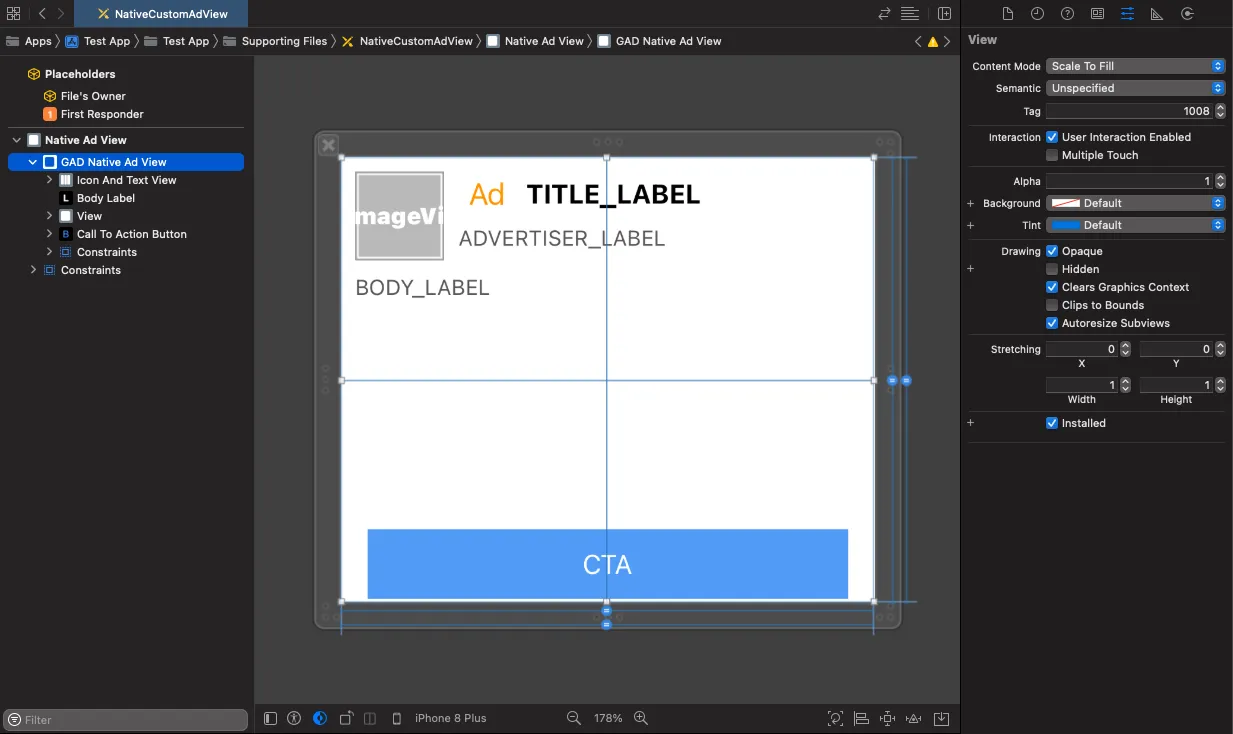
-
Set a local extra parameter for the native ad loader that contains this tag value, with the corresponding key
google_native_ad_view_tag. For example, if the view’s tag is 1008:-[setLocalExtraParameterForKey: "google_native_ad_view_tag" value: 1008]setLocalExtraParameterForKey("google_native_ad_view_tag", value: 1008)
Load the Native Ad
Load a Pre-Rendered Ad
To load a pre-rendered native ad, instantiate a MANativeAdLoader corresponding to your Ad Unit ID and call its loadAdIntoAdView method.
Implement and set the MANativeAdDelegate so that you are notified when your native ad’s load state changes.
Load and Render Ad Separately
To load a native ad, instantiate a MANativeAdLoader corresponding to your Ad Unit ID and call its loadAd method.
Implement and set the MANativeAdDelegate so that you are notified when your native ad’s load state changes.
Then use the MAAd returned in didLoadNativeAd:forAd: to render the ad view.
You can do this by calling MANativeAdLoader’s renderNativeAdView:withAd: method.
Destroy the Native Ad
If you are no longer using a native ad, you must clean up its resources.
Do so byby calling the destroy() method.
If you do not do this, the performace of your app degrades.
Below is an example of how you load and destroy a native ad, after you have bound the UI components from the previous step:
#import "ExampleViewController.h"#import <AppLovinSDK/AppLovinSDK.h>
@interface ExampleViewController()<MANativeAdDelegate, MAAdRevenueDelegate>@property (nonatomic, strong) UIView *nativeAdContainerView;@property (nonatomic, strong) MANativeAdLoader *nativeAdLoader;@property (nonatomic, strong) MAAd *loadedNativeAd;@end
@implementation ExampleViewController
⋮
- (void)createNativeAdLoader{  self.nativeAdLoader = [[MANativeAdLoader alloc] initWithAdUnitIdentifier: @"«ad-unit-ID»"];  self.nativeAdLoader.nativeAdDelegate = self;  self.nativeAdLoader.revenueDelegate = self;}
- (void)loadNativeAd{  [self.nativeAdLoader loadAdIntoAdView: [self createNativeAdView]];}
- (void)didLoadNativeAd:(MANativeAdView *)nativeAdView forAd:(MAAd *)ad{  // Cleanup any pre-existing native ad to prevent memory leaks.  if ( self.loadedNativeAd )  {    [self.nativeAdLoader destroyAd: self.loadedNativeAd];  }
  // Save ad for cleanup.  self.loadedNativeAd = ad;
  // Set to false if modifying constraints after adding the ad view to your layout  self.nativeAdContainerView.translatesAutoresizingMaskIntoConstraints = NO;
  // Add the native ad view to your layout  [self.nativeAdContainerView addSubview: nativeAdView];
  // Set ad view to span width and height of container and center the ad  [self.nativeAdContainerView addConstraint: [NSLayoutConstraint constraintWithItem: nativeAdView attribute: NSLayoutAttributeWidth r elatedBy: NSLayoutRelationEqual toItem: self.nativeAdContainerView attribute: NSLayoutAttributeWidth multiplier: 1 constant: 0]];  [self.nativeAdContainerView addConstraint: [NSLayoutConstraint constraintWithItem: nativeAdView attribute: NSLayoutAttributeHeight relatedBy: NSLayoutRelationEqual toItem: self.nativeAdContainerView attribute: NSLayoutAttributeHeight multiplier: 1 constant: 0]];  [self.nativeAdContainerView addConstraint: [NSLayoutConstraint constraintWithItem: nativeAdView attribute: NSLayoutAttributeCenterX relatedBy: NSLayoutRelationEqual toItem: self.nativeAdContainerView attribute: NSLayoutAttributeCenterX multiplier: 1 constant: 0]];  [self.nativeAdContainerView addConstraint: [NSLayoutConstraint constraintWithItem: nativeAdView attribute: NSLayoutAttributeCenterY relatedBy: NSLayoutRelationEqual toItem: self.nativeAdContainerView attribute: NSLayoutAttributeCenterY multiplier: 1 constant: 0]];}
- (void)didFailToLoadNativeAdForAdUnitIdentifier:(NSString *)adUnitIdentifier withError:(MAError *)error{  // Native ad load failed  // AppLovin recommends that you retry with exponentially higher delays up to a maximum delay}
- (void)didClickNativeAd:(MAAd *)ad { }
- (void)didPayRevenueForAd:(MAAd *)ad { }
@end
import Foundationimport UIKitimport AppLovinSDK
class ExampleViewController : UIViewController{ private var nativeAdContainerView: UIView! private var nativeAdLoader: MANativeAdLoader? private var loadedNativeAd: MAAd?
⋮
func createNativeAdLoader() { nativeAdLoader = MANativeAdLoader(adUnitIdentifier: "«ad-unit-ID»") nativeAdLoader?.nativeAdDelegate = self; nativeAdLoader?.revenueDelegate = self; }
func loadNativeAd() { nativeAdLoader?.loadAd(into: createNativeAdView()); }}
extension ExampleViewController: MANativeAdDelegate{ func didLoadNativeAdView(_ nativeAdView: MANativeAdView?, for ad: MAAd) { if let nativeAd = loadedNativeAd { nativeAdLoader?.destroy(nativeAd) }
loadedNativeAd = ad;
// Set to false if modifying constraints after adding the ad view to your layout nativeAdContainerView.translatesAutoresizingMaskIntoConstraints = false
// Add the native ad view to your layout guard let nativeAdView = nativeAdView else { return } nativeContainerView.addSubview(nativeAdView)
// Set ad view to span width and height of container and center the ad nativeAdContainerView.addConstraint(NSLayoutConstraint(item: nativeAdView, attribute: .width, relatedBy: .equal, toItem: nativeAdContainerView, attribute: .width, multiplier: 1, constant: 0)) nativeAdContainerView.addConstraint(NSLayoutConstraint(item: nativeAdView, attribute: .height, relatedBy: .equal, toItem: nativeAdContainerView, attribute: .height, multiplier: 1, constant: 0)) nativeAdContainerView.addConstraint(NSLayoutConstraint(item: nativeAdView, attribute: .centerX, relatedBy: .equal, toItem: nativeAdContainerView, attribute: .centerX, multiplier: 1, constant: 0)) nativeAdContainerView.addConstraint(NSLayoutConstraint(item: nativeAdView, attribute: .centerY, relatedBy: .equal, toItem: nativeAdContainerView, attribute: .centerY, multiplier: 1, constant: 0)) }
func didFailToLoadNativeAd(forAdUnitIdentifier adUnitIdentifier: String, withError error: MAError) { // Native ad load failed // AppLovin recommends that you retry with exponentially higher delays up to a maximum delay }
func didClickNativeAd(_ ad: MAAd) { }}
extension ExampleViewController: MAAdRevenueDelegate{ func didPayRevenue(for ad: MAAd) { }}Asset Sizes
For AppLovin Exchange demand, the maximum numbers of characters allowed for Title, Description, and CTA are as follows:
| Asset | Maximum Character Count |
|---|---|
| Title | 50 characters |
| Description | 150 characters. You can add an ellipsis (…) after 149 characters, as the 150th character. |
| CTA | 15 characters |
For SDK-mediated networks, the network sets the maximum character counts.
How to Get the Media Content Aspect Ratio
The following code snippet shows how you get the media content aspect ratio of your native ad:
- (void)didLoadNativeAd:(MANativeAdView *)nativeAdView forAd:(MAAd *)ad{ CGFloat aspectRatio = ad.nativeAd.mediaContentAspectRatio;}func didLoadNativeAd(_ nativeAdView: MANativeAdView?, for ad: MAAd){ if let nativeAd = ad.nativeAd { var aspectRatio = nativeAd.mediaContentAspectRatio }}Supported Adapter Versions
| Ad Network | Adapter Version |
|---|---|
| BidMachine | 1.9.4.1.1 |
| Google Ad Manager | 8.13.0.2 |
| Google Bidding and Google AdMob | 8.13.0.2 |
| InMobi | 10.0.2.2 |
| LINE | 2.4.20211004.2 |
| Meta Audience Network | 6.9.0.2 |
| Mintegral | 7.0.4.0.0 |
| Pangle | 4.2.0.2.1 |
| Smaato | 21.6.19.1 |
| VK Ad Network | 5.14.4.1 |
Star Rating
With the AppLovin MAX SDK, starting with version 11.7.1, you can access and render the star rating for the advertised app. The value, if available, is a floating point number in the range of [0.0, 5.0].
The MAX SDK automatically renders the stars in the container view that you designate as the star rating container. If the network does not provide the star rating, or the star rating is < 3, the SDK does not fill the star rating container view. You are responsible for adjusting your layout accordingly.
To retrieve the star rating for the current ad:
- (void)didLoadNativeAd:(MANativeAdView *)nativeAdView forAd:(MAAd *)ad{  if ( ad.nativeAd.starRating < 3 )  {    // Star rating not available, or < 3 - hide star rating container view    return;  }
  // Star rating available and >= 3 - show star rating container view}
func didLoadNativeAd(_ nativeAdView: MANativeAdView?, for ad: MAAd){ if let nativeAd = ad.nativeAd { guard let starRating = nativeAd.starRating, starRating >= 3 else { // Star rating not available, or < 3 - hide star rating container view return }
// Star rating available and >= 3 - show star rating container view }}Supported Adapter Versions (Star Rating)
| Ad Network | Adapter Version |
|---|---|
| Google Ad Manager | 9.14.0.2 |
| Google Bidding and Google AdMob | 9.14.0.2 |
| InMobi | 10.1.2.5 |
Ad Placer
Ad Placer automatically inserts native ads into your existing content stream using UITableView or UICollectionView.
To integrate this API, take the following high-level steps:
- Set up native ad layout.
- Create ad placer settings.
- Set up ad placer.
- Configure ad rendering settings.
- Optionally, receive delegate callbacks.
Per AppLovin’s policy, your ad must contain the Privacy Information icon.
This icon links to an important privacy notice.
You can bind to it via -[MANativeAdViewBinderBuilder setOptionsContentViewTag:].
Your custom view containing the UI components to bind must subclass from MANativeAdView.
1. Set Up Native Ad Layout
Ad placer supports either template or manual native ad layouts. See the “Tempates” and “Manual” sections above to learn how to configure your ad units. See Configure Ad Rendering Settings below to learn how to set up the ad placer to support your layout.
2. Create Ad Placer Settings
Create a MAAdPlacerSettings object with your ad unit identifier.
This object configures your ad placer and provides positioning information for ads in your feed.
MAAdPlacerSettings *settings = [MAAdPlacerSettings settingsWithAdUnitIdentifier: @"«ad-unit-ID»"];let settings = MAAdPlacerSettings(adUnitIdentifier: "«ad-unit-ID»")Configure Ad Positions
Ad placer positions ads in your feed. It does this based on at least one of the following:
- a list of fixed index paths that indicate where to place ads
- a repeating interval at which to regularly insert ads
- Your ad placer inserts repeating ads after the last fixed position. If you do not set any fixed positions, your ad placer adds repeating ads after the first position in the stream. This interval value must be greater than or equal to 2. An interval value less than 2 disables the ad placer.
Configure ad positions by modifying MAAdPlacerSettings:
- To add a new fixed ad position, for example at row 1:
[settings addFixedPositions: [NSIndexPath indexPathForRow: 1 inSection: 0]];settings.addFixedPosition(IndexPath(row: 1, section: 0))
- To remove existing fixed positions:
[settings resetFixedPositions];settings.resetFixedPositions()
- To change the repeating interval; for example, to insert ads at every fifth position in the feed:
settings.repeatingInterval = 5;settings.repeatingInterval = 5
Additional Settings
You can configure your ad placer by adjusting additional settings in MAAdPlacerSettings:
maximumAdCount- Set this to the maximum number of ads in a stream (default=256). If a stream contains multiple sections, this determines the maximum number of ads per ad section.
maximumPreloadedAdCount- Set this to the maximum number of ads to preload for placement in a stream (default=4).
3. Set Up Ad Placer
Choose one of these two options when you configure your ad placer:
-
If your feed is based on a
UITableView,MATableViewAdPlacer. If it is based on aUICollectionView, useMACollectionViewAdPlacer. The helper class wraps the original adapter to automatically render and insert ads into the feed. -
If your feed uses some other custom UI component, you may prefer to subclass or to directly use
MAAdPlacerin your implementation.
Using MATableViewAdPlacer
To set up your ad placer with MATableViewAdPlacer follow these instructions:
- Initialize
MATableViewAdPlacerwith your table view and settings:self.adPlacer = [MATableViewAdPlacer placerWithTableView: self.tableView settings: settings];adPlacer = MATableViewAdPlacer(tableView: tableView, settings: settings) - Replace the following
UITableViewproperties and methods with the AppLovin category equivalents (prefixed withal_):dataSourcedelegatedeleteRowsAtIndexPaths:withRowAnimation:deleteSections:withRowAnimation:dequeueReusableCellWithIdentifier:forIndexPath:deselectRowAtIndexPath:animated:endUpdatesindexPathForCell:indexPathForRowAtPoint:indexPathForSelectedRowindexPathsForRowsInRect:indexPathsForSelectedRowsindexPathsForVisibleRowsinsertRowsAtIndexPaths:withRowAnimation:insertSections:withRowAnimation:moveRowsAtIndexPaths:withRowAnimation:moveSections:withRowAnimation:performBatchUpdates:completion:rectForRowAtIndexPath:reloadDatareloadRowsAtIndexPaths:withRowAnimation:reloadSections:withRowAnimation:scrollToRowAtIndexPath:atScrollPosition:animated:selectRowAtIndexPath:animated:scrollPosition:visibleCells
- Call
loadAdsto start loading ads.
The following code shows how you load ads into a table view by using MATableViewAdPlacer:
- (void)viewDidLoad{  [super viewDidLoad];
  // Configure table view  self.tableView.al_delegate = self;  self.tableView.al_dataSource = self;
  // Configure ad placer and load ads  MAAdPlacerSettings *settings = [MAAdPlacerSettings settingsWithAdUnitIdentifier: @"«ad-unit-ID»"];  self.adPlacer = [MATableViewAdPlacer placerWithTableView: self.tableView settings: settings];  self.adPlacer.delegate = self;  [self.adPlacer loadAds];}
- (NSInteger)tableView:(UITableView *)tableView numberOfRowsInSection:(NSInteger)section{  return self.data.count;}
- (UITableViewCell *)tableView:(UITableView *)tableView cellForRowAtIndexPath:(NSIndexPath *)indexPath{  UITableViewCell *cell = [tableView al_dequeueReusableCellWithIdentifier: @"YourCell" forIndexPath: indexPath];  cell.textLabel.text = self.data[indexPath.row];  return cell;}
override func viewDidLoad(){ super.viewDidLoad()
// Configure table view tableView.al_delegate = self tableView.al_dataSource = self
// Configure ad placer and load ads let settings = MAAdPlacerSettings(adUnitIdentifier: "«ad-unit-ID»") adPlacer = MATableViewAdPlacer(tableView: tableView, settings: settings) adPlacer.delegate = self adPlacer.loadAds()}
override func tableView(_ tableView: UITableView, numberOfRowsInSection section: Int) -> Int{ return data.count}
override func tableView(_ tableView: UITableView, cellForRowAt indexPath: IndexPath) -> UITableViewCell{ let cell = tableView.al_dequeueReusableCell(withIdentifier: "YourCell", for: indexPath) cell.textLabel!.text = data[indexPath.row] return cell}Using MACollectionViewAdPlacer
To set up your ad placer with MACollectionViewAdPlacer follow these instructions:
- Initialize
MACollectionViewAdPlacerwith your table view and settings:self.adPlacer = [MACollectionViewAdPlacer placerWithCollectionView: self.collectionView settings: settings];adPlacer = MACollectionViewAdPlacer(collectionView: collectionView, settings: settings) - Replace the following
UITableViewproperties and methods with the AppLovin category equivalents (prefixed withal_):cellForItemAtIndexPath:dataSourcedelegatedeleteItemsAtIndexPaths:deleteSections:dequeueReusableCellWithIdentifier:forIndexPath:deselectItemAtIndexPath:animated:indexPathForCell:indexPathForItemAtPoint:indexPathsForSelectedItemsindexPathsForVisibleItemsinsertItemsAtIndexPaths:insertSections:layoutAttributesForItemAtIndexPath:moveItemsAtIndexPaths:moveSections:performBatchUpdates:completion:reloadDatareloadItemsAtIndexPaths:reloadSections:scrollToItemAtIndexPath:atScrollPosition:animated:selectedItemAtIndexPath:animated:scrollPosition:visibleCells
- If you use a storyboard for your collection view, set the collection view’s “Estimate Size” property to “None”.
- Call
loadAdsto start loading ads.
The following code shows how you load ads into a table view by using MACollectionViewAdPlacer:
- (void)viewDidLoad{  [super viewDidLoad];
  // Configure collection view  self.collectionView.al_delegate = self;  self.collectionView.al_dataSource = self;
  // Configure ad placer and load ads  MAAdPlacerSettings *settings = [MAAdPlacerSettings settingsWithAdUnitIdentifier: @"«ad-unit-ID»"];  self.adPlacer = [MACollectionViewAdPlacer placerWithCollectionView: self.collectionView settings: settings];  self.adPlacer.delegate = self;  [self.adPlacer loadAds];}
- (NSInteger)collectionView:(UICollectionView *)collectionView numberOfItemsInSection:(NSInteger)section{  return self.data.count;}
- (UICollectionViewCell *)collectionView:(UICollectionView *)collectionView cellForItemAtIndexPath:(NSIndexPath *)indexPath{  MyCollectionViewCell *cell = (MyCollectionViewCell *)[collectionView al_dequeueReusableCellWithIdentifier: @"YourCell" forIndexPath: indexPath];  cell.textLabel.text = self.data[indexPath.row];  return cell;}
override func viewDidLoad(){ super.viewDidLoad()
// Configure collection view collectionView.al_delegate = self collectionView.al_dataSource = self
// Configure ad placer and load ads let settings = MAAdPlacerSettings(adUnitIdentifier: "«ad-unit-ID»") adPlacer = MACollectionViewAdPlacer(collectionView: collectionView, settings: settings) adPlacer.delegate = self adPlacer.loadAds()}
override func collectionView(_ collectionView: UICollectionView, numberOfItemsInSection section: Int) -> Int{ return data.count}
override func collectionView(_ collectionView: UICollectionView, cellForItemAt indexPath: IndexPath) -> UICollectionViewCell{ let cell = collectionView.al_dequeueReusableCell(withReuseIdentifier: reuseIdentifier, for: indexPath) as! MyCollectionViewCell cell.textLabel.text = data[indexPath.row] return cell}4. Configure Ad Rendering Settings
Templates
If you use a default template, the ad view automatically sizes to 360×120 for “Small” and 360×300 for “Medium” templates.
You can customize the rendered ad size by setting the adSize property on the ad placer before you load ads.
For example, to set the ad size with a width of 300 and height of 200, make the following call:
self.adPlacer.adSize = CGSizeMake(300, 200);adPlacer.adSize = CGSize(width: 300, height: 200)Manual
If you use a manual layout, you must set the nativeAdViewNib and nativeAdViewBinder properties on the ad placer before you load ads.
AppLovin recommends that you also set the adSize property when you use manual templates.
This optimizes rendering.
5. Optionally Receive Delegate Callbacks
All ad placers include optional delegate callbacks that you can use to be notified of events:
didLoadAdAtIndexPath:didRemoveAdsAtIndexPaths:didClickAd:didPayRevenueForAd: