ネイティブ広告
ネイティブ広告を使用すると、既存のデザインと一貫性のある方法でアプリを収益化できます。AppLovin MAX SDKは、広告の個々のアセットへのアクセスを提供します。これにより、広告のレイアウトをアプリのルック&フィールに合わせてデザインできます。SDK は、画像のキャッシュとメトリクスの追跡を自動的に処理します。広告をいつ、どこで、どのように表示するかに集中できます。
手動
この API は、カスタムビューがあり、ネイティブ広告アセットをそれらのビューに手動で読み込む場合に使用します。この統合方法には、次の 3 つの大まかな手順が含まれます。
- UI コンポーネントをバインドします。
- ネイティブ広告を読み込みます。
- ネイティブ広告を破棄します。
手動APIを使用するには、Create New Ad Unit画面でManualを選択してください。

UIコンポーネントをバインド
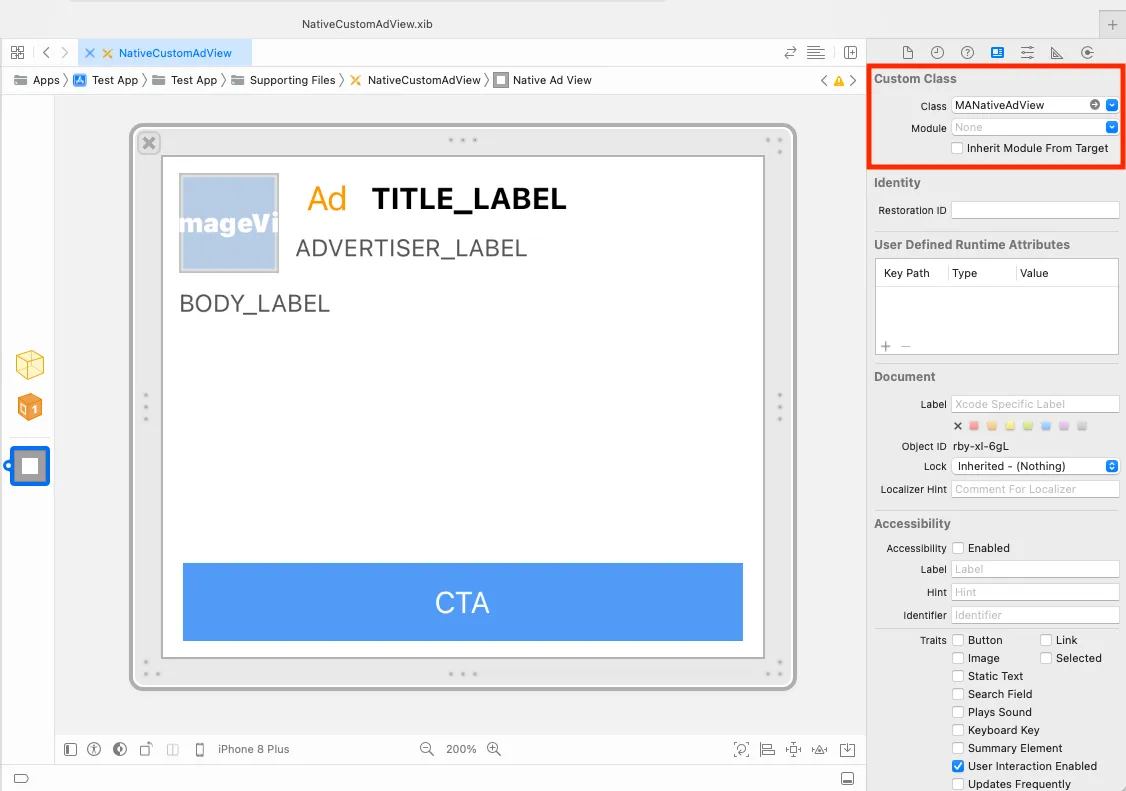
カスタムUIコンポーネントをMAX SDKにバインドし、ネイティブ広告アセットをそれらのコンポーネントにレンダリングできます。この例では、xibs と一意のタグ ID を使用して作成されたカスタムビューでこれを示しています。ただし、ビューをプログラムで作成したり、ストーリーボードを使用して作成したりする場合は、この方法を使用することもできます。
AppLovinのポリシーに基づき、広告にはプライバシー情報アイコンを表示する必要があります。
このアイコンは、プライバシーに関する重要な通知にリンクしています。
-[MANativeAdViewBinderBuilder setOptionsContentViewTag:]を使用してバインドしてください。
バインドするUIコンポーネントを含むカスタムビューは、MANativeAdViewからサブクラス化してください。
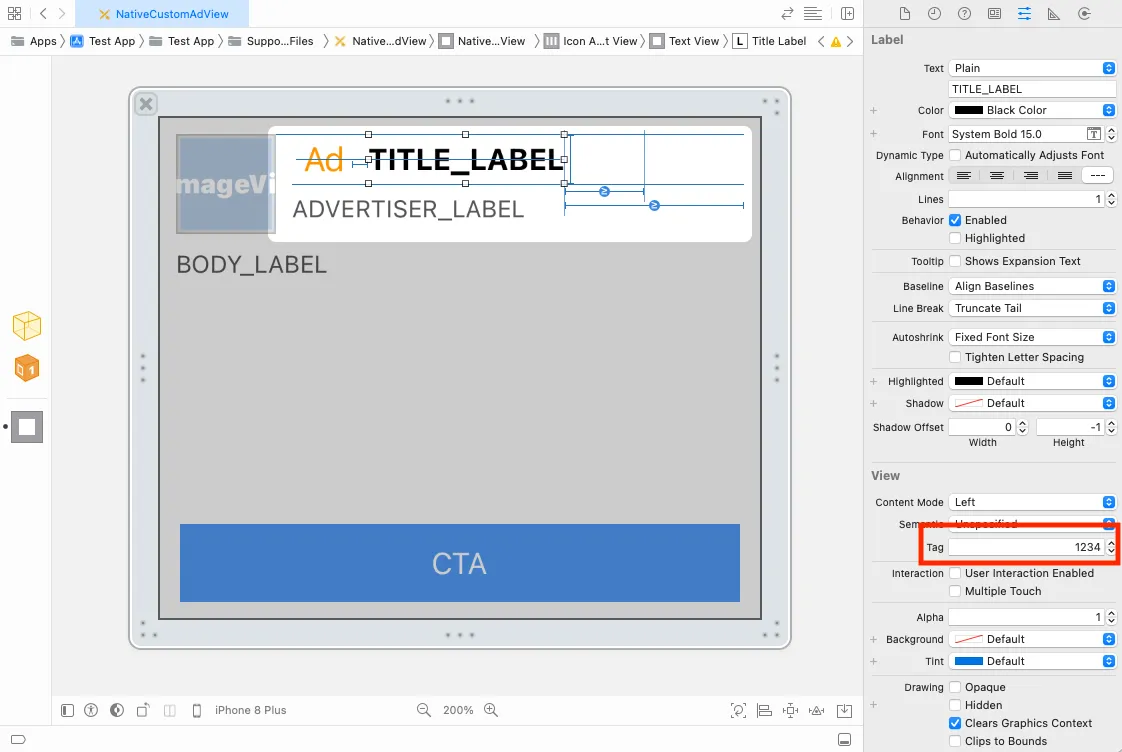
カスタムビューのサブビューに一意のタグIDを割り当てます。
これらのIDは、次の連携の手順で使用されます。
以下の例では、タイトルラベルのIDを 1234 に設定しています。
次に、一意のタグIDを使用してサブビューを MANativeAdViewBinder のインスタンスにバインドします。
AppLovinは、ネットワークが特定のアセットを返すことを保証しません。
#import "ExampleViewController.h"#import <AppLovinSDK/AppLovinSDK.h>
⋮
@implementation ExampleViewController
⋮
- (MANativeAdView *)createNativeAdView{  UINib *nativeAdViewNib = [UINib nibWithNibName: @"NativeCustomAdView" bundle: NSBundle.mainBundle];  MANativeAdView *nativeAdView = [nativeAdViewNib instantiateWithOwner: nil options: nil].firstObject;  MANativeAdViewBinder *binder = [[MANativeAdViewBinder alloc] initWithBuilderBlock:^(MANativeAdViewBinderBuilder *builder) {    builder.titleLabelTag = «title-label-tag»;    builder.bodyLabelTag = «body-lable-tag»;    builder.callToActionButtonTag = «call-to-action-label-tag»;    builder.iconImageViewTag = «icon-image-view-taG»;    builder.mediaContentViewTag = «media-view-content-view-tag»;    builder.starRatingContentViewTag = «star-rating-content-view-tag»;    builder.advertiserLabelTag = «advertiser-label-tag»;    builder.optionsContentViewTag = «options-content-view-tag»;  }];  [nativeAdView bindViewsWithAdViewBinder: binder];  return nativeAdView;}
⋮
@end
import Foundationimport UIKitimport AppLovinSDK
class ExampleViewController : UIViewController{ func createNativeAdView() -> MANativeAdView { let nativeAdViewNib = UINib(nibName: "NativeCustomAdView", bundle: Bundle.main) let nativeAdView = nativeAdViewNib.instantiate(withOwner: nil, options: nil).first! as! MANativeAdView?
let adViewBinder = MANativeAdViewBinder.init(builderBlock: { (builder) in builder.titleLabelTag = «title-label-tag»; builder.bodyLabelTag = «body-lable-tag»; builder.callToActionButtonTag = «call-to-action-label-tag»; builder.iconImageViewTag = «icon-image-view-tag»; builder.mediaContentViewTag = «media-view-content-view-tag»; builder.starRatingContentViewTag = «star-rating-content-view-tag»; builder.advertiserLabelTag = «advertiser-label-tag»; builder.optionsContentViewTag = «options-content-view-tag»; }) nativeAdView?.bindViews(with: adViewBinder) }}Google BiddingとGoogle AdMob / Google アド マネージャーを追加で連携
Google ビッディング Google AdMobアダプター アダプター バージョン 9.11.0.6 および Google アドマネージャー アダプター バージョン 9.11.0.5 では、UI コンポーネントをバインドするための追加手順を行ってください。これにより、カスタム ネイティブ広告ビュー内の関連付けられていないビューは、そのネットワークで引き続きクリック可能になります。
-
MANativeAdViewの中に、すべての広告アセットを含むラッパービューを追加します。 そのカスタムクラスをGADNativeAdViewに設定します。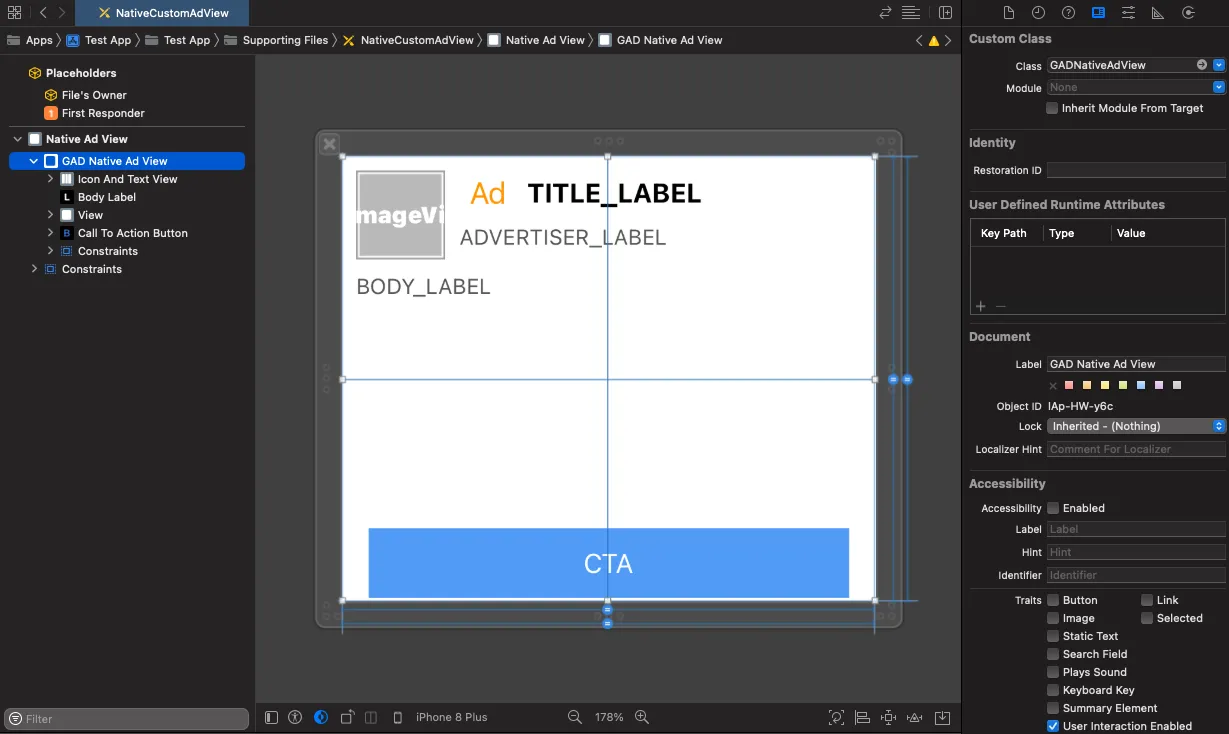
-
このラッパー ビューに、他のビューで使用されていない一意の タグ を付けます。
![NativeCustomAdViewです。 ネイティブ広告ビュー。 GADネイティブ広告ビュー。 表示: コンテンツ モード: [スケール トゥ フィル]。 セマンティック: 指定されていません。 タグ: 1008. インタラクション: ✅ ユーザーインタラクションが有効になっています。](/_astro/native-google-02.DI8DYsCh_ZFp4A8.webp)
-
ネイティブ広告ローダーのローカル追加パラメーターで、対応するキー
google_native_ad_view_tagとこのタグ値を設定します。 例えば、ビューのタグが1008の場合、以下のように設定します。-[setLocalExtraParameterForKey: "google_native_ad_view_tag" value: 1008]setLocalExtraParameterForKey("google_native_ad_view_tag", value: 1008)
ネイティブ広告をロード
プリレンダリングされた広告をロード
プリレンダリングされたネイティブ広告をロードするには、広告ユニットIDに対応する MANativeAdLoader をインスタンス化して、その loadAdIntoAdView メソッドを呼び出します。
ネイティブ広告のロードステートが変更された際に通知されるように、MANativeAdDelegate を実装し、設定します。
広告のロードとレンダリングを個別に実行
ネイティブ広告をロードするには、広告ユニットIDに対応する MANativeAdLoader をインスタンス化して、その loadAd メソッドを呼び出します。
ネイティブ広告のロードステートが変更された際に通知されるように、MANativeAdDelegate を実装し、設定します。次に、didLoadNativeAd:forAd: で返される MAAd を使用して広告ビューをレンダリングします。
これは、 MANativeAdLoader の renderNativeAdView:withAd: メソッドを呼び出すことで行えます。
ネイティブ広告を破棄
ネイティブ広告を使用しなくなった場合は、そのリソースをクリーンアップする必要があります。
これは、 destroy()メソッドを呼び出すことで行えます。
これを行わないと、アプリのパフォーマンスが低下します。
以下は、前の手順の UI コンポーネントをバインドした後で、ネイティブ広告を読み込んで破棄する手順の例です。
#import "ExampleViewController.h"#import <AppLovinSDK/AppLovinSDK.h>
@interface ExampleViewController()<MANativeAdDelegate, MAAdRevenueDelegate>@property (nonatomic, strong) UIView *nativeAdContainerView;@property (nonatomic, strong) MANativeAdLoader *nativeAdLoader;@property (nonatomic, strong) MAAd *loadedNativeAd;@end
@implementation ExampleViewController
⋮
- (void)createNativeAdLoader{  self.nativeAdLoader = [[MANativeAdLoader alloc] initWithAdUnitIdentifier: @"«ad-unit-ID»"];  self.nativeAdLoader.nativeAdDelegate = self;  self.nativeAdLoader.revenueDelegate = self;}
- (void)loadNativeAd{  [self.nativeAdLoader loadAdIntoAdView: [self createNativeAdView]];}
- (void)didLoadNativeAd:(MANativeAdView *)nativeAdView forAd:(MAAd *)ad{  // Cleanup any pre-existing native ad to prevent memory leaks.  if ( self.loadedNativeAd )  {    [self.nativeAdLoader destroyAd: self.loadedNativeAd];  }
  // Save ad for cleanup.  self.loadedNativeAd = ad;
  // Set to false if modifying constraints after adding the ad view to your layout  self.nativeAdContainerView.translatesAutoresizingMaskIntoConstraints = NO;
  // Add the native ad view to your layout  [self.nativeAdContainerView addSubview: nativeAdView];
  // Set ad view to span width and height of container and center the ad  [self.nativeAdContainerView addConstraint: [NSLayoutConstraint constraintWithItem: nativeAdView attribute: NSLayoutAttributeWidth r elatedBy: NSLayoutRelationEqual toItem: self.nativeAdContainerView attribute: NSLayoutAttributeWidth multiplier: 1 constant: 0]];  [self.nativeAdContainerView addConstraint: [NSLayoutConstraint constraintWithItem: nativeAdView attribute: NSLayoutAttributeHeight relatedBy: NSLayoutRelationEqual toItem: self.nativeAdContainerView attribute: NSLayoutAttributeHeight multiplier: 1 constant: 0]];  [self.nativeAdContainerView addConstraint: [NSLayoutConstraint constraintWithItem: nativeAdView attribute: NSLayoutAttributeCenterX relatedBy: NSLayoutRelationEqual toItem: self.nativeAdContainerView attribute: NSLayoutAttributeCenterX multiplier: 1 constant: 0]];  [self.nativeAdContainerView addConstraint: [NSLayoutConstraint constraintWithItem: nativeAdView attribute: NSLayoutAttributeCenterY relatedBy: NSLayoutRelationEqual toItem: self.nativeAdContainerView attribute: NSLayoutAttributeCenterY multiplier: 1 constant: 0]];}
- (void)didFailToLoadNativeAdForAdUnitIdentifier:(NSString *)adUnitIdentifier withError:(MAError *)error{  // Native ad load failed  // AppLovin recommends that you retry with exponentially higher delays up to a maximum delay}
- (void)didClickNativeAd:(MAAd *)ad { }
- (void)didPayRevenueForAd:(MAAd *)ad { }
@end
import Foundationimport UIKitimport AppLovinSDK
class ExampleViewController : UIViewController{ private var nativeAdContainerView: UIView! private var nativeAdLoader: MANativeAdLoader? private var loadedNativeAd: MAAd?
⋮
func createNativeAdLoader() { nativeAdLoader = MANativeAdLoader(adUnitIdentifier: "«ad-unit-ID»") nativeAdLoader?.nativeAdDelegate = self; nativeAdLoader?.revenueDelegate = self; }
func loadNativeAd() { nativeAdLoader?.loadAd(into: createNativeAdView()); }}
extension ExampleViewController: MANativeAdDelegate{ func didLoadNativeAdView(_ nativeAdView: MANativeAdView?, for ad: MAAd) { if let nativeAd = loadedNativeAd { nativeAdLoader?.destroy(nativeAd) }
loadedNativeAd = ad;
// Set to false if modifying constraints after adding the ad view to your layout nativeAdContainerView.translatesAutoresizingMaskIntoConstraints = false
// Add the native ad view to your layout guard let nativeAdView = nativeAdView else { return } nativeContainerView.addSubview(nativeAdView)
// Set ad view to span width and height of container and center the ad nativeAdContainerView.addConstraint(NSLayoutConstraint(item: nativeAdView, attribute: .width, relatedBy: .equal, toItem: nativeAdContainerView, attribute: .width, multiplier: 1, constant: 0)) nativeAdContainerView.addConstraint(NSLayoutConstraint(item: nativeAdView, attribute: .height, relatedBy: .equal, toItem: nativeAdContainerView, attribute: .height, multiplier: 1, constant: 0)) nativeAdContainerView.addConstraint(NSLayoutConstraint(item: nativeAdView, attribute: .centerX, relatedBy: .equal, toItem: nativeAdContainerView, attribute: .centerX, multiplier: 1, constant: 0)) nativeAdContainerView.addConstraint(NSLayoutConstraint(item: nativeAdView, attribute: .centerY, relatedBy: .equal, toItem: nativeAdContainerView, attribute: .centerY, multiplier: 1, constant: 0)) }
func didFailToLoadNativeAd(forAdUnitIdentifier adUnitIdentifier: String, withError error: MAError) { // Native ad load failed // AppLovin recommends that you retry with exponentially higher delays up to a maximum delay }
func didClickNativeAd(_ ad: MAAd) { }}
extension ExampleViewController: MAAdRevenueDelegate{ func didPayRevenue(for ad: MAAd) { }}アセットのサイズ
AppLovin Exchangeデマンドの場合、タイトル、説明文、CTAに使用できる最大文字数は以下のとおりです。
| アセット | 最大文字数数 |
|---|---|
| タイトル | 50文字 |
| 説明 | 150文字。149文字の後に省略記号(…)を150番目の文字として追加できます。 |
| CTA | 15文字 |
SDKメディエーションネットワークの場合、ネットワークが最大文字数を設定します。
メディアコンテンツのアスペクト比を取得
次のコード スニペットは、ネイティブ広告のメディア コンテンツのアスペクト比を取得する方法を示しています。
- (void)didLoadNativeAd:(MANativeAdView *)nativeAdView forAd:(MAAd *)ad{ CGFloat aspectRatio = ad.nativeAd.mediaContentAspectRatio;}func didLoadNativeAd(_ nativeAdView: MANativeAdView?, for ad: MAAd){ if let nativeAd = ad.nativeAd { var aspectRatio = nativeAd.mediaContentAspectRatio }}星評価
AppLovin MAXを使用すると、広告対象アプリの星評価にアクセスして表示することができます。評価されている場合、値は[0.0, 5.0]の範囲の浮動小数点数として表示されます。
MAX SDK は、星評価コンテナとして指定したコンテナ ビューに星を自動的にレンダリングします。ネットワークで星評価が提供されていない場合、または星評価が 3 <の場合、SDK は星評価コンテナ ビューに表示されません。それに応じてレイアウトを調整する責任があります。
現在の広告の星評価を取得するには:
- (void)didLoadNativeAd:(MANativeAdView *)nativeAdView forAd:(MAAd *)ad{  if ( ad.nativeAd.starRating < 3 )  {    // Star rating not available, or < 3 - hide star rating container view    return;  }
  // Star rating available and >= 3 - show star rating container view}
func didLoadNativeAd(_ nativeAdView: MANativeAdView?, for ad: MAAd){ if let nativeAd = ad.nativeAd { guard let starRating = nativeAd.starRating, starRating >= 3 else { // Star rating not available, or < 3 - hide star rating container view return }
// Star rating available and >= 3 - show star rating container view }}Ad Placer
Ad Placerは、UITableView または UICollectionView を使用して、既存のコンテンツストリームにネイティブ広告を自動的に挿入します。
このAPIを連携するには、以下の手順に従ってください。
- ネイティブ広告のレイアウトを設定します。
- Ad Placer設定を作成します。
- Ad Placerを設定します。
- 広告のレンダリング設定を構成します。
- 必要に応じて、デリゲート コールバックを受け取ります。
AppLovinのポリシーに基づき、広告にはプライバシー情報アイコンを表示する必要があります。
このアイコンは、プライバシーに関する重要な通知にリンクしています。
-[MANativeAdViewBinderBuilder setOptionsContentViewTag:]を使用してバインドしてください。
バインドするUIコンポーネントを含むカスタムビューは、MANativeAdViewからサブクラス化してください。
1. ネイティブ広告レイアウトを設定
Ad Placerは、手動のネイティブ広告レイアウトをサポートしています。 広告ユニットの設定方法については、上記の「手動」セクションを参照してください。 Ad Placerを設定してレイアウトをサポートする方法については、以下の広告レンダリング設定を構成を参照してください。
2. 広告配置設定を作成
広告ユニット識別子を使用して MAAdPlacerSettings オブジェクトを作成します。
このオブジェクトは、Ad Placerを設定し、フィード内の広告の位置情報を提供します。
MAAdPlacerSettings *settings = [MAAdPlacerSettings settingsWithAdUnitIdentifier: @"«ad-unit-ID»"];let settings = MAAdPlacerSettings(adUnitIdentifier: "«ad-unit-ID»")広告位置を構成
Ad placer はフィードに広告を配置します。これは、次のうち少なくとも 1 つに基づいて行われます。
- 広告を配置する場所を示す固定インデックス パスの一覧
- 広告を定期的に挿入する間隔
- Ad Placerには、最後の固定位置の後に繰り返し広告が挿入されます。固定掲載順位を設定しない場合、広告掲載枠はストリームの最初の掲載順位の後に繰り返し広告を追加します。この間隔値は 2 以上である必要があります。 間隔の値が 2 より小さいと、Ad Placerは無効になります。
MAAdPlacerSettingsを変更して広告位置を設定します。
- 新しい固定広告の掲載順位(例えば、行 1)を追加するには:
[settings addFixedPositions: [NSIndexPath indexPathForRow: 1 inSection: 0]];settings.addFixedPosition(IndexPath(row: 1, section: 0))
- 既存の固定ポジションを削除するには:
[settings resetFixedPositions];settings.resetFixedPositions()
- 繰り返し間隔を変更するには。たとえば、フィードの 5 つおきに広告を挿入するには:
settings.repeatingInterval = 5;settings.repeatingInterval = 5
その他の設定
Ad Placerは、MAAdPlacerSettings に調整を加えることで設定できます。
maximumAdCount- ストリーム内の広告の最大数を設定します (デフォルト = 256)。ストリームに複数のセクションが含まれている場合は、広告セクションあたりの広告の最大数を決定します。
maximumPreloadedAdCount- ストリームに配置するためにプリロードする広告の最大数に設定します(デフォルト = 4)。
3. Ad Placerを設定
Ad Placerを設定する際には、次の 2 つのオプションのいずれかを選択します。
-
フィードが
UITableView、MATableViewAdPlacerベースの場合。UICollectionViewベースの場合は、MACollectionViewAdPlacerを使用してください。 ヘルパークラスは、元のアダプターをラップして、広告を自動的にレンダリングし、フィードに挿入します。 -
その他のカスタムUIコンポーネントをフィードに使用している場合は、サブクラス化するか、 実装環境で
MAAdPlacerを直接使用することをお勧めします。
MATableViewAdPlacerを使用
MATableViewAdPlacer でAd Placerを設定するには、以下の手順に従ってください。
- テーブルビューと設定で
MATableViewAdPlacerを初期化します。self.adPlacer = [MATableViewAdPlacer placerWithTableView: self.tableView settings: settings];adPlacer = MATableViewAdPlacer(tableView: tableView, settings: settings) - 以下の
UITableViewプロパティとメソッドをAppLovinカテゴリーに相当するもの(al_で始まるもの)に置き換えてください。dataSourcedelegatedeleteRowsAtIndexPaths:withRowAnimation:deleteSections:withRowAnimation:dequeueReusableCellWithIdentifier:forIndexPath:deselectRowAtIndexPath:animated:endUpdatesindexPathForCell:indexPathForRowAtPoint:indexPathForSelectedRowindexPathsForRowsInRect:indexPathsForSelectedRowsindexPathsForVisibleRowsinsertRowsAtIndexPaths:withRowAnimation:insertSections:withRowAnimation:moveRowsAtIndexPaths:withRowAnimation:moveSections:withRowAnimation:performBatchUpdates:completion:rectForRowAtIndexPath:reloadDatareloadRowsAtIndexPaths:withRowAnimation:reloadSections:withRowAnimation:scrollToRowAtIndexPath:atScrollPosition:animated:selectRowAtIndexPath:animated:scrollPosition:visibleCells
loadAdsを呼び出して、広告のロードを開始します。
以下のコードは、MATableViewAdPlacerを使用して広告をテーブルビューにロードする方法を示しています。
- (void)viewDidLoad{  [super viewDidLoad];
  // Configure table view  self.tableView.al_delegate = self;  self.tableView.al_dataSource = self;
  // Configure ad placer and load ads  MAAdPlacerSettings *settings = [MAAdPlacerSettings settingsWithAdUnitIdentifier: @"«ad-unit-ID»"];  self.adPlacer = [MATableViewAdPlacer placerWithTableView: self.tableView settings: settings];  self.adPlacer.delegate = self;  [self.adPlacer loadAds];}
- (NSInteger)tableView:(UITableView *)tableView numberOfRowsInSection:(NSInteger)section{  return self.data.count;}
- (UITableViewCell *)tableView:(UITableView *)tableView cellForRowAtIndexPath:(NSIndexPath *)indexPath{  UITableViewCell *cell = [tableView al_dequeueReusableCellWithIdentifier: @"YourCell" forIndexPath: indexPath];  cell.textLabel.text = self.data[indexPath.row];  return cell;}
override func viewDidLoad(){ super.viewDidLoad()
// Configure table view tableView.al_delegate = self tableView.al_dataSource = self
// Configure ad placer and load ads let settings = MAAdPlacerSettings(adUnitIdentifier: "«ad-unit-ID»") adPlacer = MATableViewAdPlacer(tableView: tableView, settings: settings) adPlacer.delegate = self adPlacer.loadAds()}
override func tableView(_ tableView: UITableView, numberOfRowsInSection section: Int) -> Int{ return data.count}
override func tableView(_ tableView: UITableView, cellForRowAt indexPath: IndexPath) -> UITableViewCell{ let cell = tableView.al_dequeueReusableCell(withIdentifier: "YourCell", for: indexPath) cell.textLabel!.text = data[indexPath.row] return cell}MACollectionViewAdPlacerを使用
MACollectionViewAdPlacer でAd Placerを設定するには、以下の手順に従ってください。
- テーブルビューと設定で
MACollectionViewAdPlacerを初期化します。self.adPlacer = [MACollectionViewAdPlacer placerWithCollectionView: self.collectionView settings: settings];adPlacer = MACollectionViewAdPlacer(collectionView: collectionView, settings: settings) - 以下の
UITableViewプロパティとメソッドをAppLovinカテゴリーに相当するもの(al_で始まるもの)に置き換えてください。cellForItemAtIndexPath:dataSourcedelegatedeleteItemsAtIndexPaths:deleteSections:dequeueReusableCellWithIdentifier:forIndexPath:deselectItemAtIndexPath:animated:indexPathForCell:indexPathForItemAtPoint:indexPathsForSelectedItemsindexPathsForVisibleItemsinsertItemsAtIndexPaths:insertSections:layoutAttributesForItemAtIndexPath:moveItemsAtIndexPaths:moveSections:performBatchUpdates:completion:reloadDatareloadItemsAtIndexPaths:reloadSections:scrollToItemAtIndexPath:atScrollPosition:animated:selectedItemAtIndexPath:animated:scrollPosition:visibleCells
- コレクション ビューにストーリーボードを使用する場合は、コレクション ビューの [見積もりサイズ] プロパティを [なし] に設定します。
loadAdsを呼び出して、広告のロードを開始します。
以下のコードは、MACollectionViewAdPlacerを使用して広告をテーブルビューにロードする方法を示しています。
- (void)viewDidLoad{  [super viewDidLoad];
  // Configure collection view  self.collectionView.al_delegate = self;  self.collectionView.al_dataSource = self;
  // Configure ad placer and load ads  MAAdPlacerSettings *settings = [MAAdPlacerSettings settingsWithAdUnitIdentifier: @"«ad-unit-ID»"];  self.adPlacer = [MACollectionViewAdPlacer placerWithCollectionView: self.collectionView settings: settings];  self.adPlacer.delegate = self;  [self.adPlacer loadAds];}
- (NSInteger)collectionView:(UICollectionView *)collectionView numberOfItemsInSection:(NSInteger)section{  return self.data.count;}
- (UICollectionViewCell *)collectionView:(UICollectionView *)collectionView cellForItemAtIndexPath:(NSIndexPath *)indexPath{  MyCollectionViewCell *cell = (MyCollectionViewCell *)[collectionView al_dequeueReusableCellWithIdentifier: @"YourCell" forIndexPath: indexPath];  cell.textLabel.text = self.data[indexPath.row];  return cell;}
override func viewDidLoad(){ super.viewDidLoad()
// Configure collection view collectionView.al_delegate = self collectionView.al_dataSource = self
// Configure ad placer and load ads let settings = MAAdPlacerSettings(adUnitIdentifier: "«ad-unit-ID»") adPlacer = MACollectionViewAdPlacer(collectionView: collectionView, settings: settings) adPlacer.delegate = self adPlacer.loadAds()}
override func collectionView(_ collectionView: UICollectionView, numberOfItemsInSection section: Int) -> Int{ return data.count}
override func collectionView(_ collectionView: UICollectionView, cellForItemAt indexPath: IndexPath) -> UICollectionViewCell{ let cell = collectionView.al_dequeueReusableCell(withReuseIdentifier: reuseIdentifier, for: indexPath) as! MyCollectionViewCell cell.textLabel.text = data[indexPath.row] return cell}4. 広告レンダリング設定を構成
広告をロードする前に、Ad PlacerでnativeAdViewNibとnativeAdViewBinderのプロパティを設定します。
AppLovinは、adSizeプロパティの設定も推奨しています。
これにより、レンダリングが最適化されます。
5. デリゲートコールバックを受信(オプション)
すべてのAd Placerには、イベントの通知を受け取るために使用できるオプションのデリゲート コールバックが含まれています。
didLoadAdAtIndexPath:didRemoveAdsAtIndexPaths:didClickAd:didPayRevenueForAd: