Test Mode
Use the test mode feature to verify that you successfully integrated particular ad networks from among those that MAX mediates.
To enable test mode, define a test device and select a network in the Test Mode section of your MAX account. After you enable test mode for a device, when that device makes an ad request to the network it does so with the network’s test mode enabled. The device also receives detailed device logs.
When you turn off Test Mode on your device, your ad units revert to using the configuration listed in the MAX Ad Units page. In addition to using Test Mode in the dashboard, AppLovin recommends that you use Mediation Debugger Test Ads on your devices. This is a quick way to test integration.
Enable Test Mode
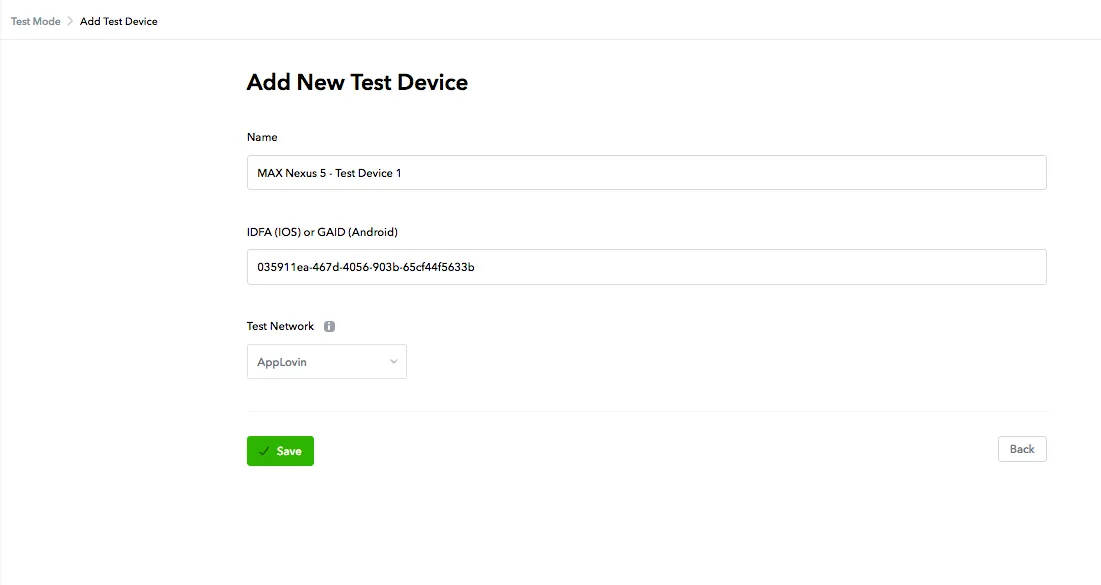
To enable Test Mode, select MAX > Mediation > Manage > Test Mode and click + Add Test Device.

Type the device Name and the “Google Advertising ID” (GAID).

Choose the Test Network you would like to see ads from. Then click ✔ Save. When the save completes, all MAX apps associated with your account start receiving test ads from the network you selected.

Disable Test Mode
To disable test mode on your device:
- Select MAX > Mediation > Manage > Test Mode.
- Find your device in the list of MAX Test Devices. In the row associated with that device, hover over the green dot in the Status column.
- A pause icon (⏸️) button appears next to the dot. Click that button.
- The Pause Test Device dialog appears. Click ✔ Yes.
This disables test mode on your device. Your device now receives ads based on the ad unit configuration that is listed in your MAX Ad Units page.
How to Enable Test Ads in the AppLovin SDK
You can programmatically enable test ads for one or more GAIDs in the AppLovin SDK.
To enable test ads for a set of GAIDs, pass a list of test device advertising IDs in AppLovin SDK settings. You must set test GAIDs when you create the first SDK instance. The following code snippets show how to do this in Java and Kotlin:
AppLovinSdkInitializationConfiguration initConfig = AppLovinSdkInitializationConfiguration.builder( "«SDK-key»" ) .setMediationProvider( AppLovinMediationProvider.MAX ) .setTestDeviceAdvertisingIds( Arrays.asList("«your-GAID»") ) .build();val initConfigBuilder = AppLovinSdkInitializationConfiguration.builder("«SDK-key»") .setMediationProvider(AppLovinMediationProvider.MAX) .setTestDeviceAdvertisingIds(Arrays.asList("«your-GAID»")) .build()You can find your SDK key in the Account > General > Keys section of the AppLovin dashboard.
Troubleshooting
If you cannot get test ads after you follow these steps, you might have an integration issue. Follow the steps in “Why am I not seeing any ads?”.