SDK Bidder Network Guides
This page shows you how to integrate a variety of SDK bidder networks as ad networks on the MAX mediation platform.
Before you start:
- Correctly integrate the supported MAX ad formats into your application.
- Add the adapters for the networks you intend to integrate by following the instructions in the Preparing Mediated Networks page for your platform.
After you complete this integration, you can validate it by using the Mediation Debugger.
Amazon
Step 1. Create an Amazon Account
To access Amazon ad inventory through MAX Mediation platform, you must have a valid account with Amazon. Sign in to your account through the Amazon Publisher Services page. If you do not already have an account, you will be prompted to create an account.
Step 2. Create an Application in Amazon Publisher Services Portal
To start creating your apps, log into your Amazon account and select SETUP > App & Slot Setup.
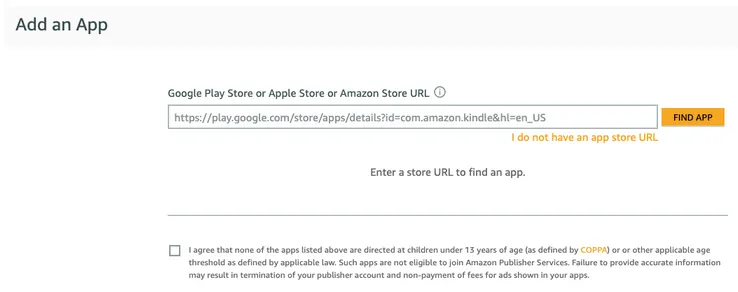
After you create an app, select Actions > SETUP > ADD A SLOT and add an ad slot to your app.
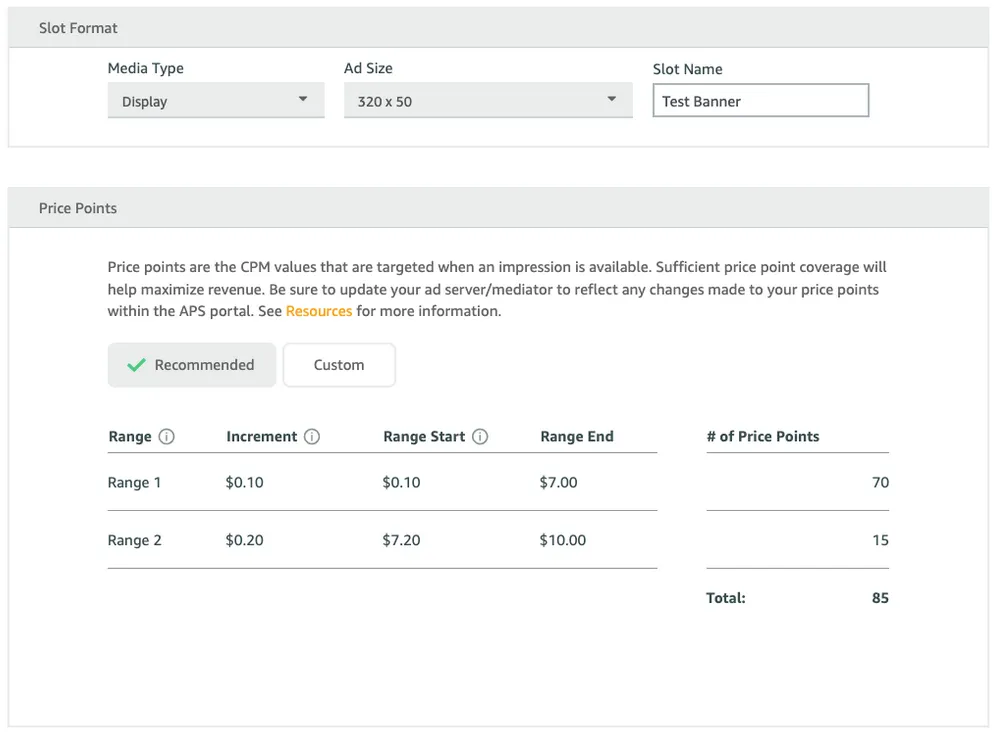
Step 3. Upload Your Price Point Mapping
Amazon shares with you a CSV file that contains price point mapping. Upload that file into the MAX Dashboard on the ad units for which you would like to enable APS:

You only have to do this once. MAX uses the mapping across your entire account. If you update your price points, upload the new file by using the same process. When you do this, AppLovin merges the new file into the existing price points AppLovin has in its system, overriding any existing price points and adding any new price points.
Step 4. Add Amazon Publisher Services entries in your app-ads.txt file
Amazon does not bid on apps that do not have the proper app-ads.txt lines placed in a valid app-ads.txt file.
Visit the app-ads.txt section in your Amazon Publisher Services portal and follow the instructions there to update your app-ads.txt file appropriately.
BidMachine
Step 1. Create a BidMachine Account
To enable BidMachine ad inventory through MAX Mediation platform, you must have an approved monetization account with BidMachine. If you do not have an account, contact BidMachine at hi@bidmachine.io to request an account.
Step 2. Create a Source ID in BidMachine
Ask your BidMachine representative to create the Source ID of your account. They will tell you the Source ID, which you need to enable BidMachine on MAX.
Step 3. Enable BidMachine in Your MAX Account
- When you complete your BidMachine setup, log in to your MAX account and select MAX > Manage > Ad Units.
- Click the MAX ad unit placement on which you want to enable BidMachine.
- Type the BidMachine Source ID values associated with the MAX ad unit you selected.
- Click the Status bar to activate the network.
- Click ✓ Save. This enables BidMachine in the participating networks list for this ad unit.
BIGO Ads
Step 1. Create a BIGO Ads Account
To enable BIGO Ads ad inventory through MAX Mediation platform, you must have a valid account with BIGO Ads. If you do not have an account, sign up at the BIGO Ads Developer Management Platform.
If you already have an account and placements, skip to Step 3 and activate BIGO Ads in your MAX ad units.
Step 2. Create an Application and Placements in BIGO Ads
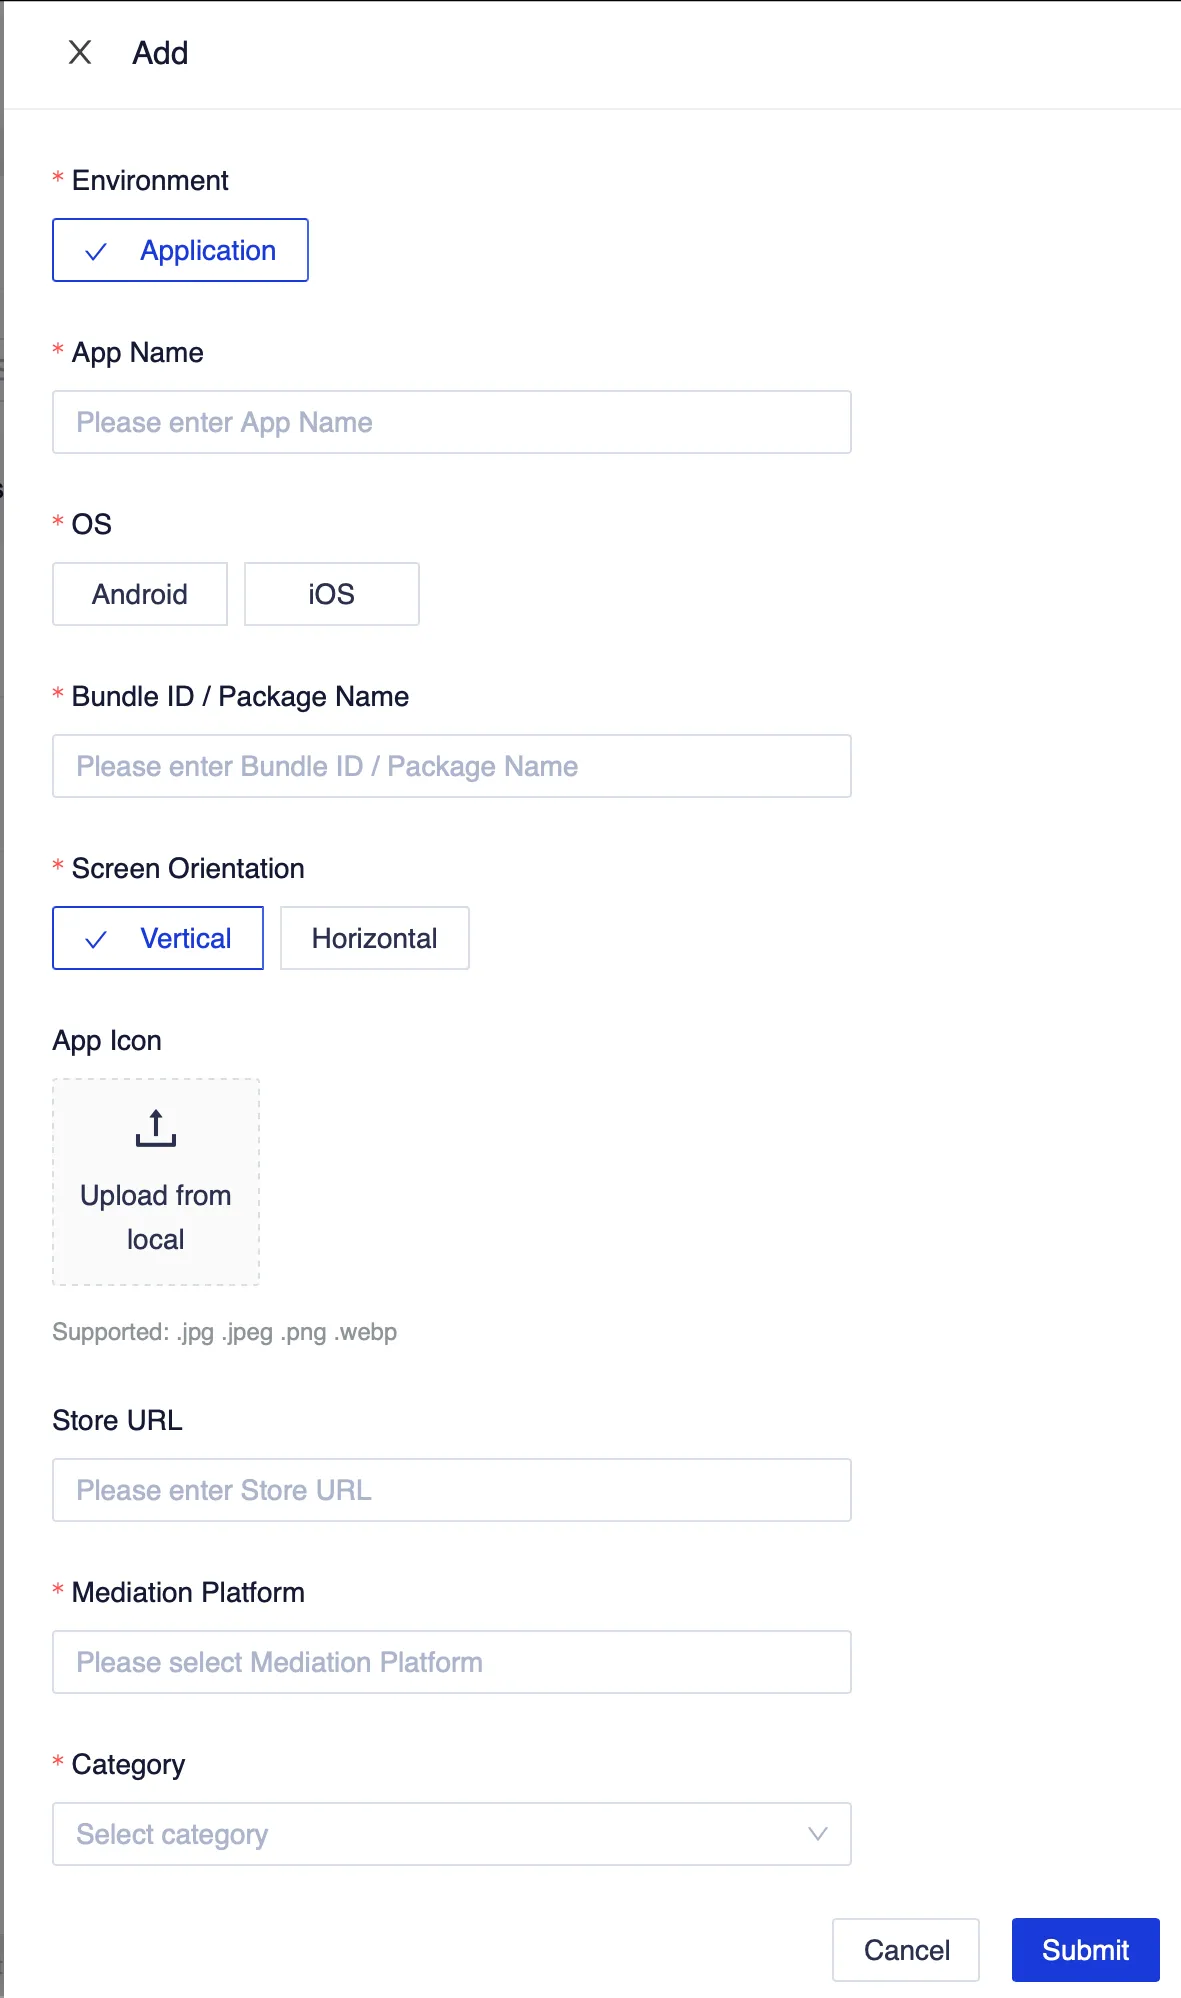
Add Your App
- Log in to the BIGO Ads Developer Management Platform.
- Navigate to Inventory in the top navigation bar. Select Apps and Sites in the left sidebar.
- Click the Add button.

- Fill in your application information, then click Submit.
Create a Placement
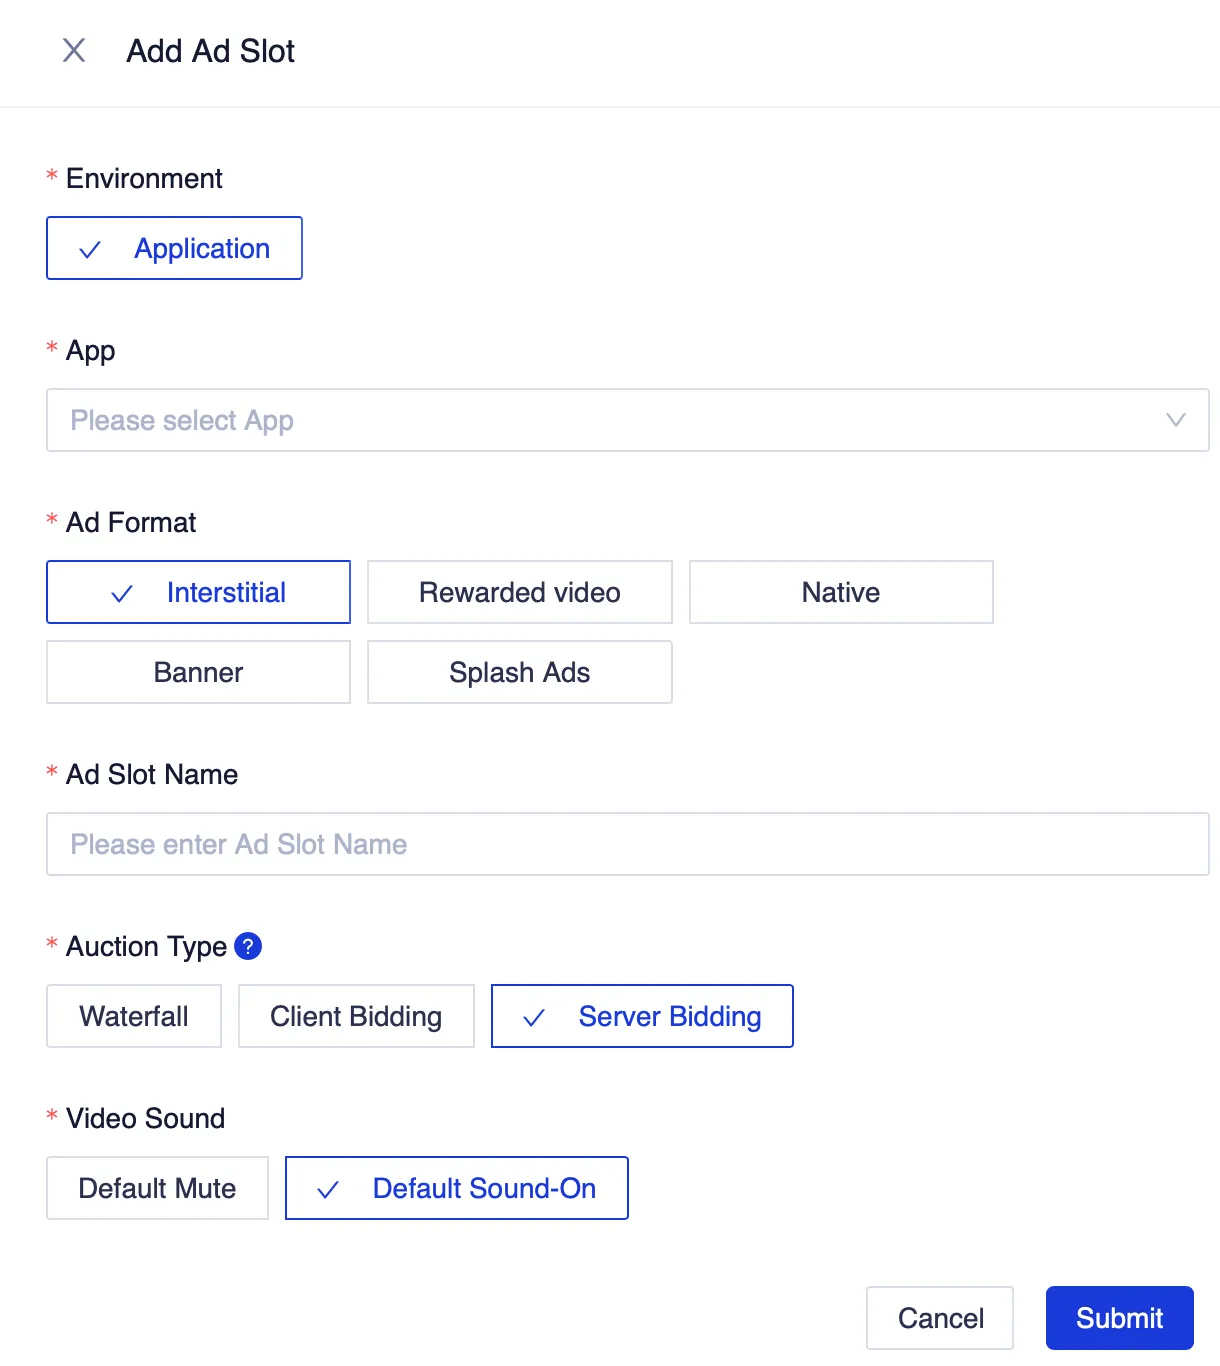
- Navigate to Inventory in the top navigation bar. Select Ad Slots in the left sidebar.
- Click the Add button.

- Select your App and Ad Format.
- Enter your Ad Slot Name.
- Under Auction Type, select Server Bidding.
- Click Submit.
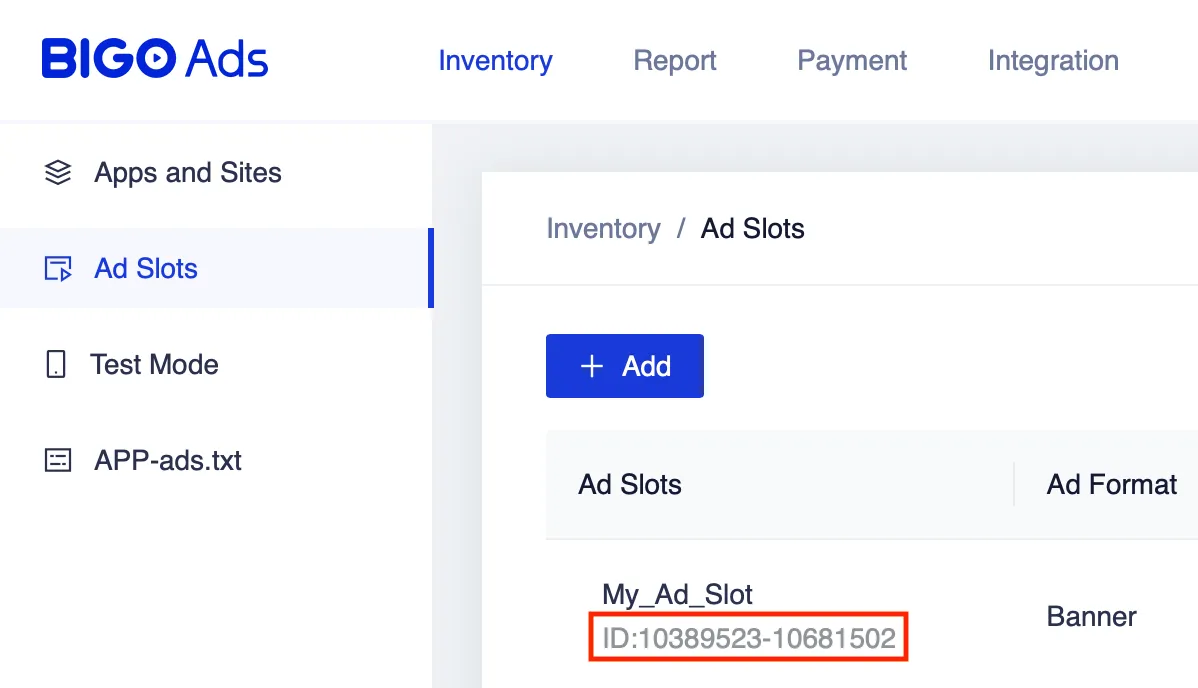
When you create an ad slot, BIGO Ads generates a corresponding ad slot ID. You can find it in the BIGO Ads Developer Management Platform in the Ad Slots section:
Step 3. Enable BIGO Ads in Your MAX Account
- When you have the BIGO Ads ad slot ID(s) you need, log in to your MAX account.
- Select MAX > Manage > Ad Units.
- Click the MAX ad unit placement on which you want to enable BIGO Ads.
- Type the BIGO Ads ad slot ID associated with the MAX ad unit you selected.
- Click the Status bar to activate the network.
- Click ✓ Save. This enables BIGO Ads in the participating networks list for this ad unit.
Digital Turbine (DT) Exchange
Step 1. Create a DT Exchange Account
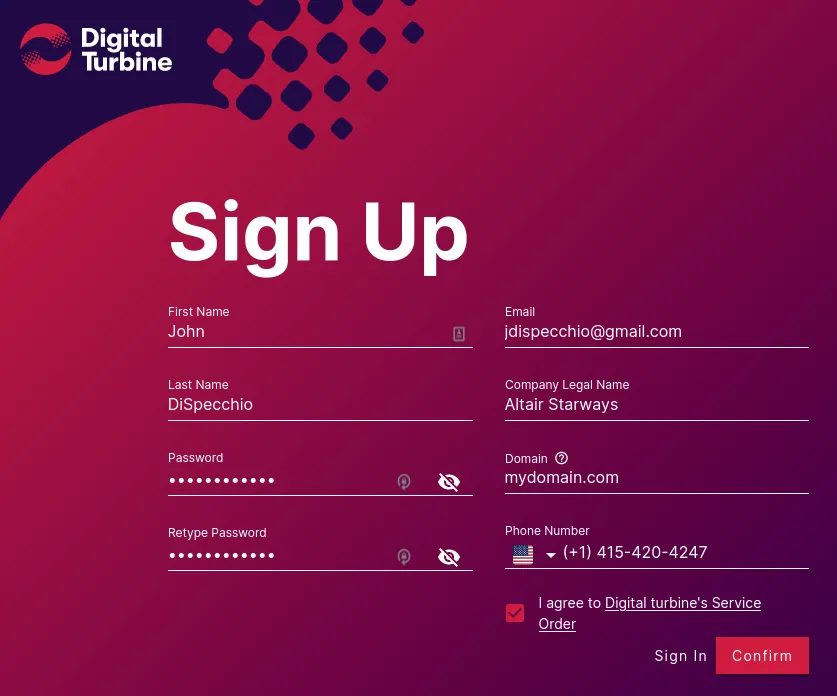
To access DT Exchange ad inventory through MAX Mediation platform, you must have a valid account with DT Exchange. If you do not have an account, sign up for an account at Digital Turbine Console. Enter all the required details and click Confirm.
Make sure to enter your official email address that appears on the app store or your website. After you complete the registration process and DT Exchange processes your information, DT Exchange sends you an official acceptance email.
Step 2. Create an Application in DT Exchange
-
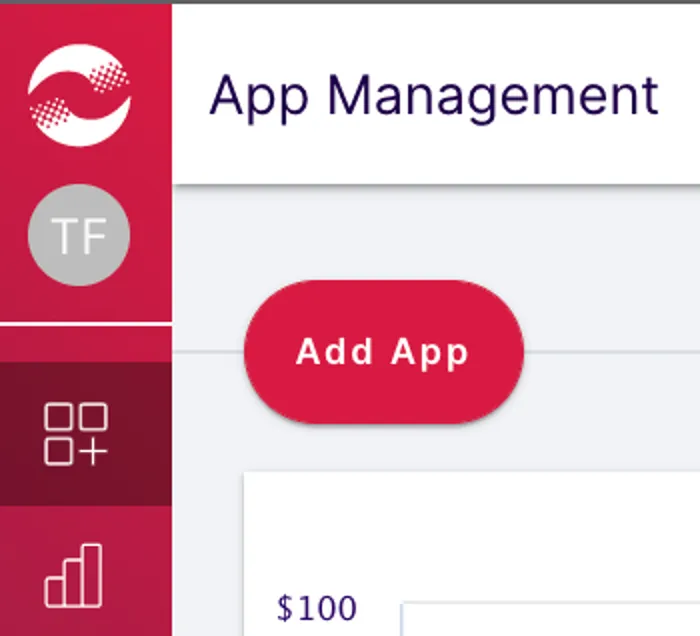
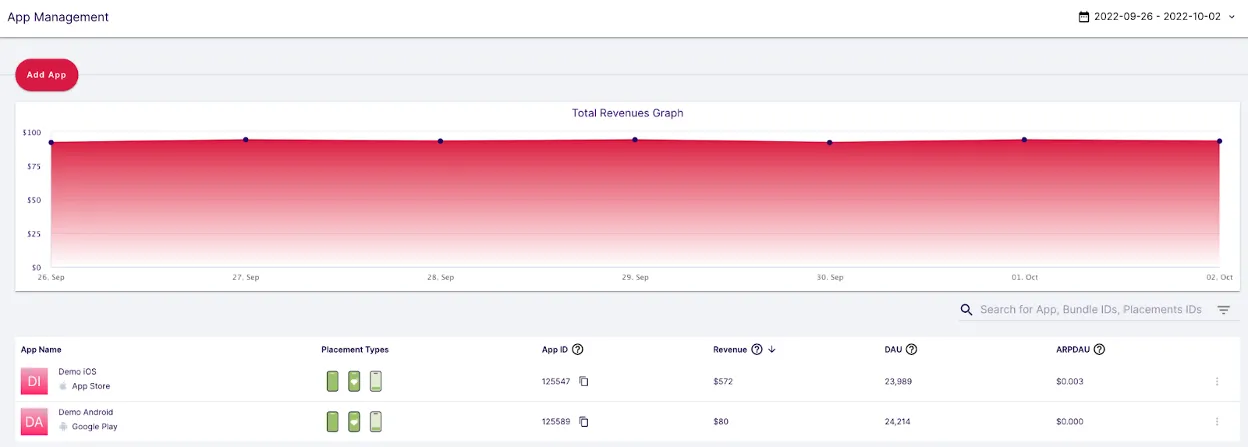
Log in to your DT Exchange account. You are directed to the App Management page.
-
Click ADD APP.
-
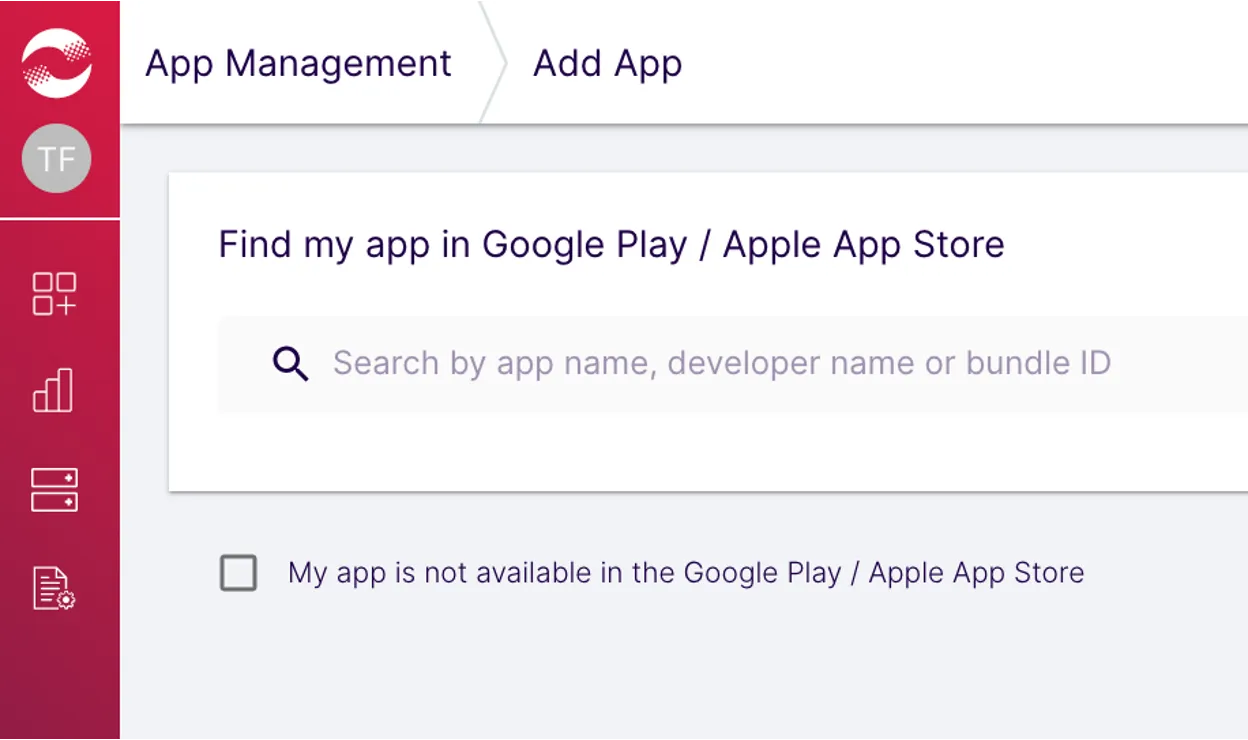
The Add App page appears.
If your app is already published in the app store:
-
Enter one of the following in the search field:
- App Name
- Developer Name
- Bundle ID
As you enter your details, a list of apps appears according to the information you enter. Choose the app you want from the search results.
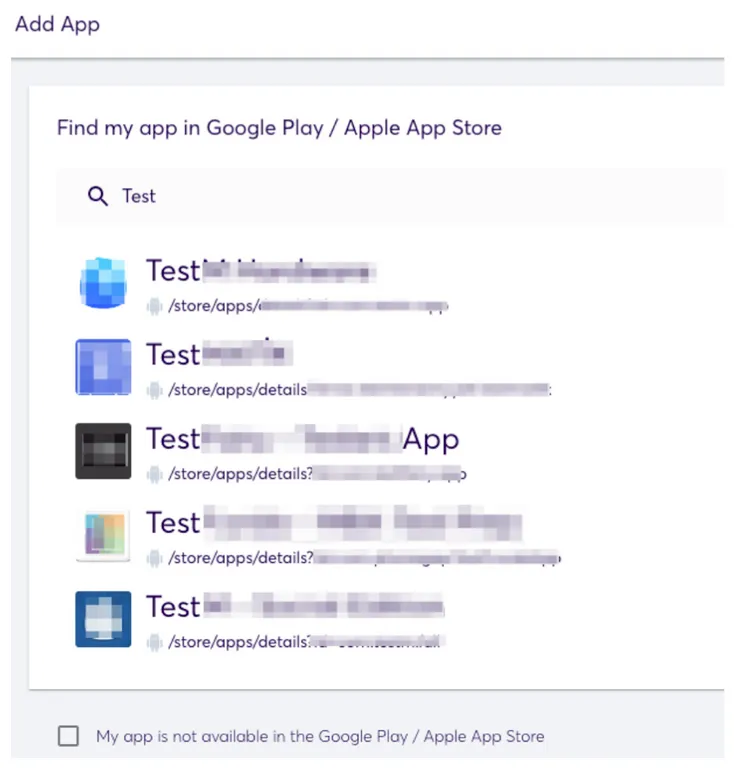
-
If accurate, check the confirmation box confirming that the target audience of your app does not include children and that your app is not likely to be accessed by children if it applies to your app.

If your app is not yet published in the App Store:
- Check My App is Not Available in the Google Play / Apple App Store
- Enter the name of the app.
- Select either the Android or the iOS platform.
- In the Category drop-down select the relevant categories that your app corresponds with.
Advertisers use these categories for targeting purposes.
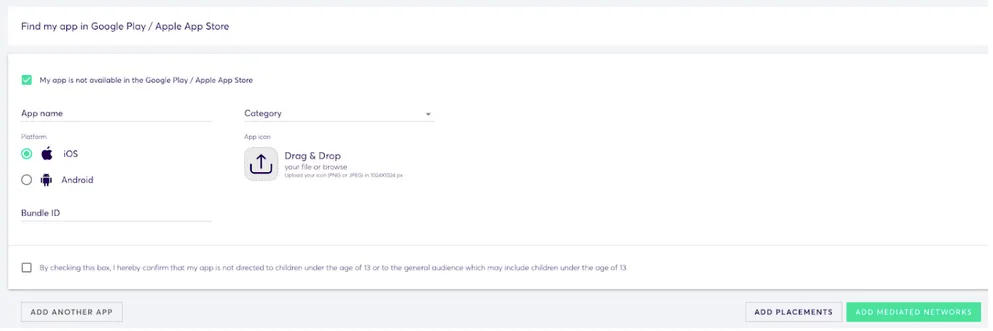
-
Step 3. Create a Placement in DT Exchange
- Click Apps in the left menu.
Choose the app for which you want to create placements.
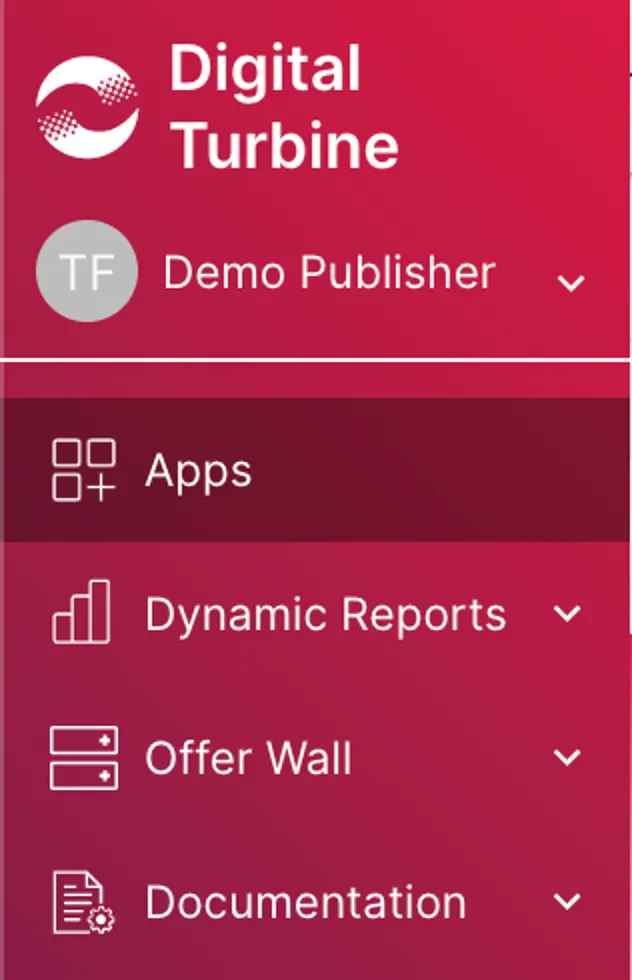
- The Placements tab opens, displaying all created placements.
 Create separate placements for bidding and waterfall ad units:
- Enter a name for the new placement. Choose a name that differentiates between bidding and waterfall ad units.
- From the dropdown list, select the placement type.
- Click Save Placement when you finish.
Repeat this process to add more placements if necessary.
Step 4. Enable DT Exchange in Your MAX Account
- When you have all the DT Exchange ad unit IDs you need, log in to your MAX account and select MAX > Manage > Ad Units.
To retrieve the necessary IDs, take the following steps:
- Click Apps in the left menu. Next to each app in the list you will find its corresponding ID.
- To retrieve a Placement ID, select the app that the placement belongs to in the App Management page. That page displays all created placements. Select Placement setup. The placement ID displays at the top of the page.
- Click the MAX ad unit placement on which you want to enable DT Exchange.
- Type the DT Exchange App ID and the DT Exchange Placement IDs for your bidding instance.
- Click the Status bar to activate the network. Click ✓ Save. This enables DT Exchange in the participating networks list for this ad unit.
Step 1. Create an AdMob Account
To access Google demand as a bidder through the MAX Mediation platform, you must have a valid account with AdMob. If you do not have an account, sign up for AdMob here.
Step 2. Create an Application and Ad Units in AdMob
AppLovin recommends that you create new placement IDs for accurate reporting in MAX.
Add Your App
- Log in to your AdMob account.
- Select Apps.
- You can either search for an existing app, add a new app, or select an existing app to monetize using MAX Mediation.
You must create a unique AdMob application per platform (iOS + Android).
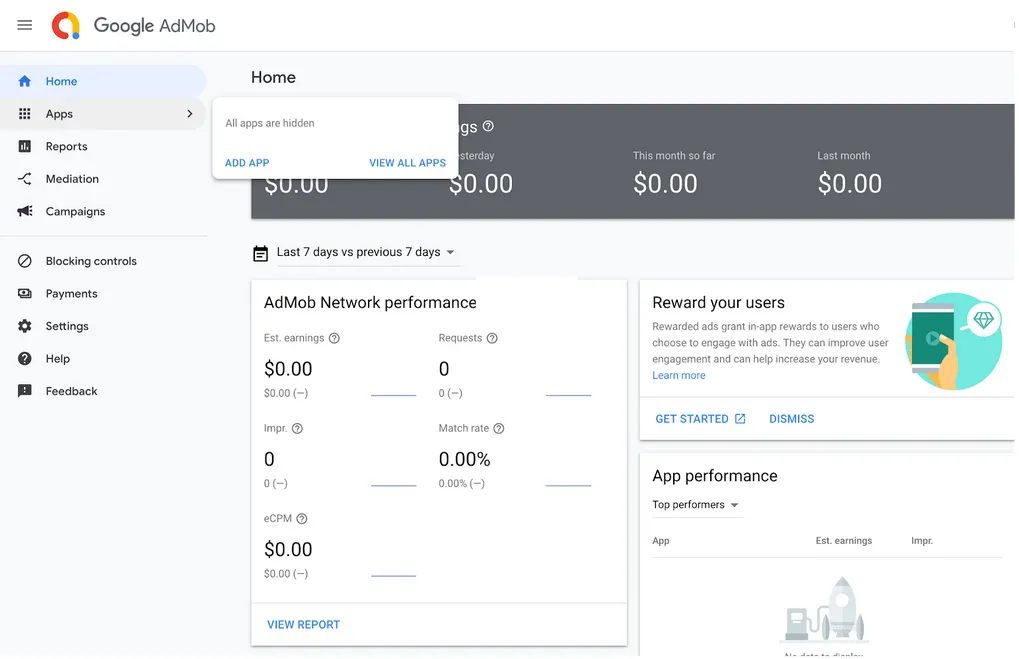
- When you have an app in your AdMob account, you can create ad units for partner bidding. You must activate Partner bidding for an ad unit if you want Google bidding to serve to that ad unit. Advanced settings are excluded from this ad unit type.
Create Ad Units

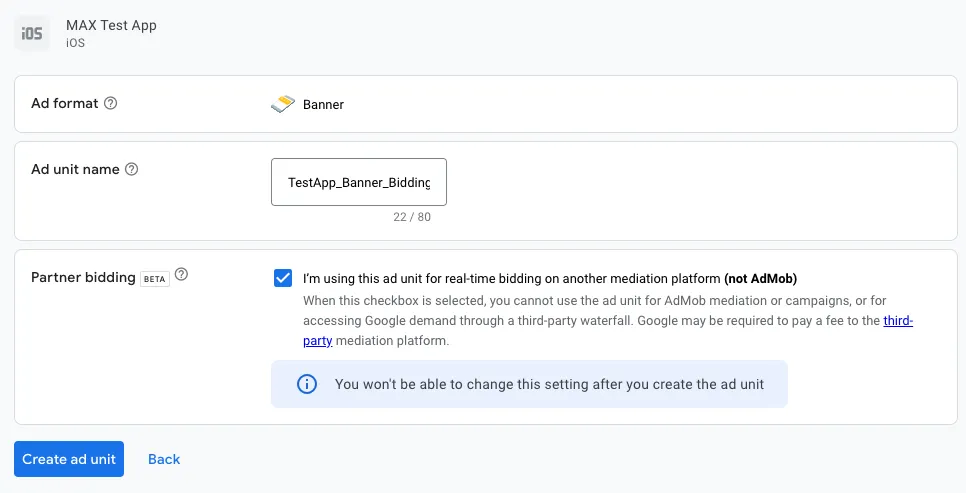
Banner/MREC
- Select the Banner format.
- Enter an Ad Unit Name.
- Check the box in the Partner bidding section. Note that advanced settings are excluded from this ad unit type.
- Click Create Ad Unit.
- Note your AdMob app ID and the Ad Unit ID.
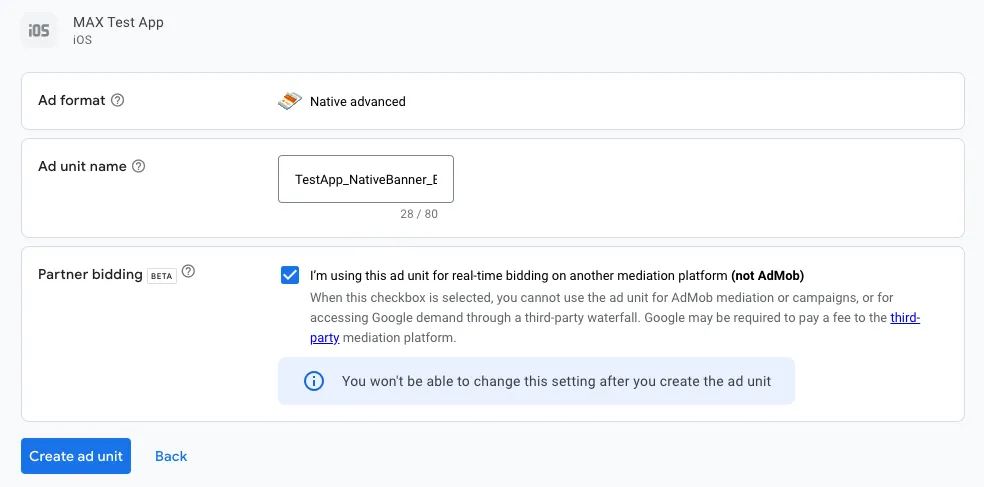
Native
- Select the Native advanced format.
- Enter an Ad Unit Name.
- Check the box in the Partner bidding section. Note that advanced settings are excluded from this ad unit type.
- Click Create Ad Unit.
- Note your AdMob app ID and the Ad Unit ID.
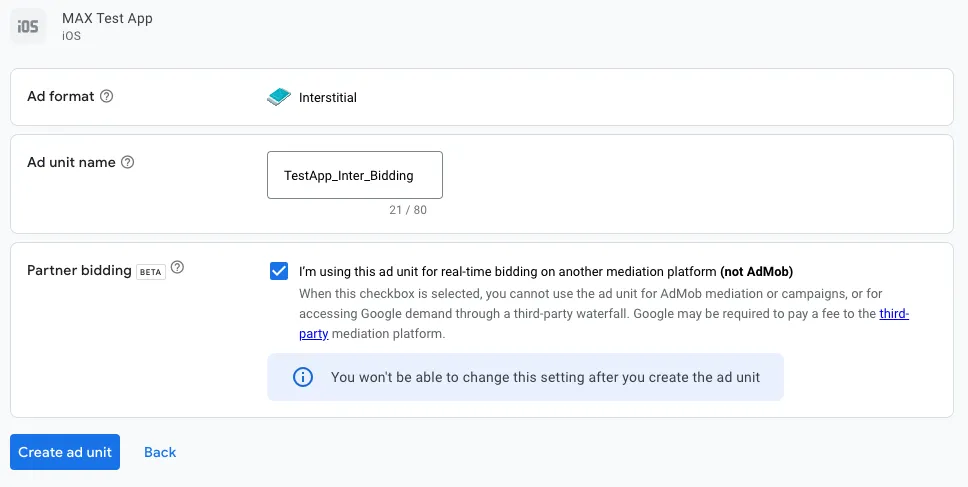
Interstitial
- Select the Interstitial format.
- Enter an Ad Unit Name.
- Check the box in the Partner bidding section. Note that advanced settings are excluded from this ad unit type.
- Click Create Ad Unit.
- Note your AdMob app ID and the Ad Unit ID.
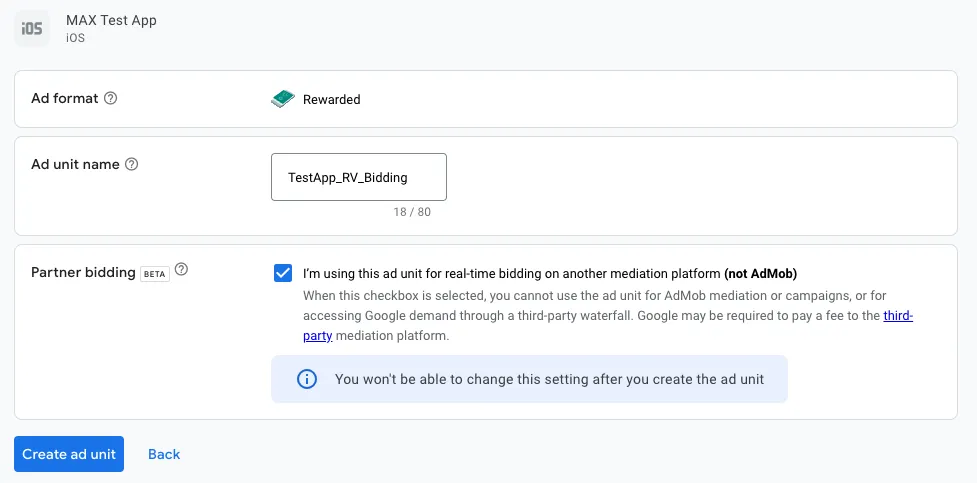
Rewarded Video
- Select the Rewarded format.
- Enter an Ad Unit Name.
- Do not change the default Reward Settings.
- Check the box in the Partner bidding section. Note that advanced settings are excluded from this ad unit type.
- Click Create Ad Unit.
- Note your AdMob app ID and the Ad Unit ID.
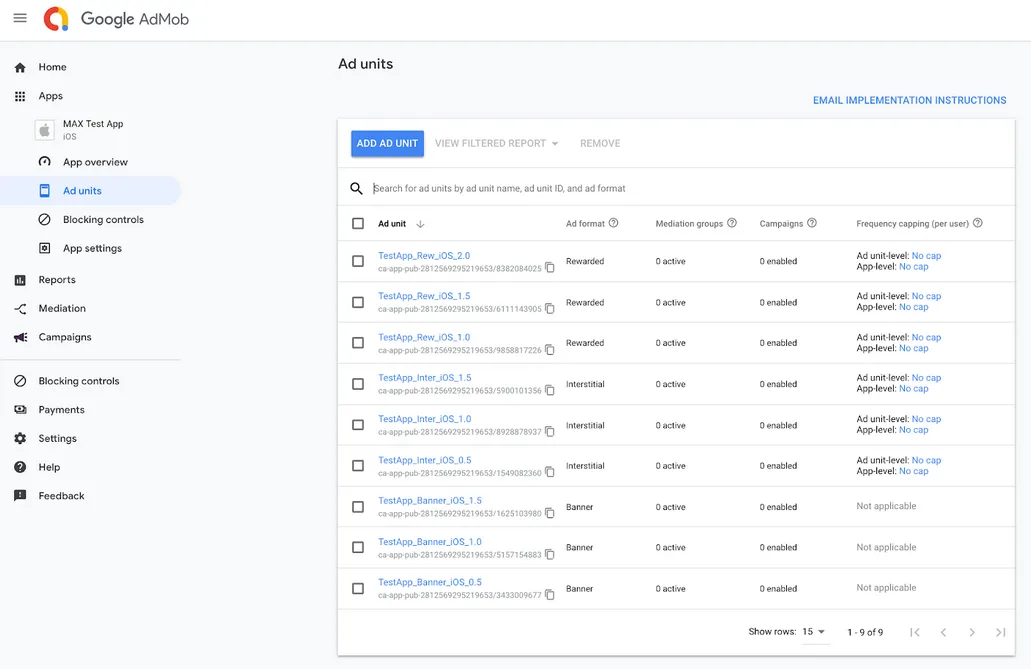
Get Placement IDs
After you create your AdMob ad units, you can get the placement IDs from the Apps > Ad Units section:
Step 3. Enable Google Bidding in Your MAX Account
- When you complete your Google bidding setup, log in to your MAX account.
- Select MAX > Manage > Ad Units.
- Click the MAX ad unit placement on which you want to enable Google bidding.
- Type the AdMob App ID and the Ad Unit ID values associated with the MAX ad unit you selected.
- Click the Status bar to activate the network.
- Click ✓ Save. This enables Google bidding in the participating networks list for this ad unit.
InMobi
Step 1. Create an InMobi Account
To enable InMobi ad inventory through MAX Mediation platform, you must have an approved monetization account with InMobi. If you do not have an account, sign up at the InMobi site.
If you have already created ad units in your InMobi monetization dashboard, skip to Step 3 and activate InMobi in your MAX ad units.
Step 2. Create an Application and Placements in InMobi
To start monetizing your app with InMobi, add your app in the InMobi monetization dashboard.
- Log in to the dashboard.
- Select Inventory > Inventory Settings > Add Inventory.

- In the Enter App details field, type the store URL for your application.
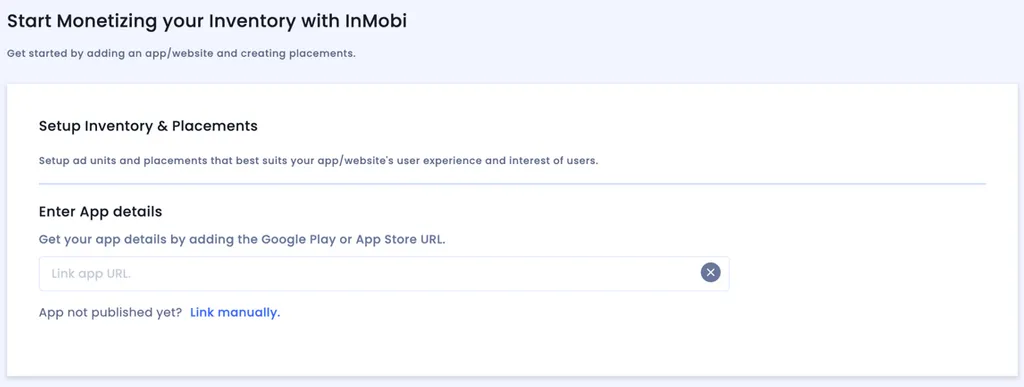
- To enable InMobi as a mediated network, create InMobi placement IDs:
- Select your app and click + Add a placement.
- Select which ad format you desire.
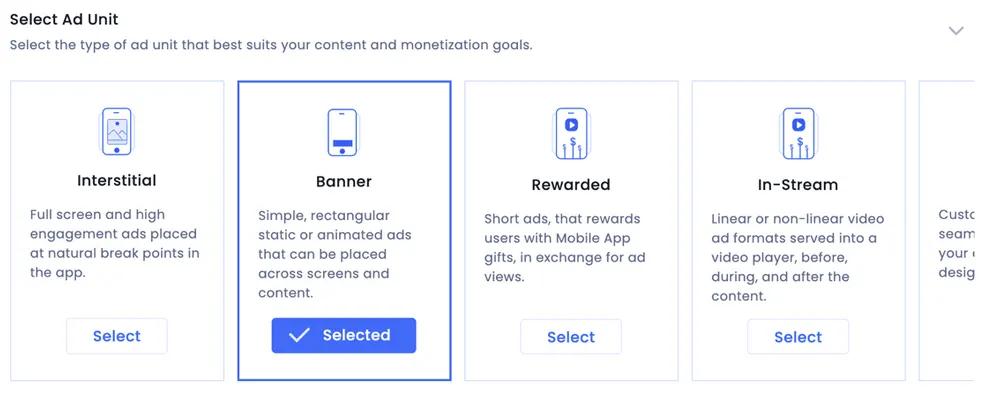
- Enter the placement details.
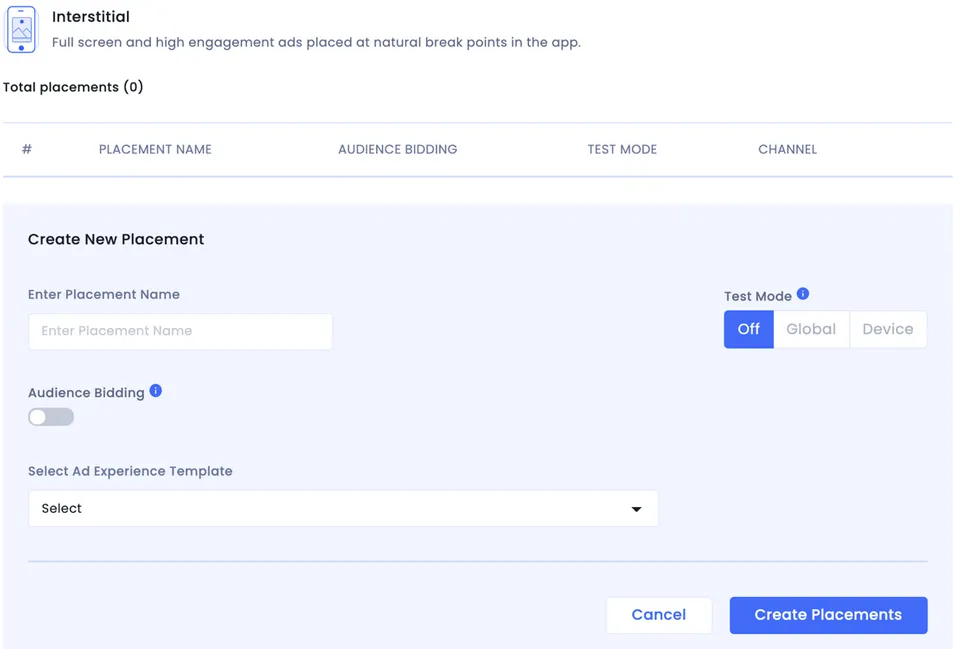
- Click Create Placements to save the placement. Note the placement ID. You will use it when you enable InMobi in your MAX ad unit.
To enable InMobi Bidding, contact your InMobi account team about how to create a placement.
To enable InMobi in MAX Mediation, you need your InMobi Account ID and the placement IDs associated with your app. You can find your Account ID by selecting Finance > Payment Settings in the left navigation menu of your InMobi dashboard, and then selecting Payment Information:

If you want to create placement IDs with with set price floors, contact your InMobi account team for instructions.
Make sure to set up your payment details in the Payment Settings section of the InMobi monetization dashboard. You must set up your payment details in order to start monetizing with InMobi.
Step 3. Enable InMobi in Your MAX Account
- When you complete your InMobi setup, log in to your MAX account.
- Select MAX > Manage > Ad Units.
- Click the MAX ad unit placement on which you want to enable InMobi.
- Type the InMobi Account ID and the Placement ID values associated with the MAX ad unit you selected.
- Click the Status bar to activate the network.
- Click ✓ Save. This enables InMobi in the participating networks list for this ad unit.
ironSource Ads
Step 1. Create an ironSource Account
To enable ironSource Ads ad inventory through the MAX Mediation platform, you must have an approved account with ironSource. If you do not have an account, sign up at the ironSource site.
If you already have an account, skip this step.
Step 2. Create an Application in ironSource
Add Your App
To start monetizing your app with ironSource Ads, add your app on the ironSource Ads dashboard.
-
Log in to your ironSource Ads account.
-
In the navigation bar on the left side of the page, select iS Ads. Click Apps.
-
The Apps page appears. Click Add app.
-
If your app is live in the App Store or on Google Play, enter your app’s URL. Click Import App Info. Your app’s name and category should appear automatically. If any field is incomplete, fill it manually.
If your app is not live yet, enter a temporary app name and update its information later from the Apps page.
Click Add App.
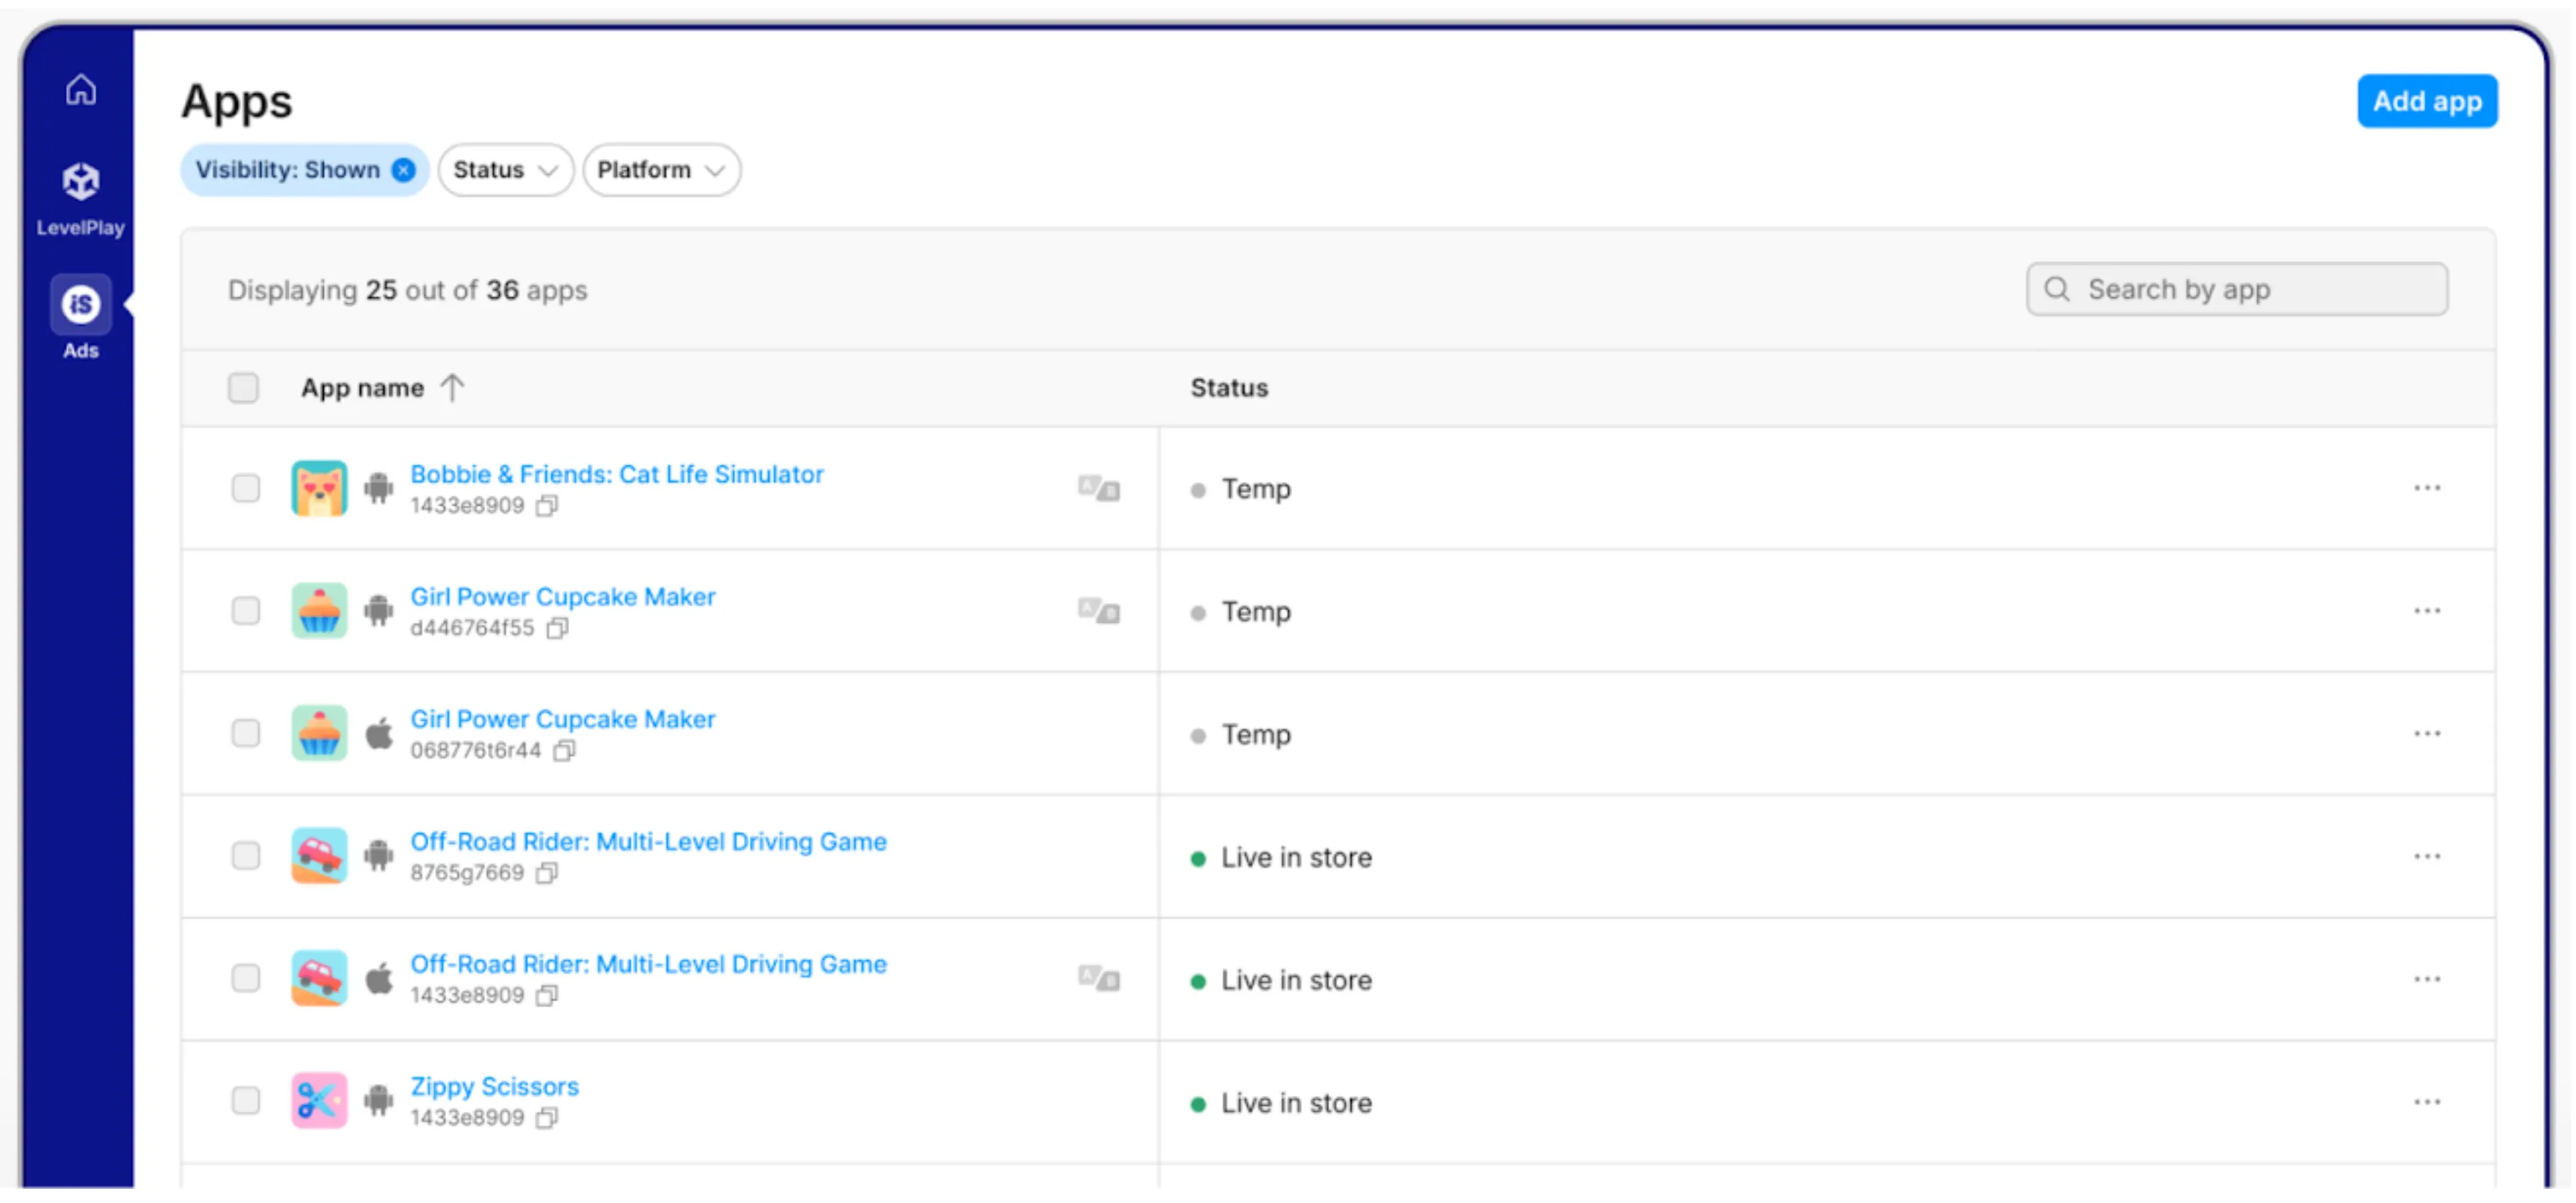
When you create your app this way, ironSource generates an app key. You can see this key below the name of your app on the Apps page. You need this key in step #3 below.
Set Up Your App
There are two ways you can set up your new app:
- New Setup
- You can begin with an empty configuration and configure everything about your app. This also means you must create instances for each price point. To do this, under Setup Configurations, select New Setup.
- Duplicate Setup from Another Application
- You can also clone your COPPA, CCPA, and ad unit settings (including placements and capping) from an existing app. To do so, select Duplicate setup from another application and then select the app you want to duplicate from the Application dropdown menu.
Select COPPA and CCPA Settings
- Indicate whether your app is directed to children by selecting the appropriate option under COPPA.
- Decide how you want to comply with CCPA.
- Click Add App.
ironSource Ads Instances
After you add your app, ironSource Ads bidding instances automatically appear in the Instances page. Be sure to activate the instances.
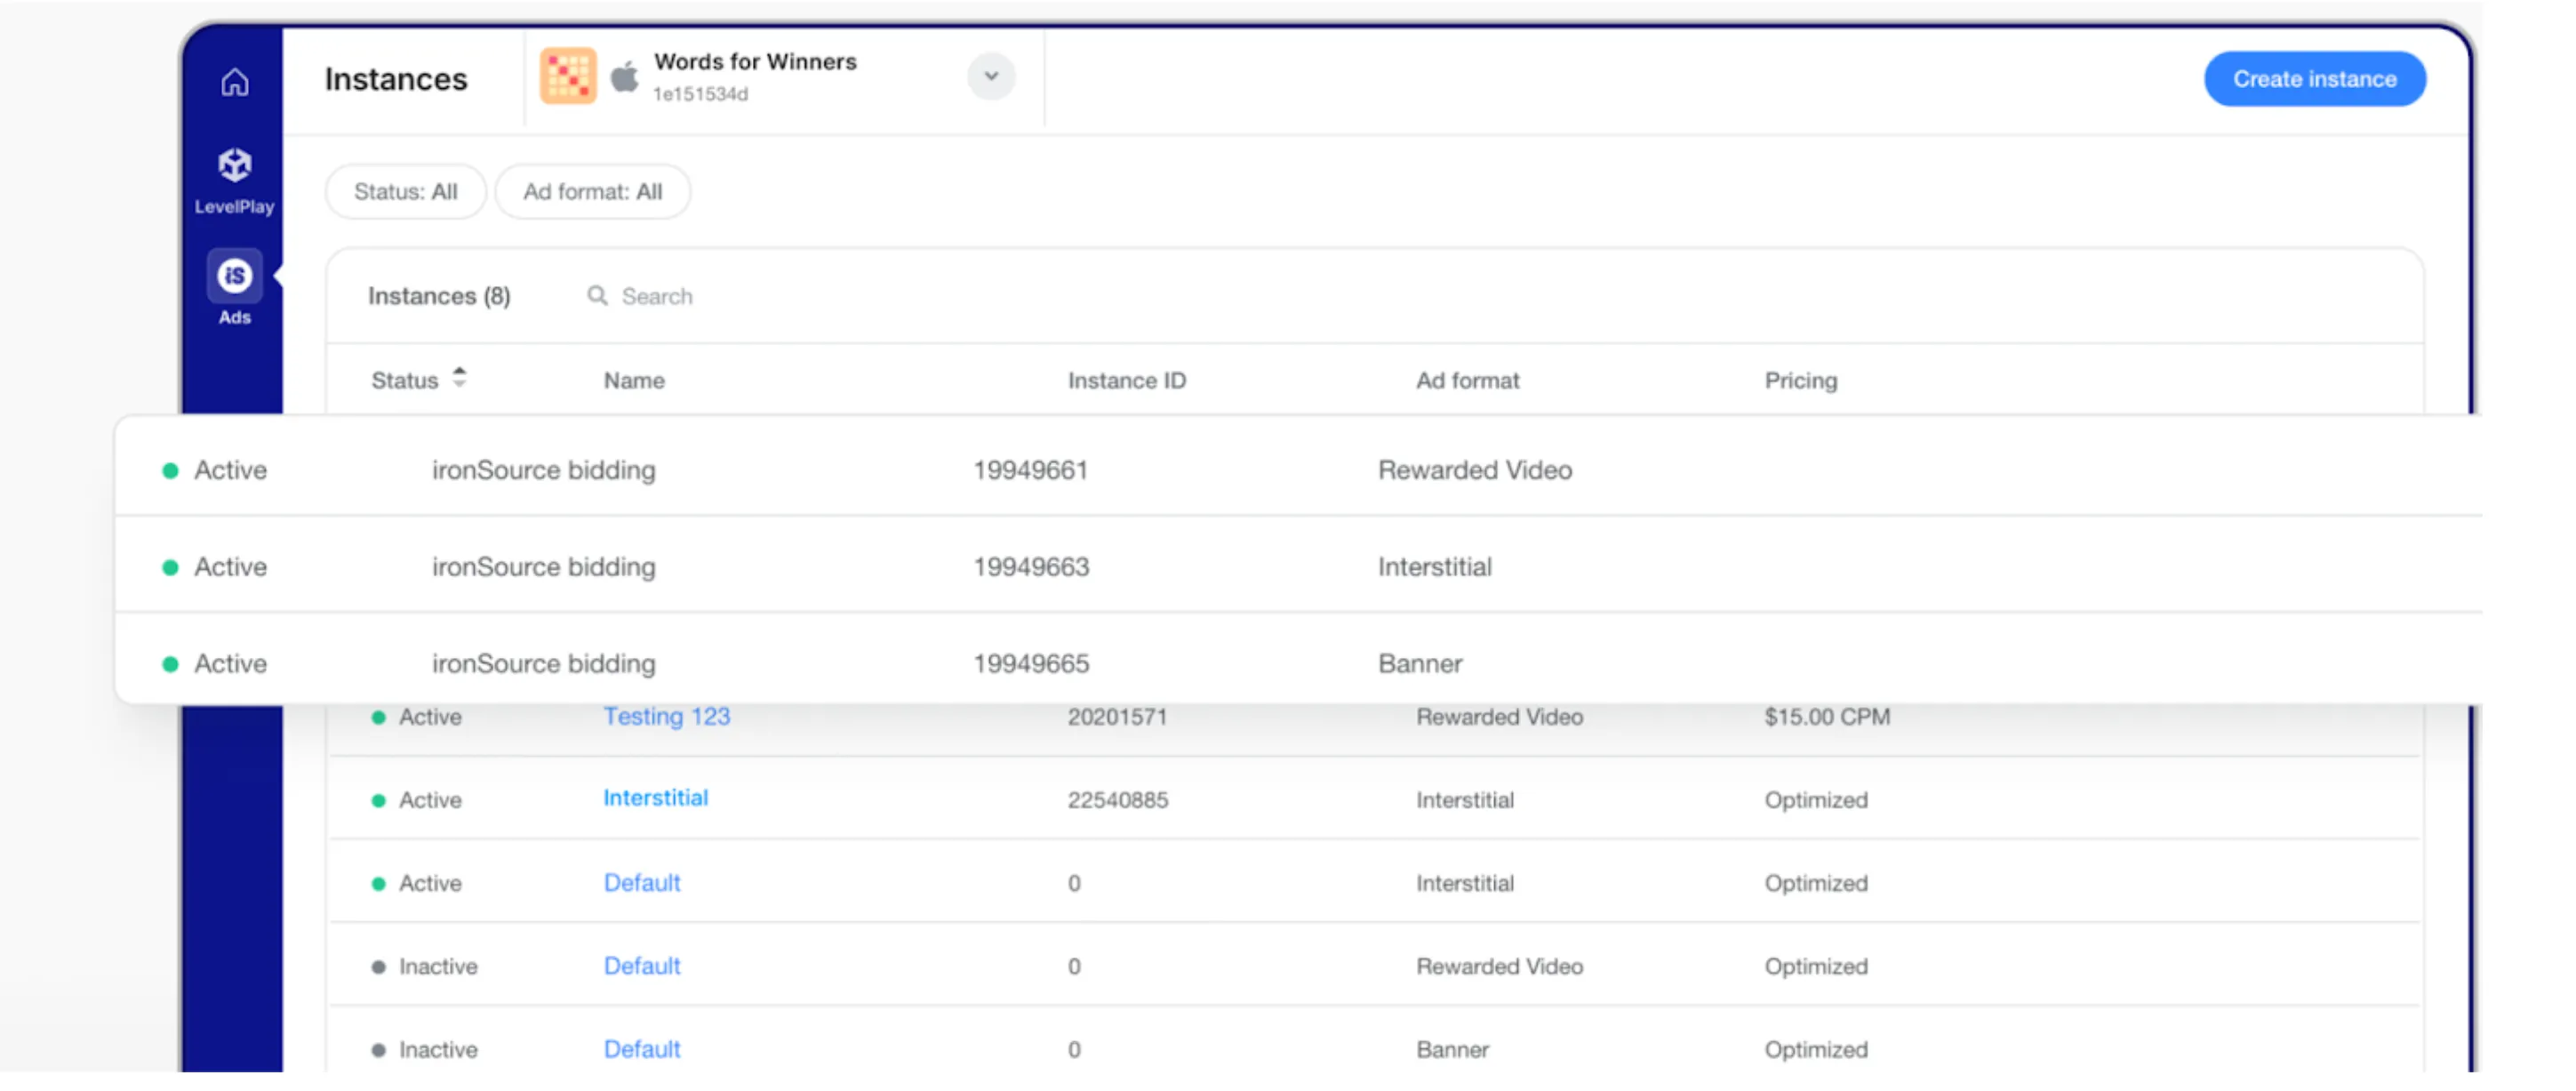
Step 3. Enable ironSource Ads in Your MAX Account
- When you have the ironSource app key and instance ID values, log in to your MAX account.
- Select MAX > Manage > Ad Units.
- Click the MAX ad unit placement on which you want to enable ironSource Ads.
- Click the Status bar to activate the network. This enables ironSource in the participating networks list for this ad unit.
- Type the ironSource app key and instance ID values associated with the MAX ad unit you selected in the Placement Name section.
- Click ✓ Save.
Liftoff Monetize
Step 1. Create a Liftoff Account
To enable Liftoff Monetize ad inventory through MAX Mediation platform, you must have an approved account with Liftoff. If you do not have an account, sign up at the Liftoff site.
If you already have a Liftoff account, skip to Step 3 and activate Liftoff Monetize in your MAX ad units. AppLovin recommends that you create new placement IDs, as this improves the accuracy of what MAX reports.
Step 2. Create an Application and Placements in Liftoff Monetize
Add Your App
If you already created an app, skip to the Create a Placement section and create placement IDs for your MAX integration.
- Log in to your Liftoff account.
- Click Add Application.
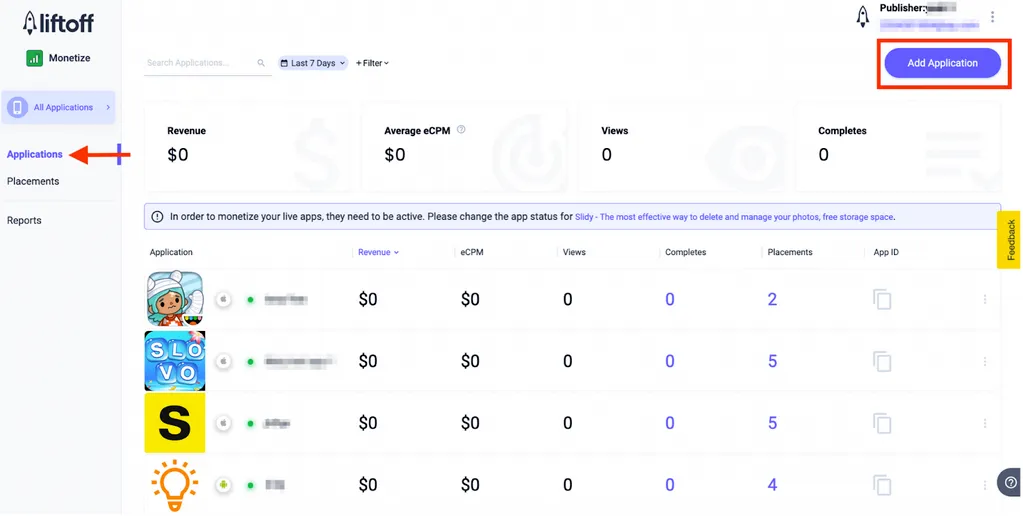
- Fill in your App Settings:
- App Store: choose iOS or Android
- Custom App Name: Type the name of your application.
- App Store/Connect Your Live App: Choose “My app is live in the Apple App Store” if the app is live, and then select your app by using the search field. If your app is not live yet, choose “My app is not live yet” instead.
- COPPA Compliance: Check the box if your app is directed to children under 13.
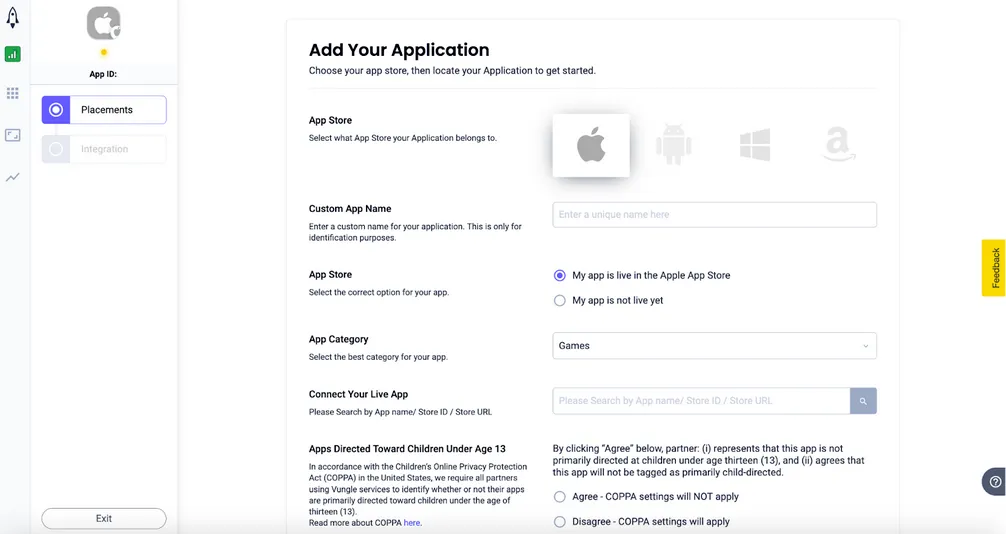
- Click Continue.
Create a Placement
After you finish creating your new app, you can create a new placement.
- Select whichever app in the application list you want to create a placement for, then click Add Placement.
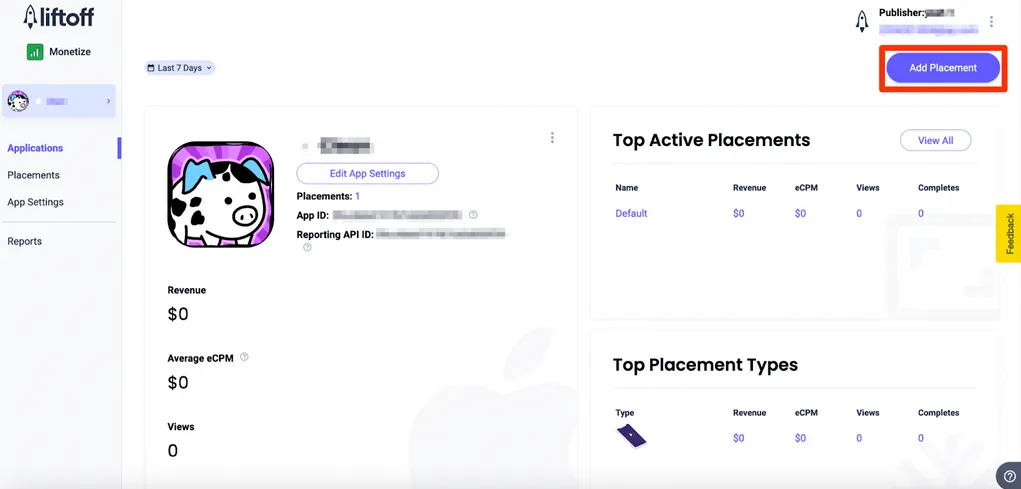
- Fill in the necessary details to create a Liftoff Monetize placement:
- Placements: Choose Banner, Interstitial, or Rewarded depending on which ad format you want to enable through MAX Mediation.
- Placement Name: Type a name for the placement.
- Ad Refresh (Banner): Disable this if it is not already disabled.
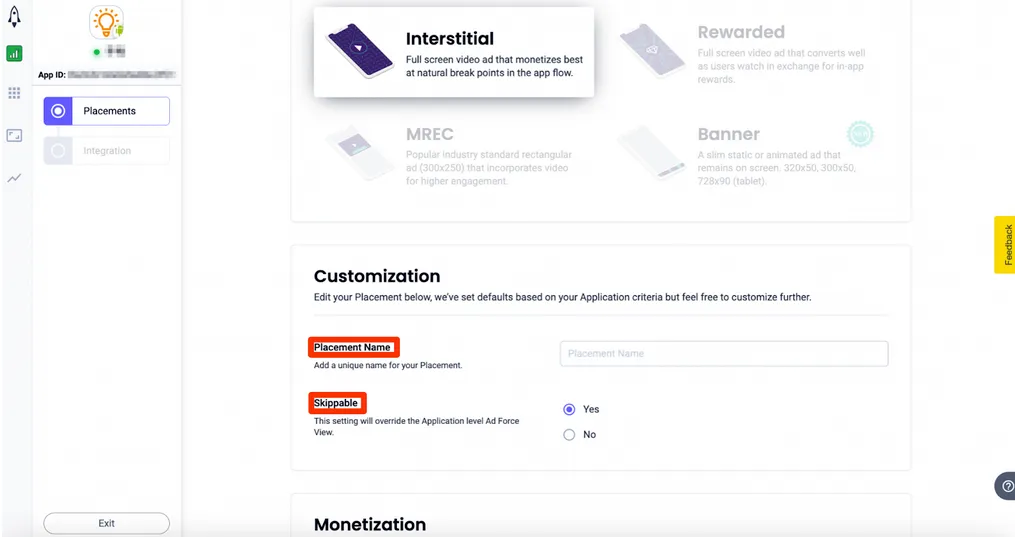
- To enable bidding, toggle the In-App Bidding button in the Monetization section.
- Click Continue and make note of the Placement Reference ID.
You will use it in Step 3 to enable this placement on MAX.
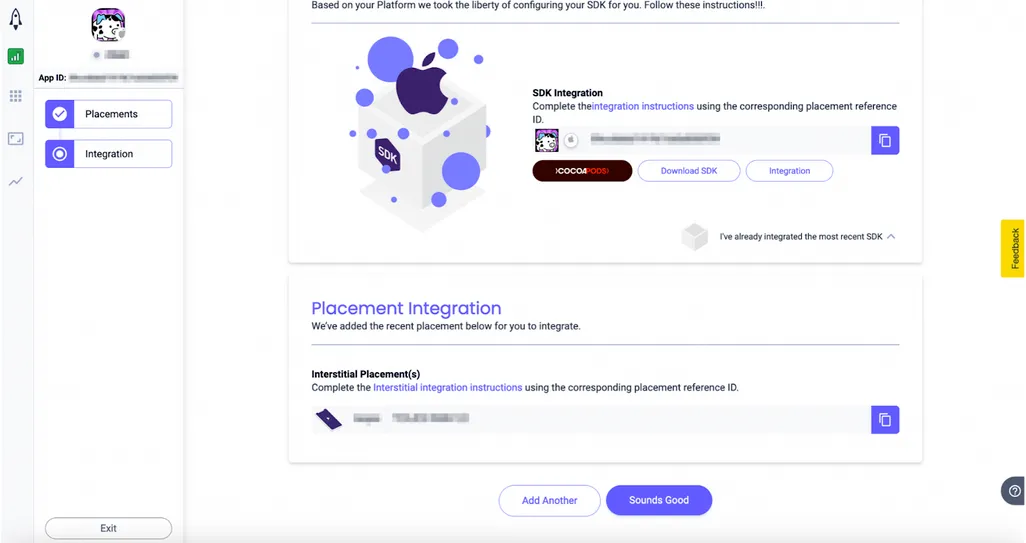 Liftoff Monetize also generates a Reference ID after you submit your ad.
You can view this ID on the details page.
The Reference ID is based on the Placement name you supply, and you cannot alter it.
In order to integrate the Liftoff Monetize SDK with placements, you must include the Reference ID in your application.
Step 3. Enable Liftoff Monetize in Your MAX Account
- When you have the Liftoff Reference ID you need, log in to your MAX account.
- Select MAX > Manage > Ad Units.
- Click the MAX ad unit placement on which you want to enable Liftoff Monetize.
- Type the Liftoff Reference ID value associated with the MAX ad unit you selected.
- Click the Status bar to activate the network.
- Click ✓ Save. This enables Liftoff Monetize in the participating networks list for this ad unit.
Meta Audience Network
Step 1. Create a Meta for Developers Account
To access Meta Audience Network ad inventory through MAX Mediation platform, you must have a valid Meta for Developers account. Sign up for a Meta for Developers account at the Meta For Developers site and review the About Audience Network guide.
If you already have a Monetization Manager account, skip to Step 3 and activate Meta Audience Network in your MAX ad units. AppLovin recommends that you create new placement IDs, as this improves the accuracy of what MAX reports.
After you register, sign into your Meta for Developers Monitization Manager account and create a new business or choose an existing one. To create a new business go to Monetization Manager.
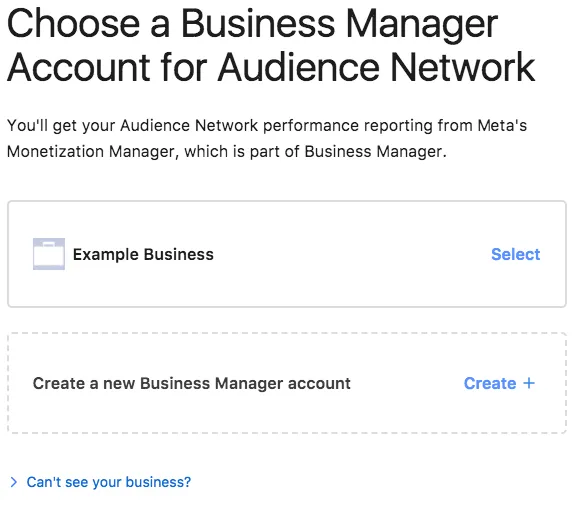
Step 2. Create an Application and Ad Units in the Monetization Manager
After you create your business, create a property for each app you created. If your app has multiple versions, for different operating systems (Android, iOS), you can group these versions together into a single property. This consolidates reporting and management.
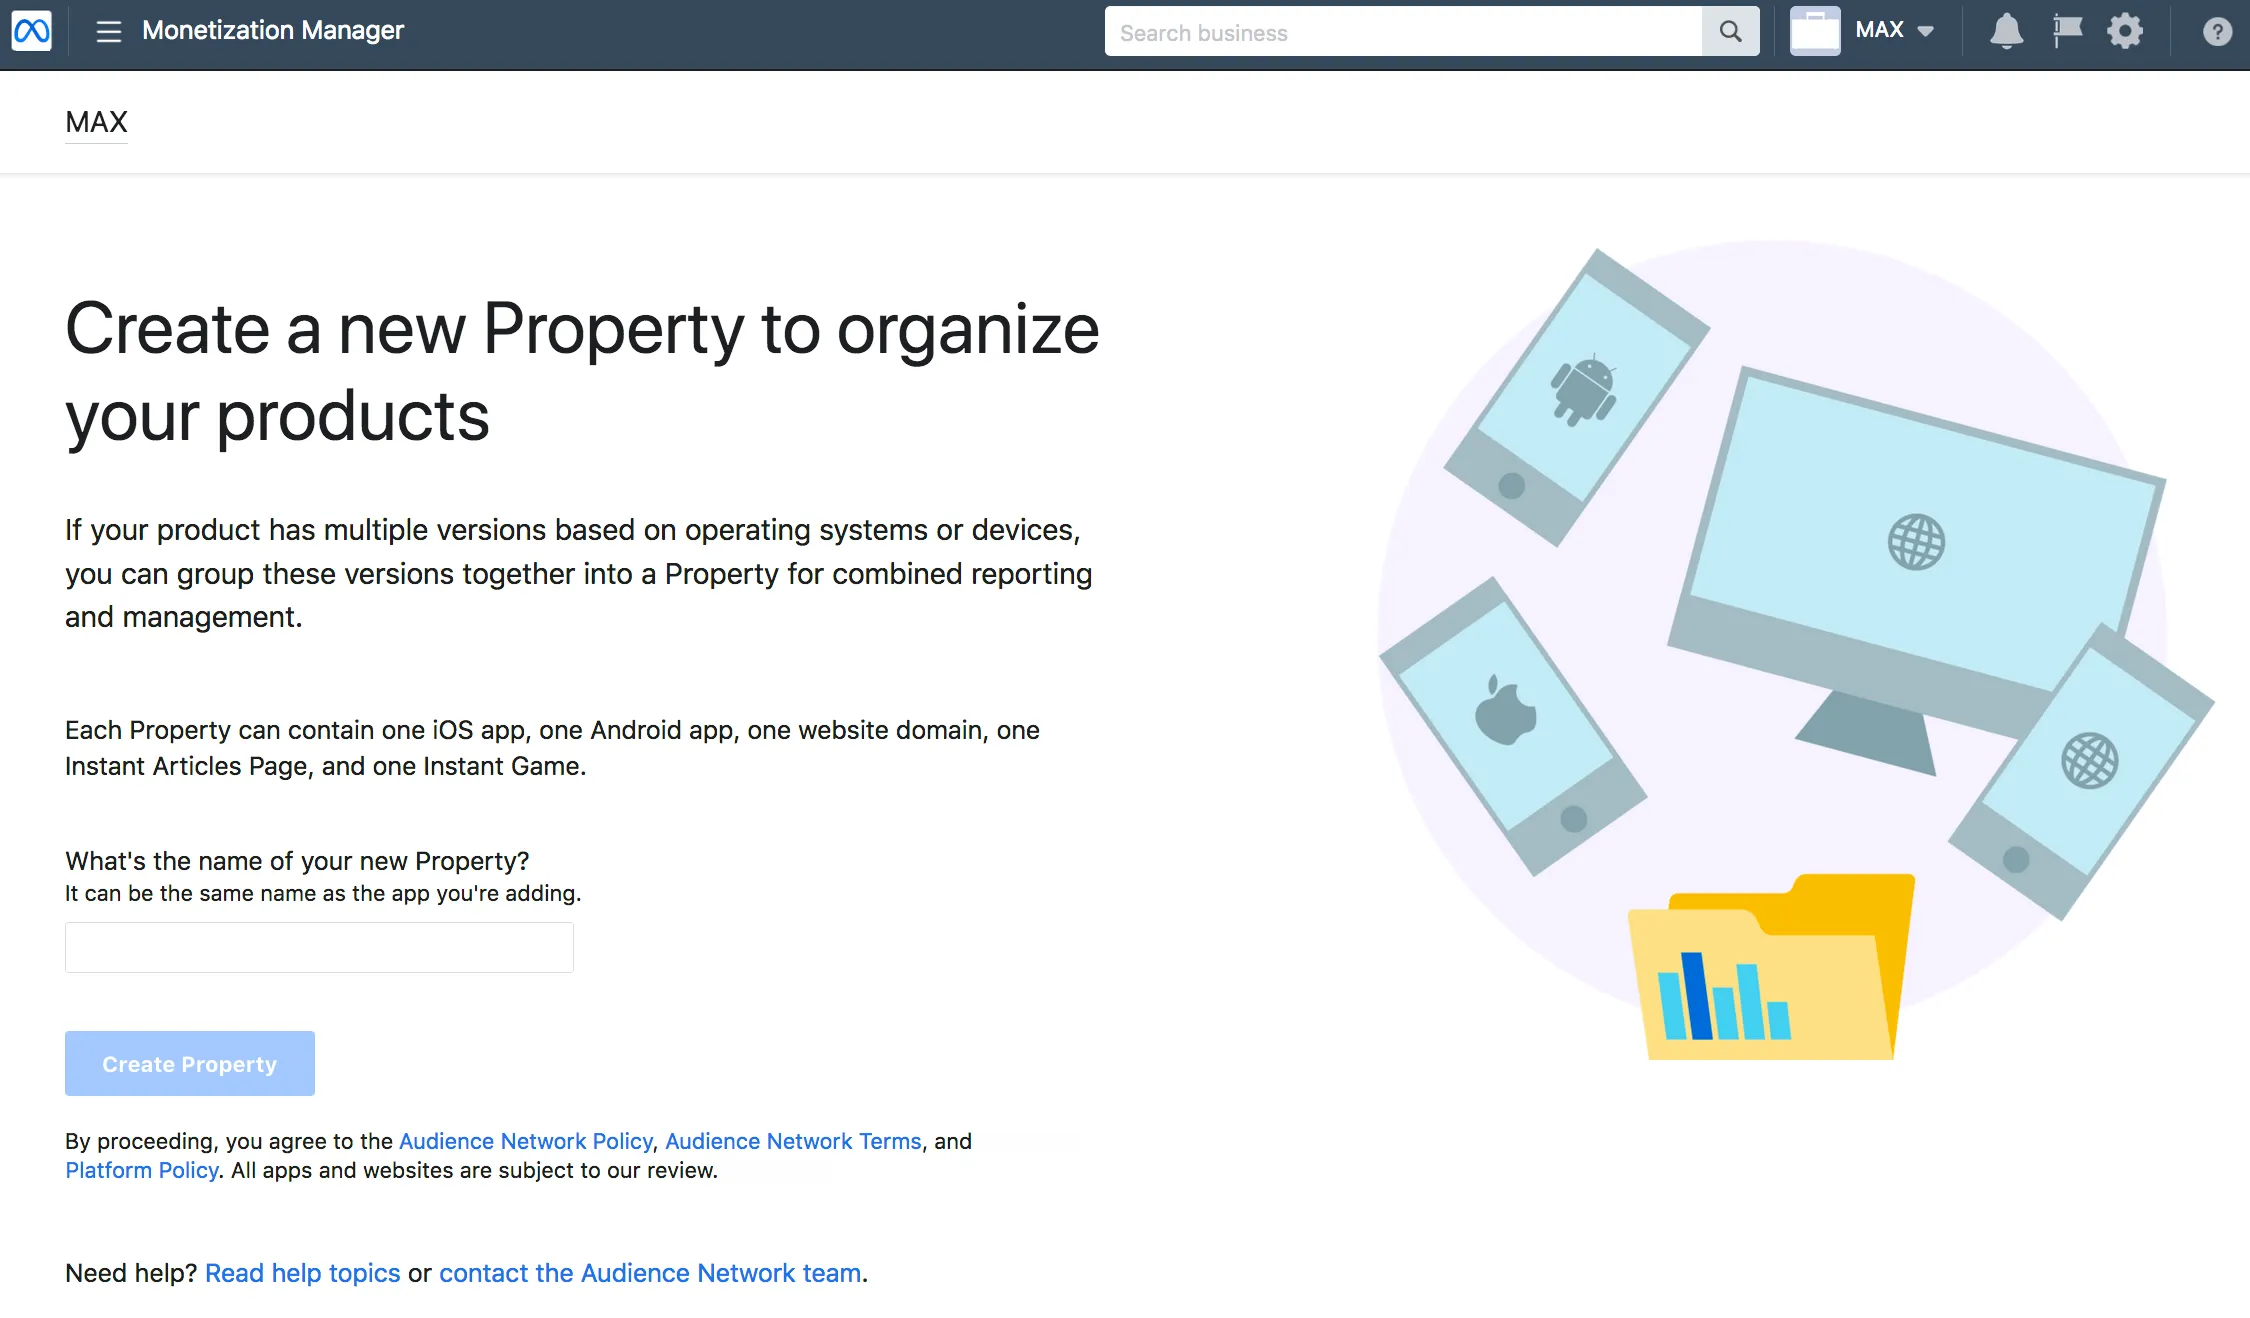
Choose Your Platform and Display Format
After you create your property, add the platform you want to monetize. Within a property you can have up to four Ad Spaces per platform. You can add ad placements to each Ad Space.
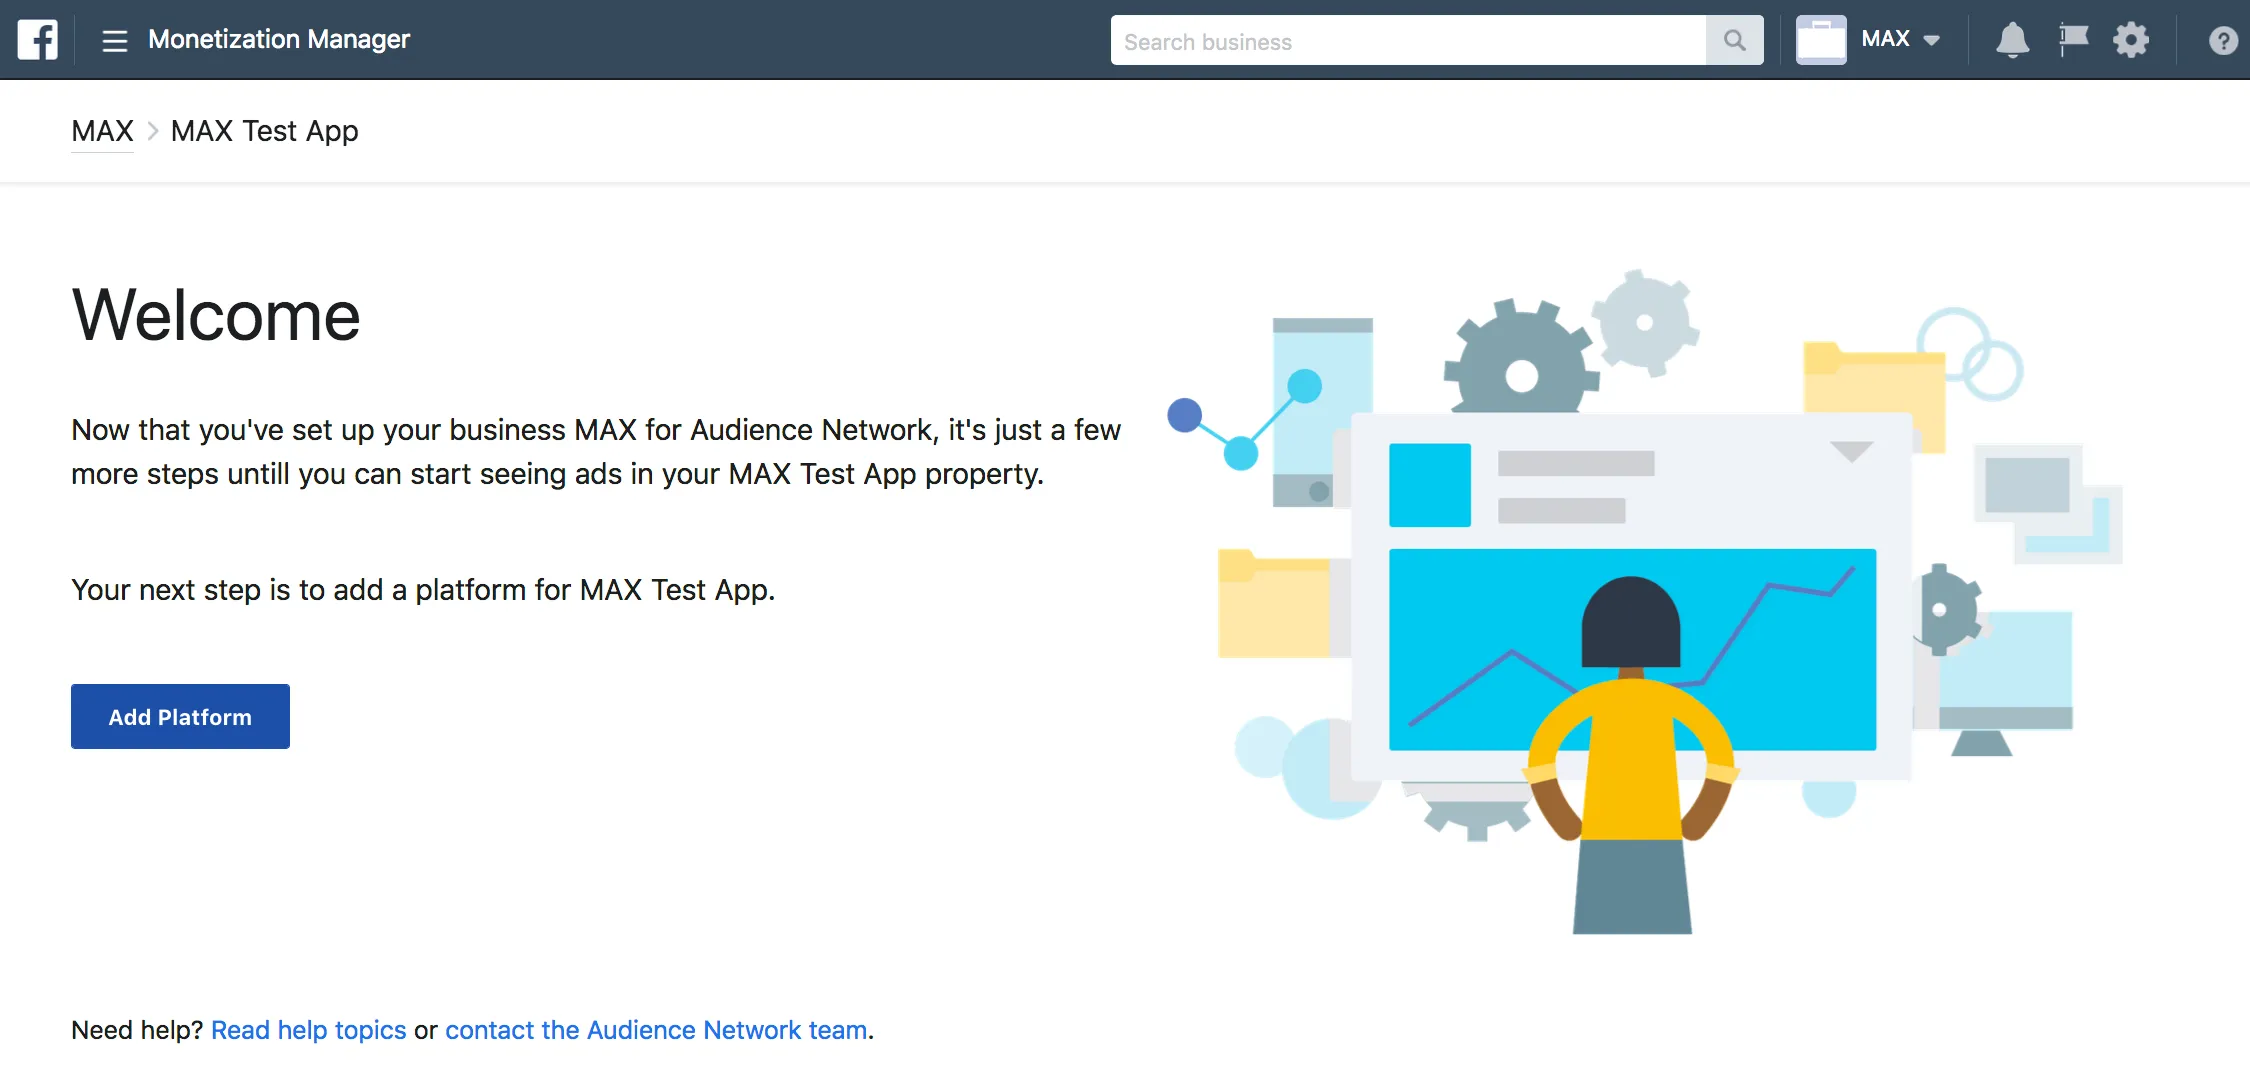
![Monetization Manager. Platforms. Platforms are the various types of products and surfaces [sic.] you can monetize with Audience Network. Add the platform you want to monetize. iOS app / Android app / Website / Instant Articles.](/_astro/meta-04.CRqj5WXs_nzNrn.webp)
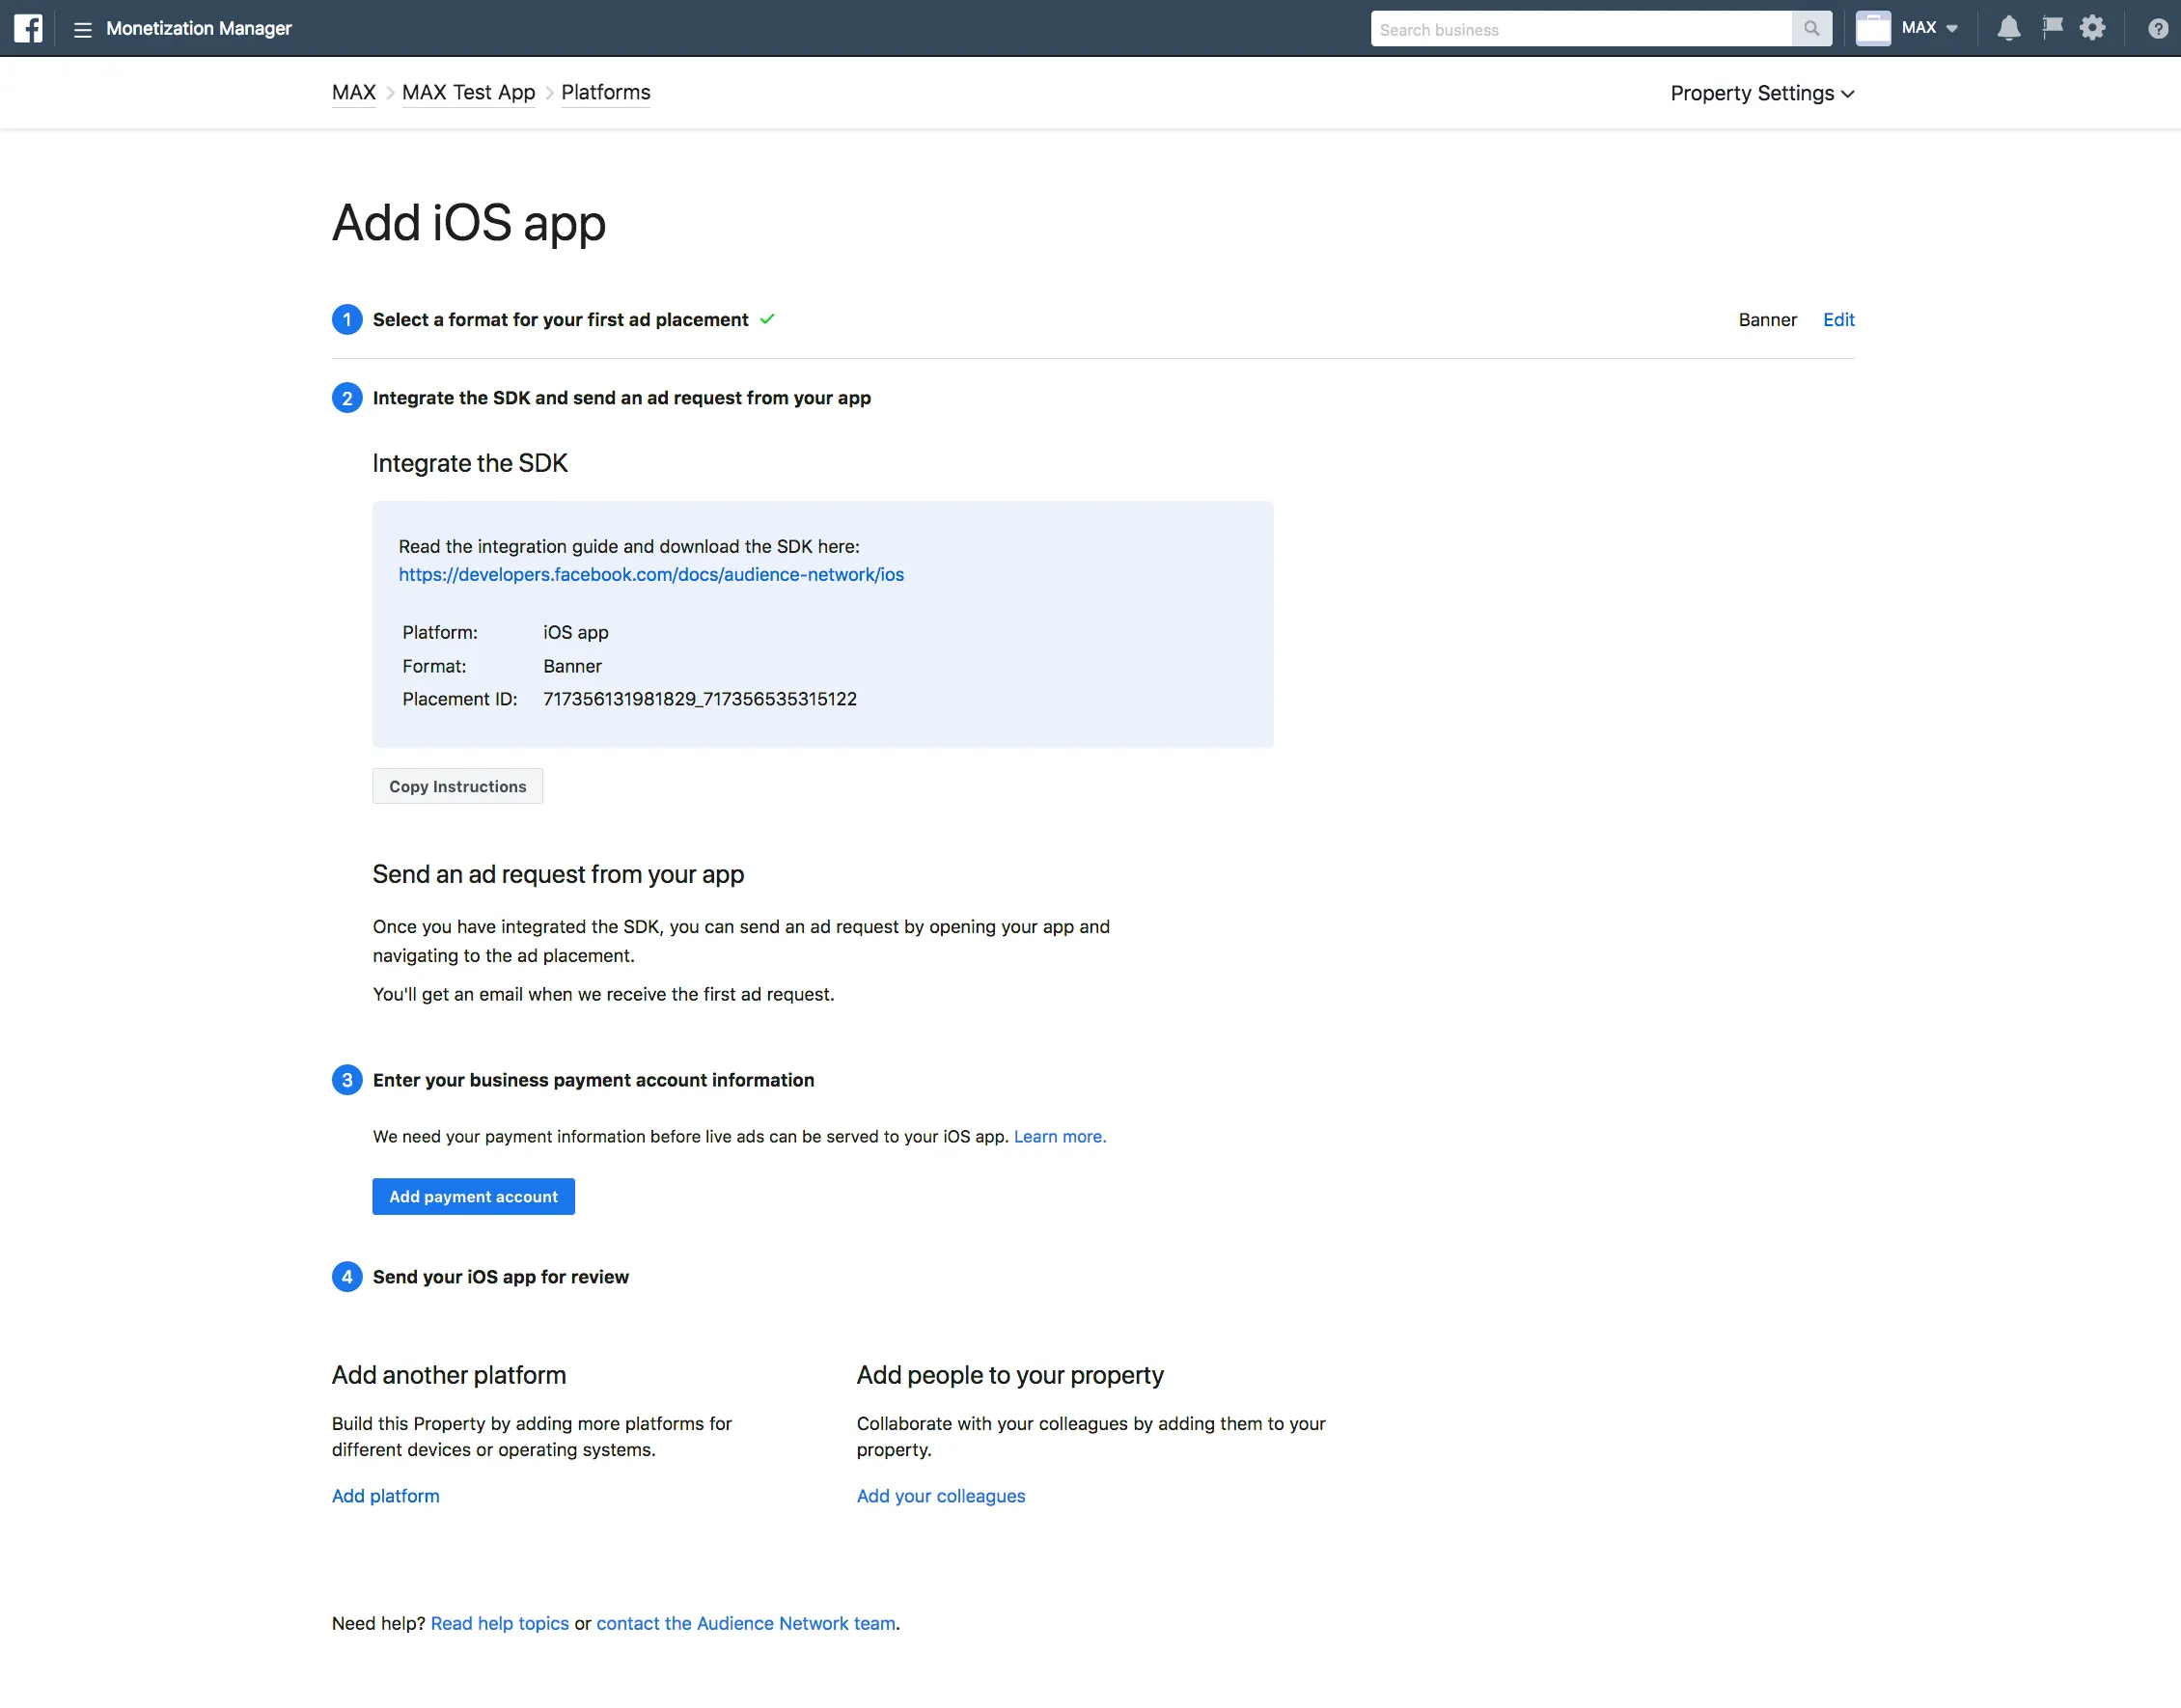
You can add your payout information as soon as you finish setting up your business manager and property. Your app cannot receive Meta Audience Network ads until you add payout information.
Create Ad Space
Create your first ad placement by choosing a display format. Monetization Manager allows you to create up to four Ad Spaces per platform.
- Go to Meta’s Monetization Manager.
- Search for your property in the search bar by using your property name or property ID. Then click Manage Property next to the Property you want to create an Ad Space for.
- Select the platform on which you want to create an Ad Space.
If the platform you want to use does not exist, click Add Platforms (in the upper right of the page) to create it.
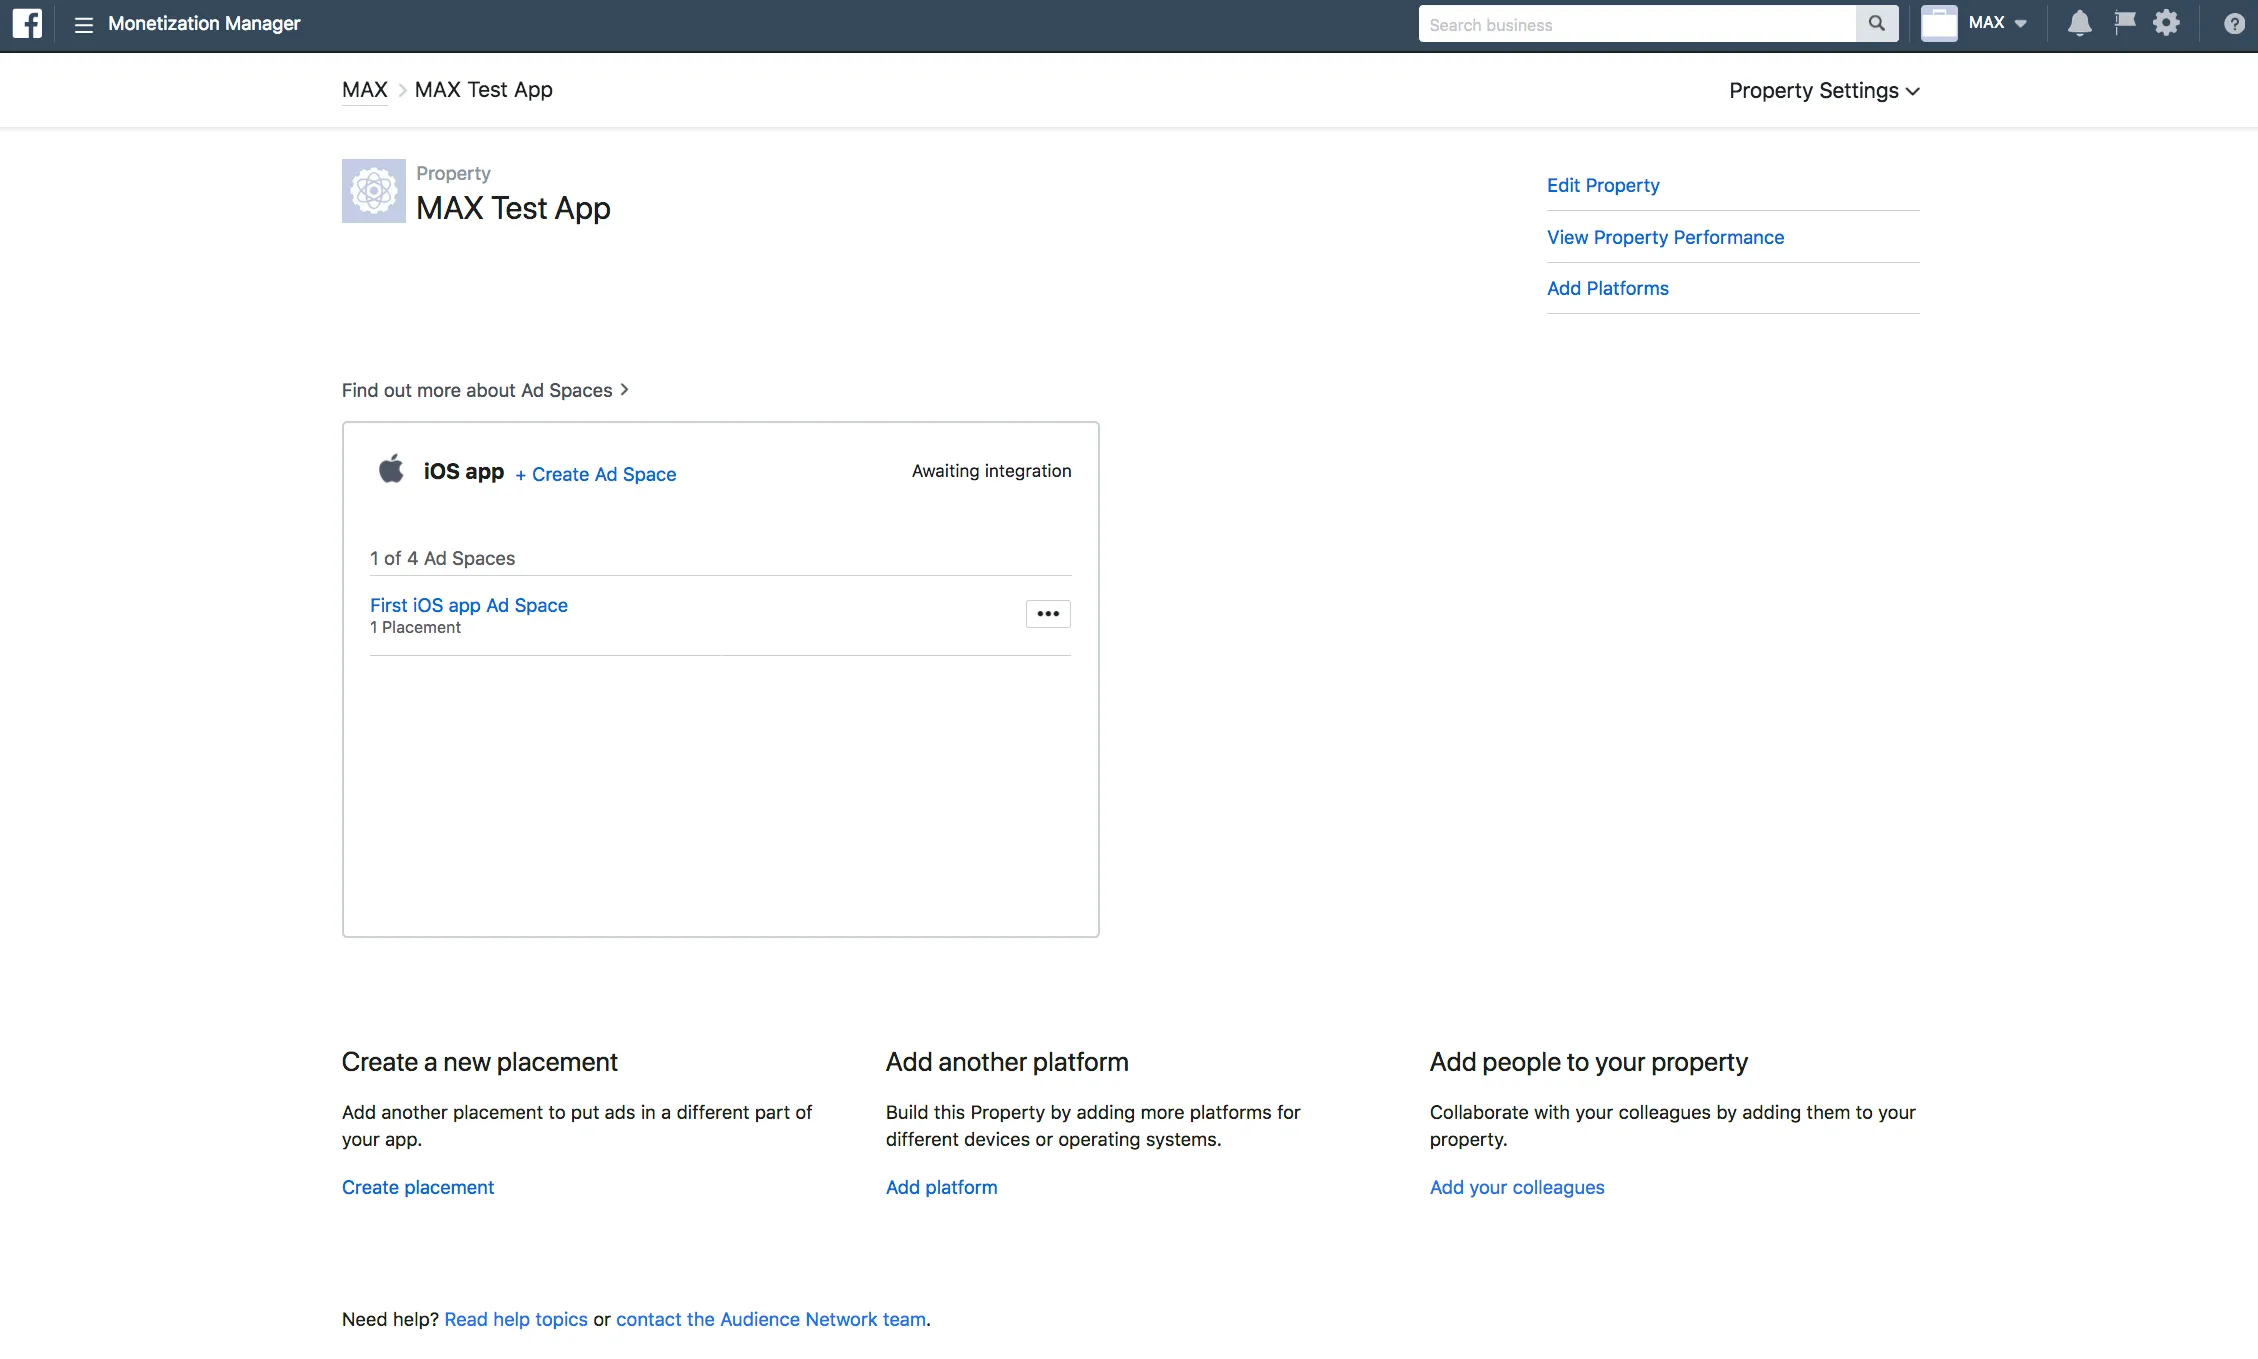
- Click + Create Ad Space.
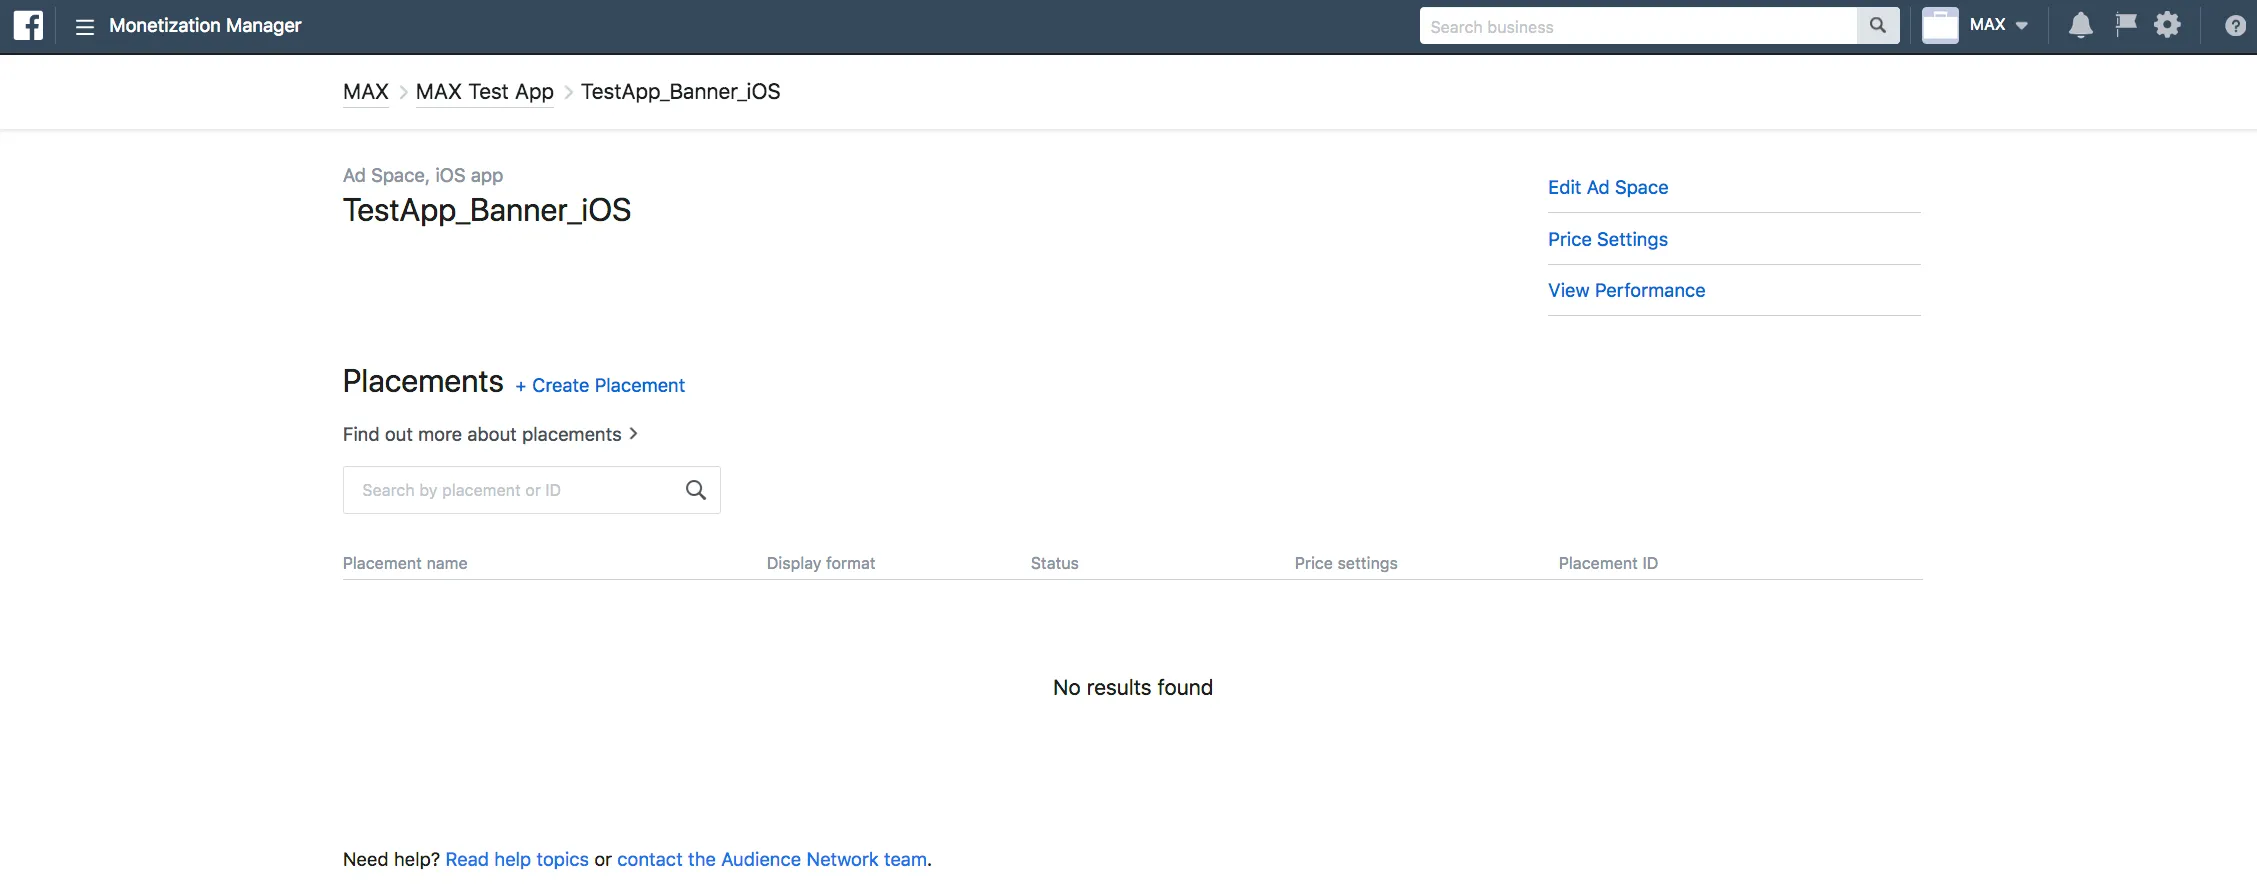
- Now that you have created your Ad Space, you can create ad placements.
Click on the edit icon and + Create placement.
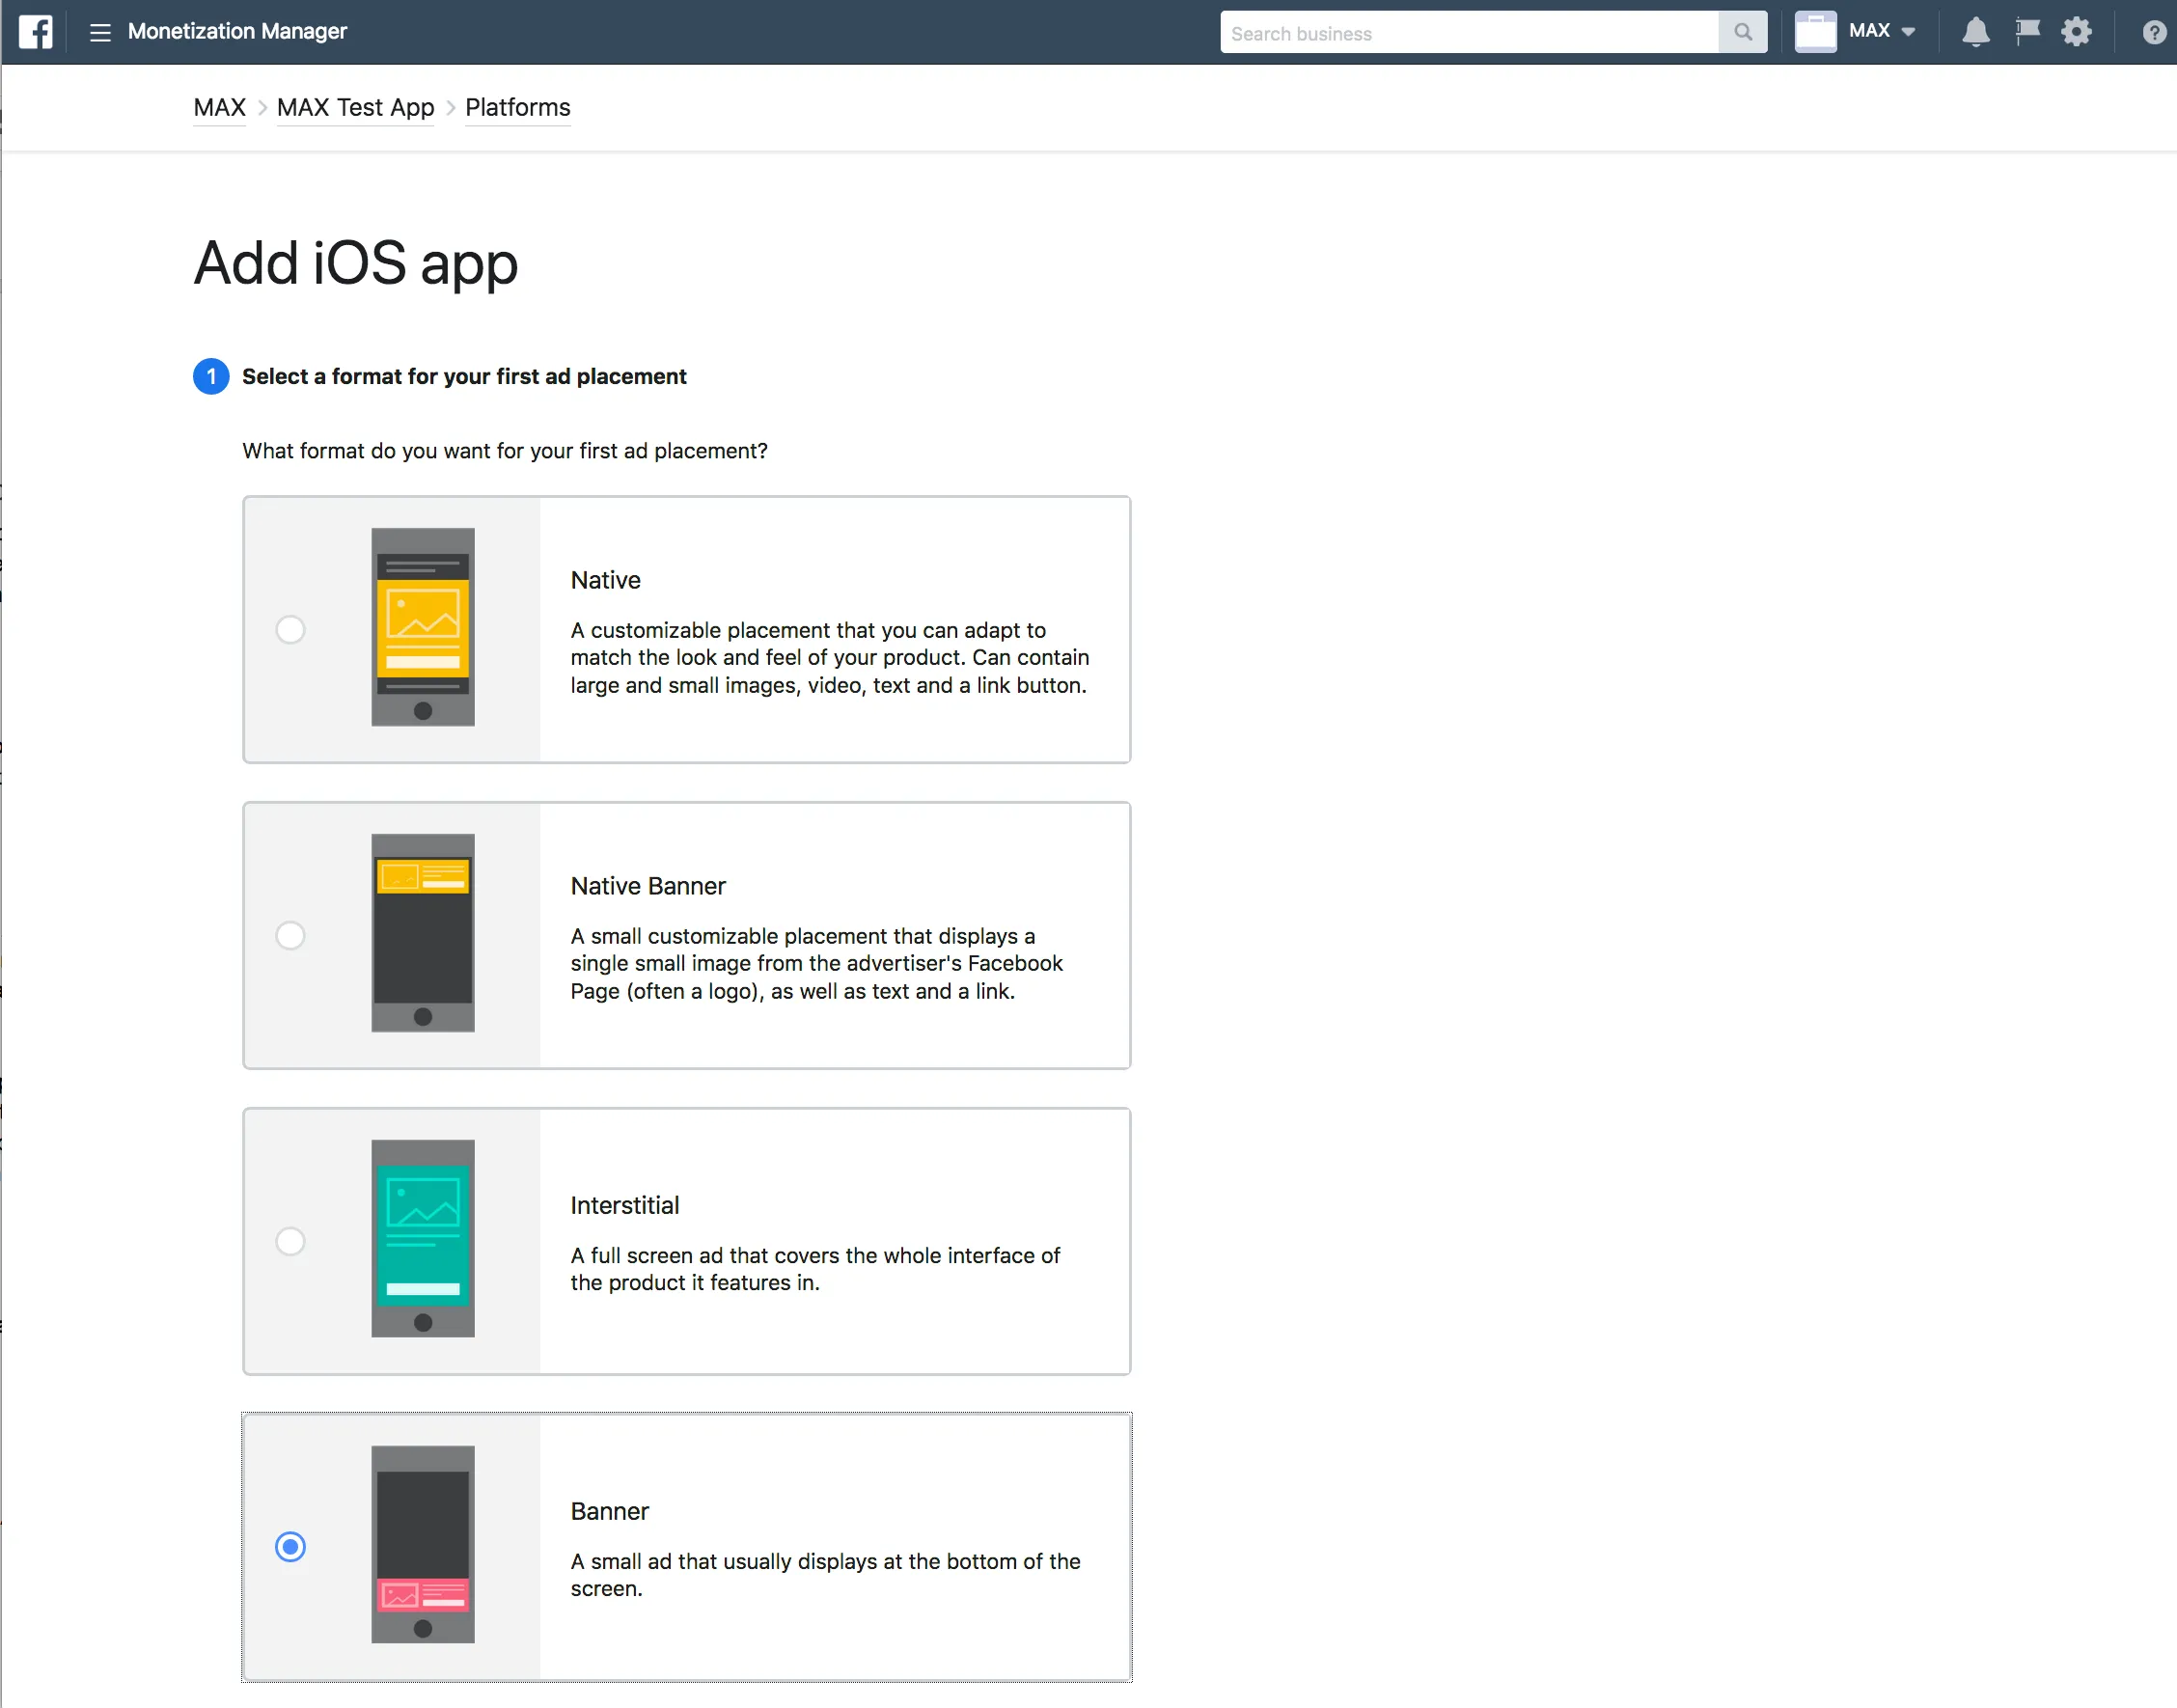
Create Ad Placement
Meta Audience Network offers different types of ad units. Each ad unit in your app is identified by means of a unique placement ID. Only one Ad Space can use an ad placement, and that placement must have the same platform as the Ad Space. To create an ad placement:
- Go to Meta’s Monetization Manager.
- Search for the property for which you want to create an ad placement by typing your property name or property ID in the search bar. Then click Manage Property to the right of the property.
- Scroll down to the Placements section and click Create placement.
- Type your placement name, select the Ad Space, check an ad Display format, and type an optional Description.
If you want to enable Meta Audience Network Bidding, you can use your existing placement IDs or create a new one. Meta Audience Network will no longer apply the floor value when you use the same placement ID in bidding. Work with your AppLovin account team to ensure that you apply best practices before you launch.
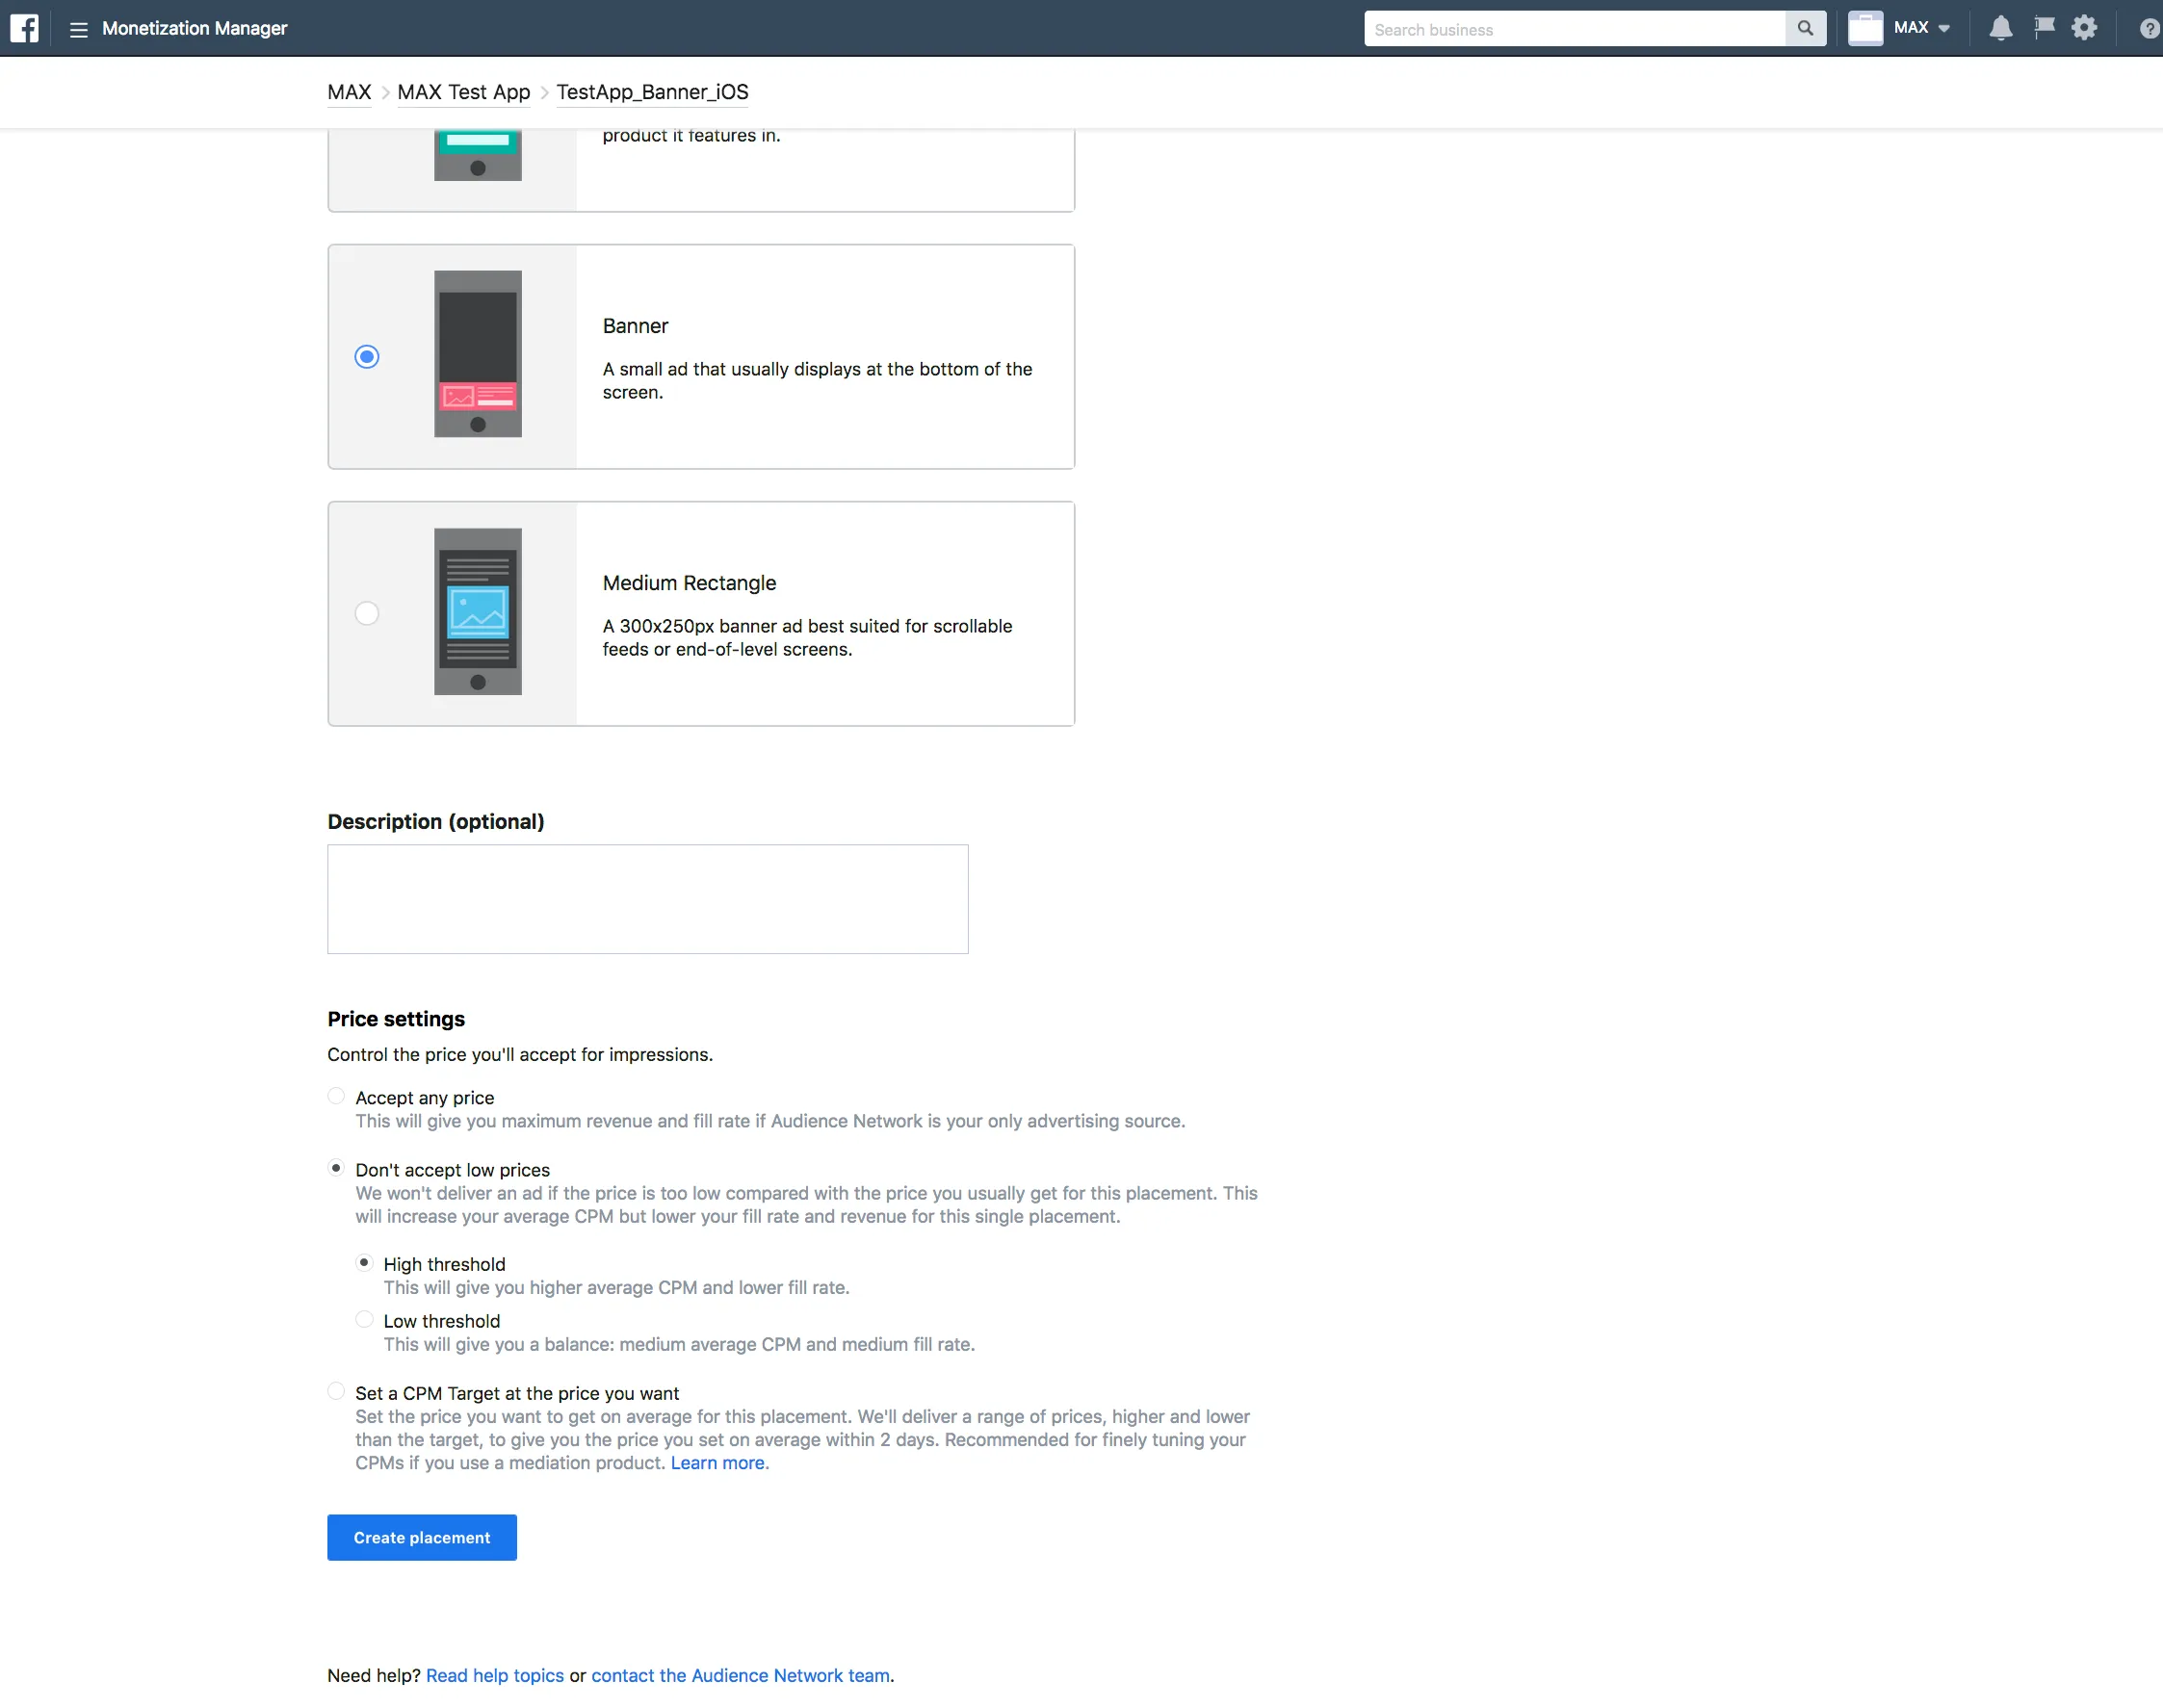
Step 3. Enable Meta Audience Network in Your MAX Account
- In the Monetization Manager, click Managed property.
- Click Ad Spaces.
- Scroll down to Placements, or filter to find the placement that you need.
In the Placement ID column, click Get Code or Copy ID for all of the ad units you would like to enable through MAX.

- When you have all of the ad unit IDs you need, log in to your MAX account.
- Select MAX > Manage > Ad Units.
- Click the MAX ad unit placement on which you want to enable Meta Audience Network.
- Type the Meta Placement ID associated with the MAX ad unit you selected.
- Click the Status bar to activate the network.
- Click ✓ Save. This enables Meta Audience Network in the participating networks list for this ad unit.
Your app won’t be able to receive Audience Network ads until you add payout information to your Meta for Developers account. Learn about how to add a payout account or troubleshoot adding apps to Audience Network.
Mintegral
Step 1. Create a Mintegral Account
To enable Mintegral ad inventory through MAX Mediation platform, you must have an approved account with Mintegral. If you do not have an account, sign up at the Mintegral Publisher Monetization Platform.
If you already have an account, skip to Step 3 and activate Mintegral in your MAX ad units.
Step 2. Create an Application and Ad Unit in Mintegral
To start monetizing your app with Mintegral, add your app on the Mintegral dashboard.
- After you log in to the Mintegral dashboard, select APP Setting in the top menu bar. The APP Setting page appears.
- Mintegral generates an App Key for each account.
Make note of this key as you will need it when you request ads.
You can retrieve it from your Mintegral APP Setting section.

- Click Add APP to begin the process of adding your app.
On the Add APP page, fill in your app information.
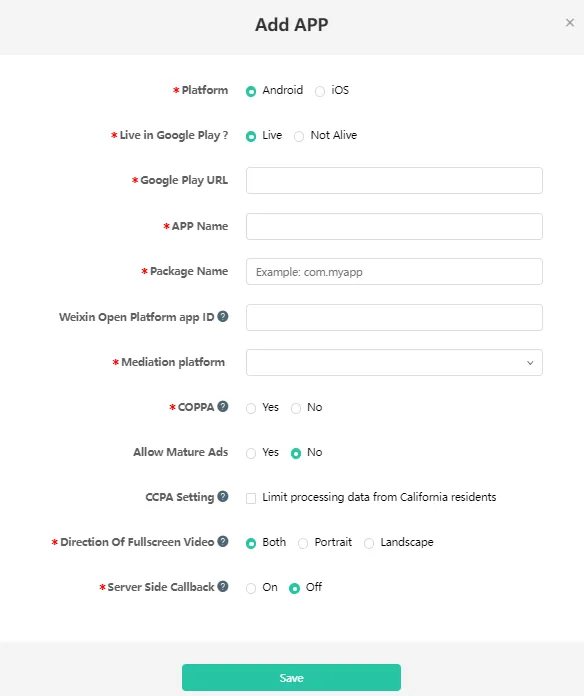
- Click Save.
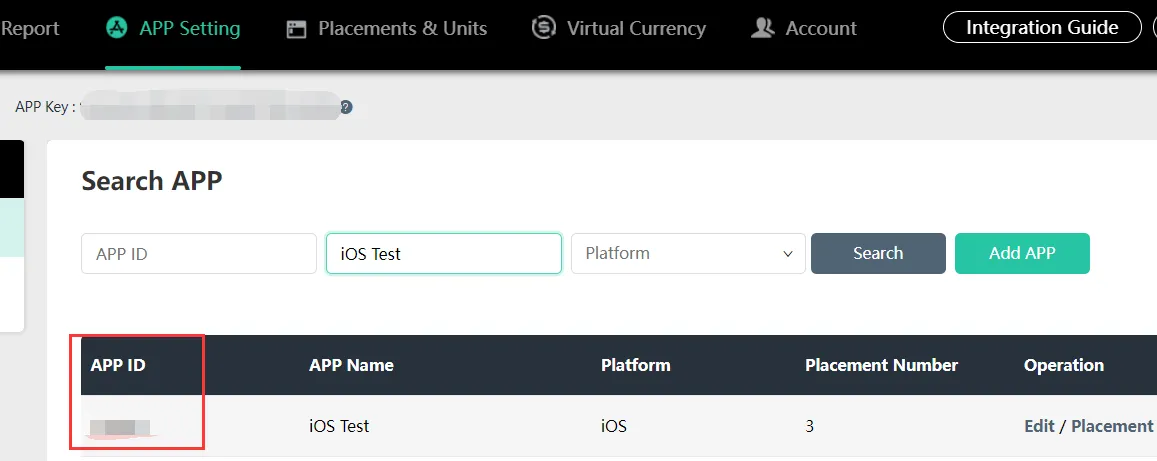
When you create an app, Mintegal generates a corresponding App ID for your app. You can find this App ID in the Mintegral App Setting section.
Create Ad Placements & Units
Follow these steps to create a placement for an ad unit:
-
Select Placements & Units in Mintegral.
-
From the Search APP list, select your ad unit that you want to create a placement for.
-
Click Add Placement.

-
Type a Placement Name, choose an AD Format, and type a Unit Name. Choose Header Bidding as the Bidding Type.
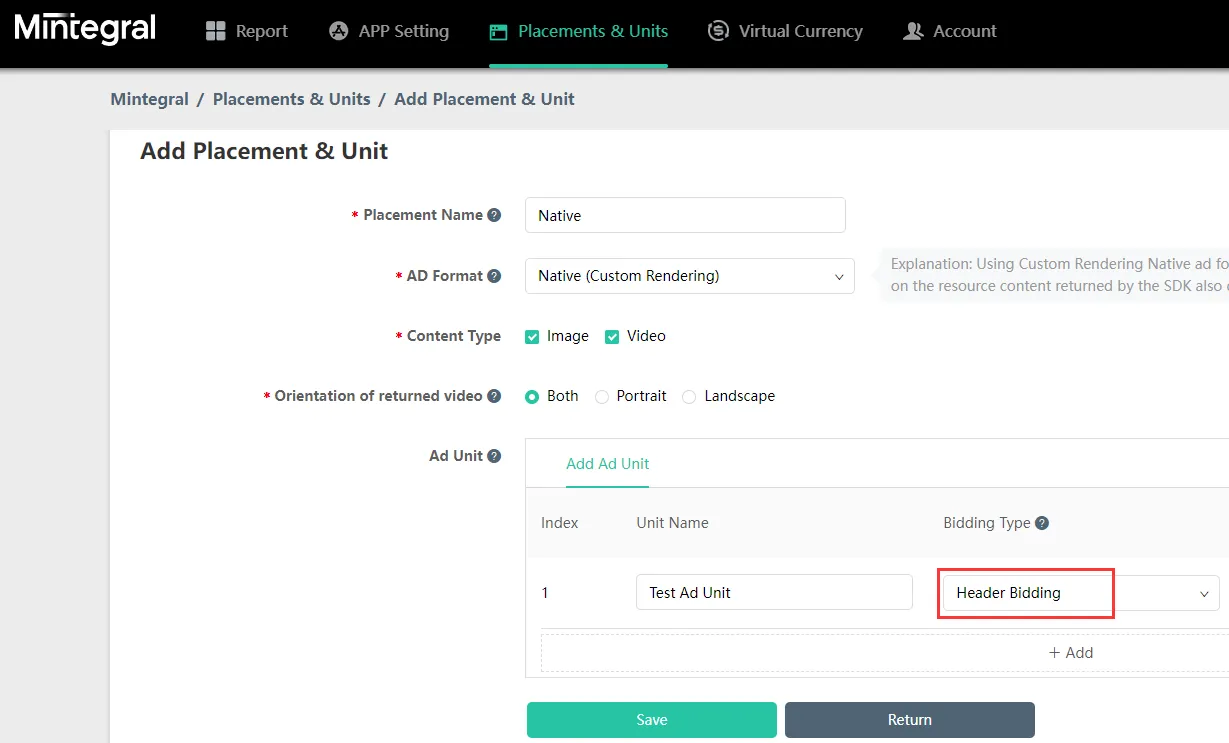 If you cannot enable Header Bidding, contact your Mintegral account manager or send email to developer@mintegral.com.
MAX Mediation supports Banner, Rewarded Video, Interstitial, and Native. MAX Mediation does not support any other Mintegral ad formats.
- When you create a Banner ad unit, choose No for the Show The Close Button and Auto Refresh options.
- For MREC ads, choose the Banner format.
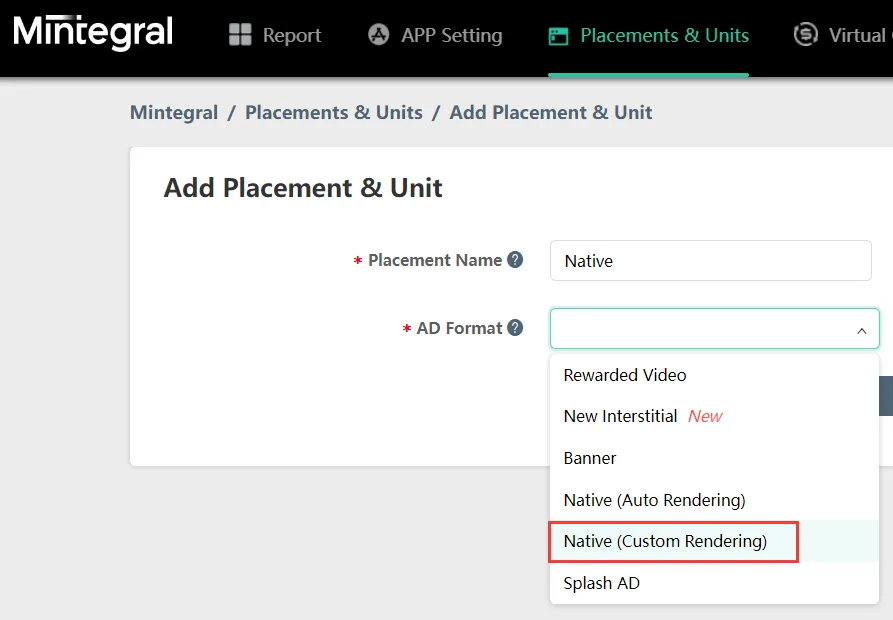
- For Native ads, choose the Native (Custom Rendering) format:
-
Click Save.
When you create an ad unit, Mintegral generates a corresponding Ad Unit ID. You can find the Ad Unit ID in the Mintegral Placements & Units section:
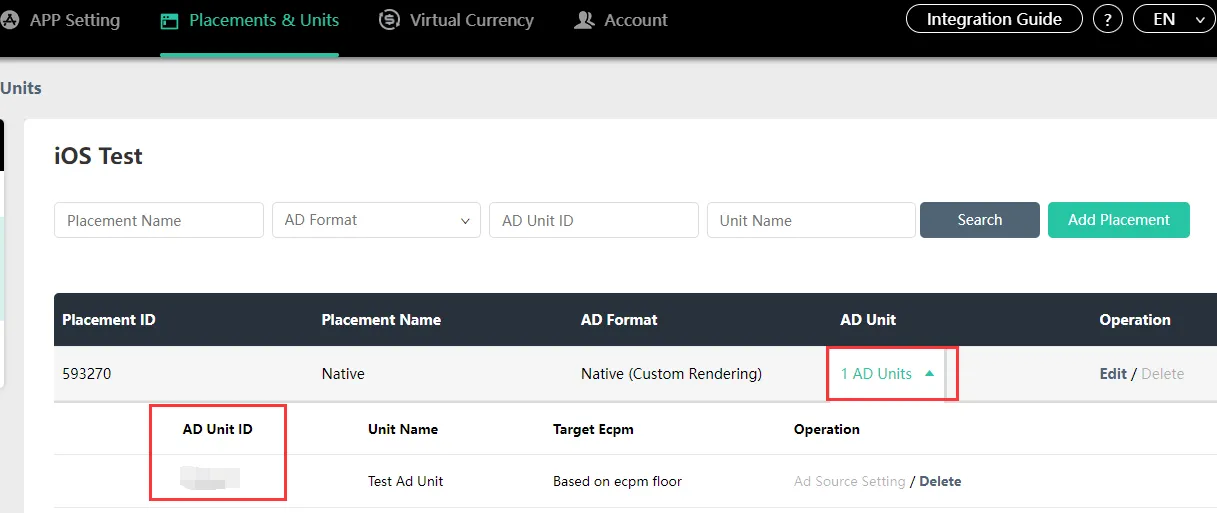
Set up your payment details at the Mintegral Monetization Platform. This allows you to receive payments at your preferred payment method. You must set up your payment details to receive fill from Mintegral.
Step 3. Enable Mintegral in Your MAX Account
- When you have the Mintegral ad unit ID(s) you need, log in to your MAX account.
- Select MAX > Manage > Ad Units.
- Click the MAX ad unit placement on which you want to enable Mintegral.
- Type the Mintegral ad unit ID(s) associated with the MAX ad unit you selected in the Placement Name section.
- Click the Status bar to activate the network.
- Click ✓ Save. This enables Mintegral in the participating networks list for this ad unit.
MobileFuse
Step 1. Complete Your MobileFuse Contract
Complete the MobileFuse contract, which you can find here.
Step 2. Complete the Onboarding Questionnaire
Complete the onboarding questionnaire, which you can find here.
This provides MobileFuse with the necessary information to create your placement IDs. Answer thoroughly.
Step 3. Receive Account Access and Placement IDs
After you complete steps 1 and 2, you are introduced to your Account Manager at MobileFuse. Your Account Manager creates your placement IDs for you and provides you with the following information:
- Login credentials for the MobileFuse reporting UI. This UI is in EST/EDT and is delayed by 2–4 hours.
- A full list of MobileFuse’s
app-ads.txtlines. These can also be found here. Yourapp-ads.txtfile must be live before you launch. When you are correctly serving this file from your developer website, inform your MobileFuse account team. See theapp-ads.txtInfo page to learn how to correctly serve yourapp-ads.txtfile. - Your direct line ID.
- Your Publisher ID and full list of Placement IDs.
Step 4. Enable MobileFuse in Your MAX Account
- When you complete your MobileFuse setup, log in to your MAX account.
- Select MAX > Manage > Ad Units.
- Click the MAX ad unit placement on which you want to enable MobileFuse.
- Type the MobileFuse Placement IDs associated with the MAX ad unit you selected.
- Click the Status bar to activate the network.
- Click ✓ Save. This enables MobileFuse in the participating networks list for this ad unit.
Best Practices
After you enter the IDs into MAX, you can begin monetizing. These best practices ensure a successful launch:
- You target U.S. and Canada only.
app-ads.txtis in place.- The IDs are mapped appropriately to the corresponding ad unit.
Moloco
Step 1. Create a Moloco Account
To enable Moloco inventory through MAX Mediation platform, you must have an approved account with Moloco. If you do not have an account, contact Moloco to obtain one.
Step 2. Create an Application and Ad Units in Moloco
Add Your App
- Log in to Moloco.
- Navigate to the Overview > Apps tab in the left navigation bar. Select New App.
- Fill in information about your application, then click Create.
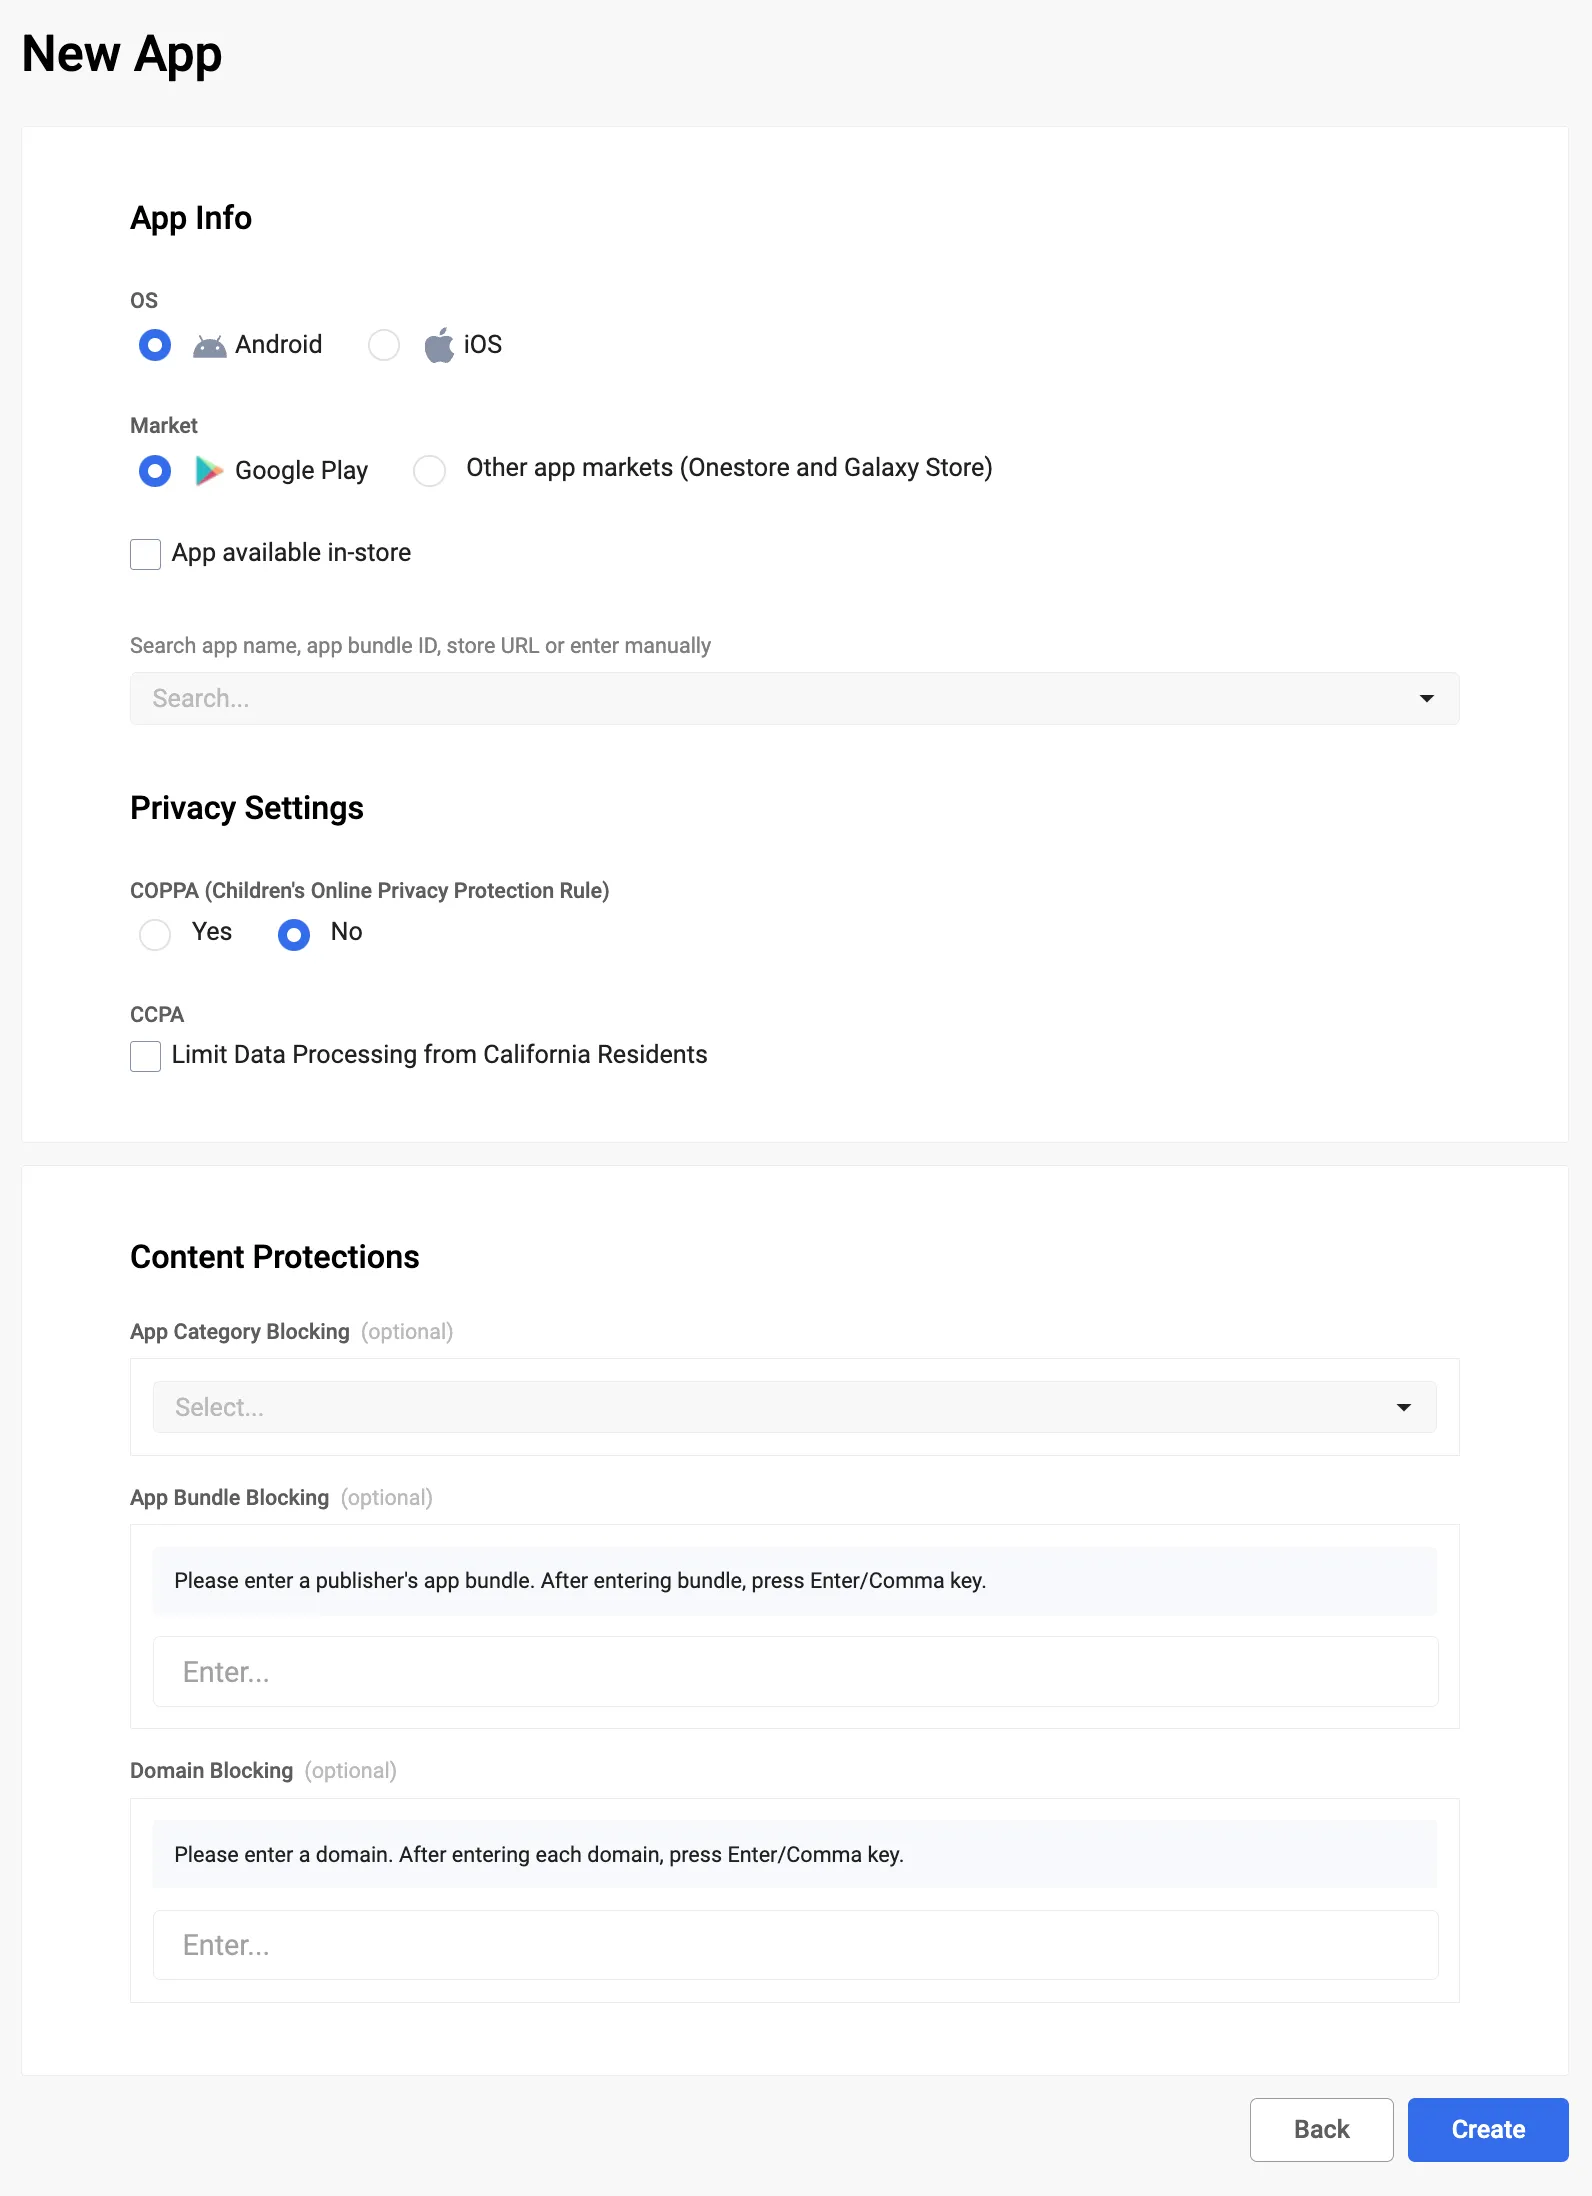
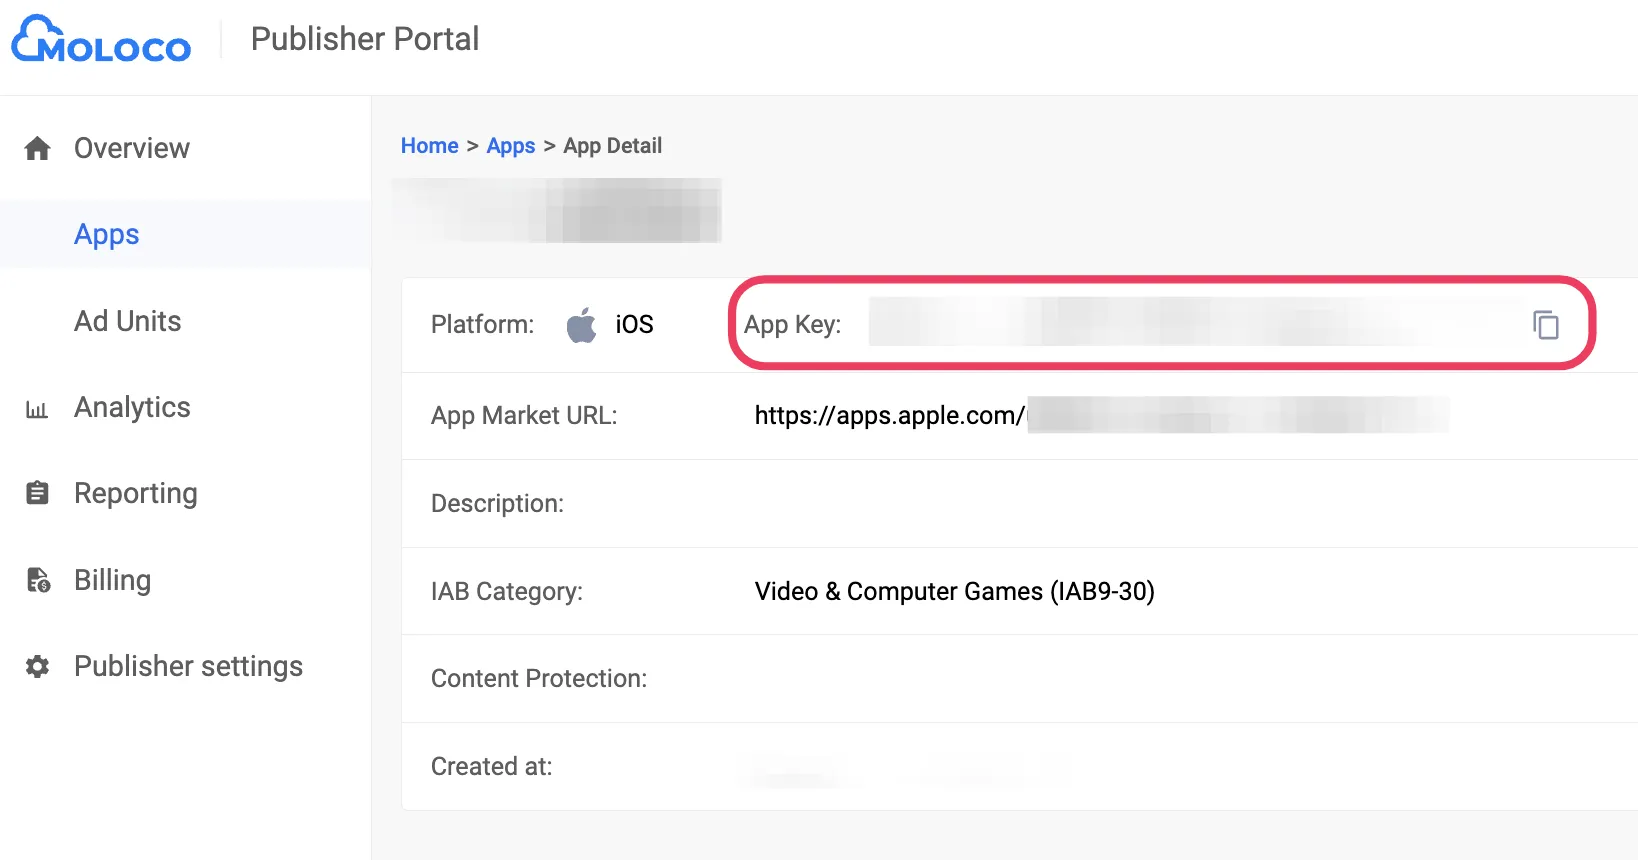
- Moloco generates an App Key for each application.
Make note of this key as you will need it when you request ads.
You can retrieve it from the Overview > Apps section in the Moloco publisher portal.
After you create your app, you can create Moloco Ad Units for your MAX ad units.
Create an Ad Unit
- Log in to Moloco.
- Click Ad Units in the left menu.
- Choose the app for which you want to create Ad Units.
- Click New Ad Unit. Do not use existing waterfall ad units for in-app bidding.
- Enter the Ad Unit Name, choose the “In-app bidding” Auction method, and choose an Inventory Type.
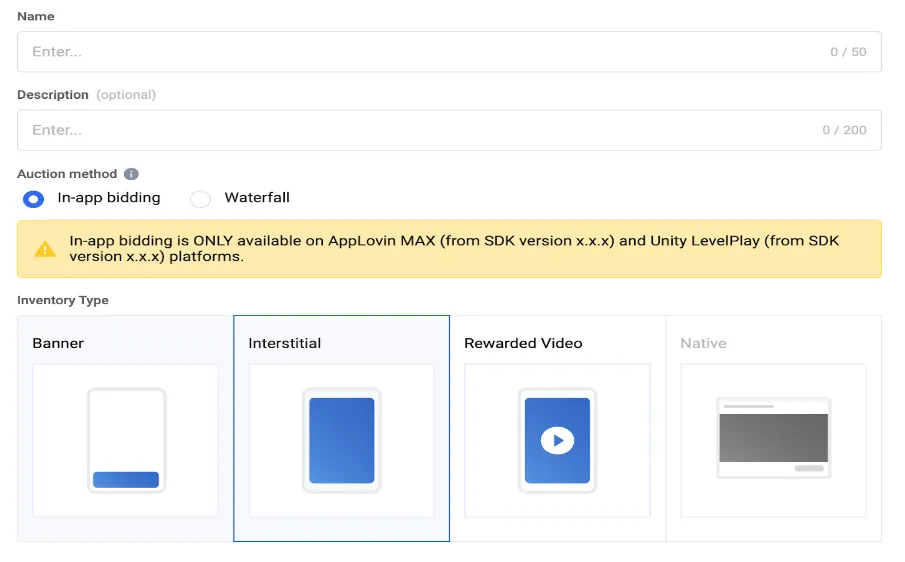
- Click Create.
You need your Moloco App Key and Ad Unit ID so that you can enable Moloco in your MAX account. To get these values:
- For the App Key, navigate to the Overview > Apps tab in the left navigation bar, select your App, and copy the App Key.
- For the Ad Unit ID, navigate to the Overview > Ad Units tab in the left navigation bar, select your App from the dropdown menu, and copy the Ad Unit ID.
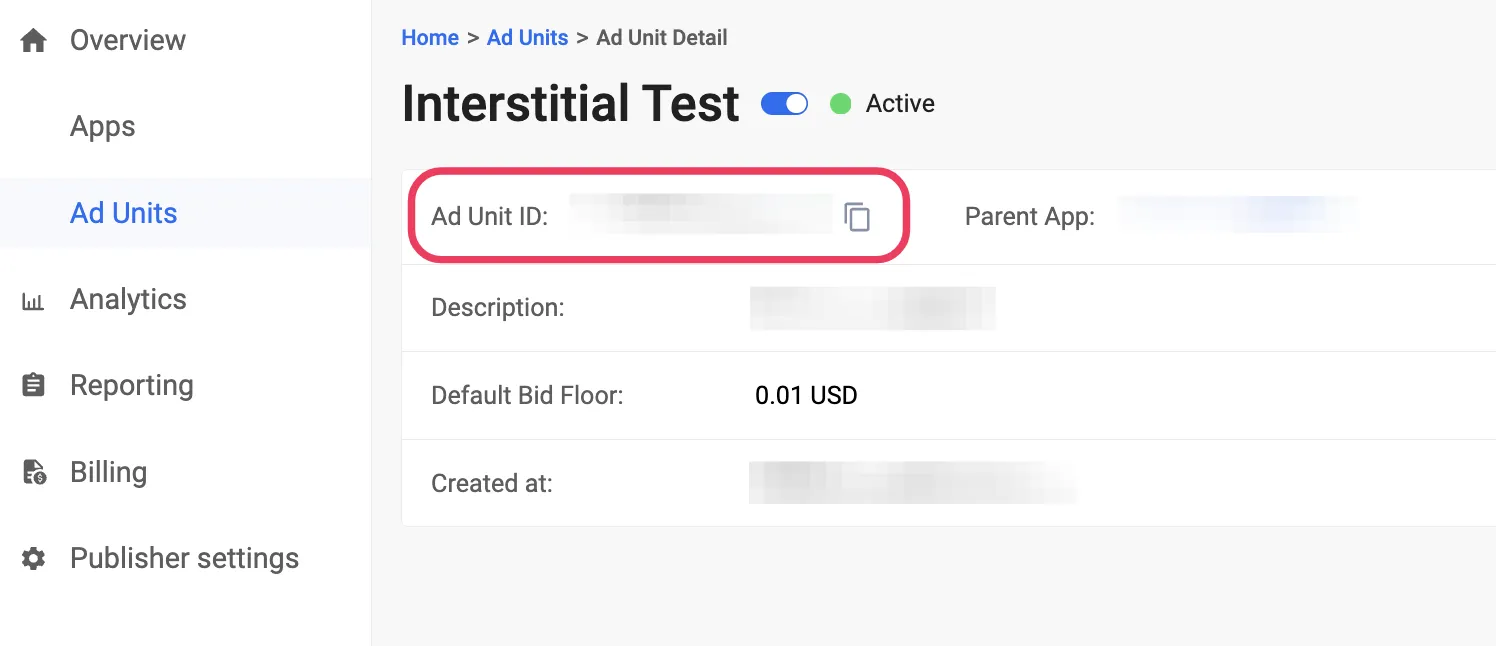
Step 3. Enable Moloco in Your MAX Account
- Log in to your MAX account.
- Select MAX > Manage > Ad Units.
- Click the MAX ad unit placement on which you want to enable Moloco.
- Click the Status bar to activate the network. This enables Moloco in the participating networks list for this ad unit.
- Type the Moloco App Key and Ad Unit ID values associated with the MAX ad unit you selected.
- Click ✓ Save.
Ogury
Step 1. Create an Ogury Account
To enable Ogury ad inventory through MAX Mediation platform, you must have an approved monetization account with Ogury. If you do not have an account, sign up at the Ogury site.
If you already have ad units created in your Ogury monetization dashboard, skip to Step 3 and activate Ogury in your MAX ad units.
Note that Ogury supports only Android apps.
Step 2. Create an Application and Ad Units in Ogury
Add Your App
To start monetizing your app with Ogury, add your app in the Ogury Monetization dashboard.
- Log in to the Ogury Monetization dashboard.
- Select Assets.
- Click NEW ASSET.
- Search for or type your application name into the APP SELECTION field.
Type the package name and the bundle name for your application into the APP NAME and BUNDLE fields.
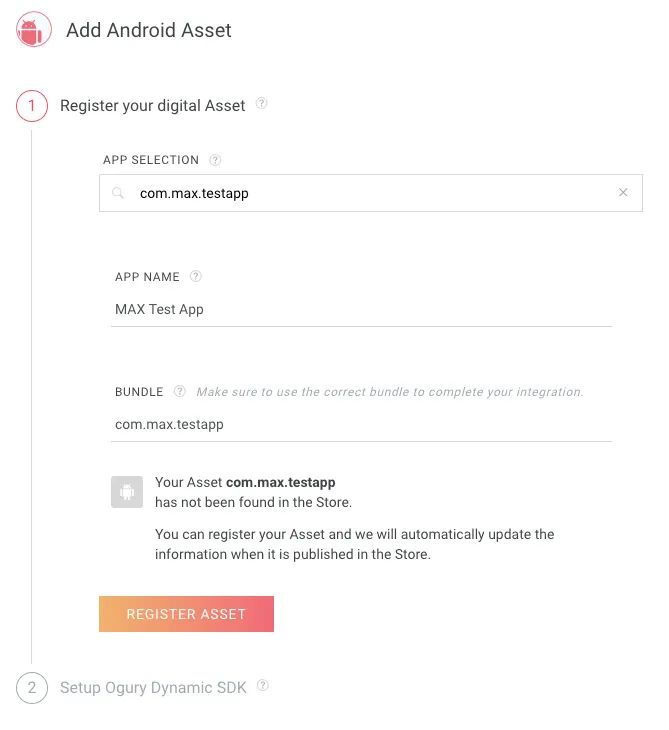
- Click REGISTER ASSET.
You can now create ad units that correspond to the CPM values you entered in MAX.
Create Ad Units
- In the Ogury Monetization dashboard, click your app name.
- Select Assets > Monetization settings.
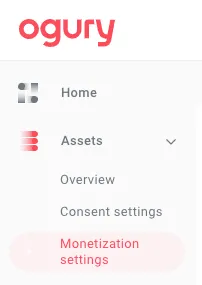
- Click NEW AD UNIT.
- Type an Ad Unit name.
- Choose the Ad Unit type you desire (such as Interstitial or Rewarded).
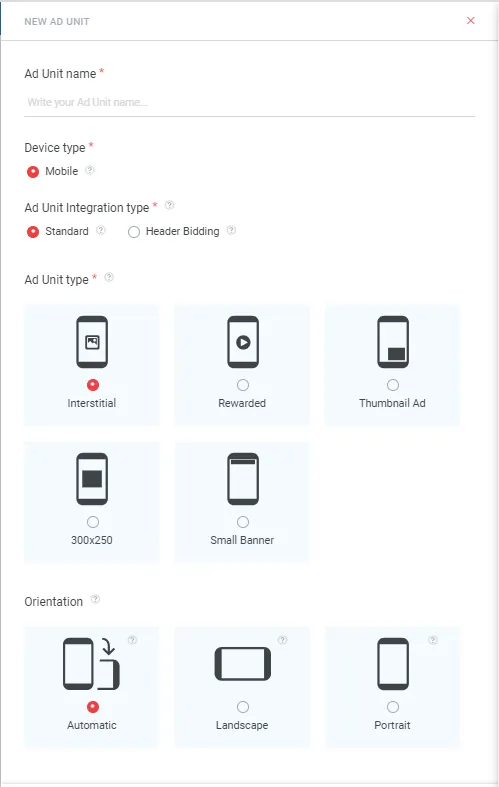
- For Rewarded ads, AppLovin recommends that you leave Reward Settings empty and that you set Callback Settings to No.
- To create a bidding ad unit, select Header Bidding as the Ad Unit integration type.
- Click CREATE AD.
To enable Ogury in MAX Mediation, you need your Ogury ad unit IDs and Asset Key. You can retrieve the Asset Key from the Assets > Overview section of your Ogury Monetization dashboard.

You can retrieve an ad unit ID from the Assets > Monetization settings section of your Ogury Monetization dashboard. To do so, click the ⎘ icon in the AD UNIT ID column associated with the ad unit whose ID you want to retrieve.

Set up your payment details in the My Bank Info section of your Ogury Monetization dashboard. You must set up your payment details in order to receive fill from Ogury.
Step 3. Enable Ogury in Your MAX Account
- When you complete your Ogury setup, log in to your MAX account.
- Select MAX > Manage > Ad Units.
- Click the MAX ad unit placement on which you want to enable Ogury.
- Type the Ogury API Key and the Ogury Ad Unit ID values associated with the MAX ad unit you selected, along with the CPM floors you created in the network dashboard.
- Click the Status bar to activate the network.
- Click ✓ Save. This enables Ogury in the participating networks list for this ad unit.
Pangle
Step 1. Create a Pangle Account
To enable Pangle ad inventory through MAX Mediation platform, you must have an approved monetization account with Pangle. If you do not have an account, sign up at the Pangle site.
If you already have ad units created in your Pangle dashboard, skip to Step 3 and activate Pangle in your MAX ad units.
Step 2. Create an Application and Placements in Pangle
Add Your App
To start monetizing your app with Pangle, add your app in the Pangle dashboard:
- Log into the dashboard.
- Select Applications.
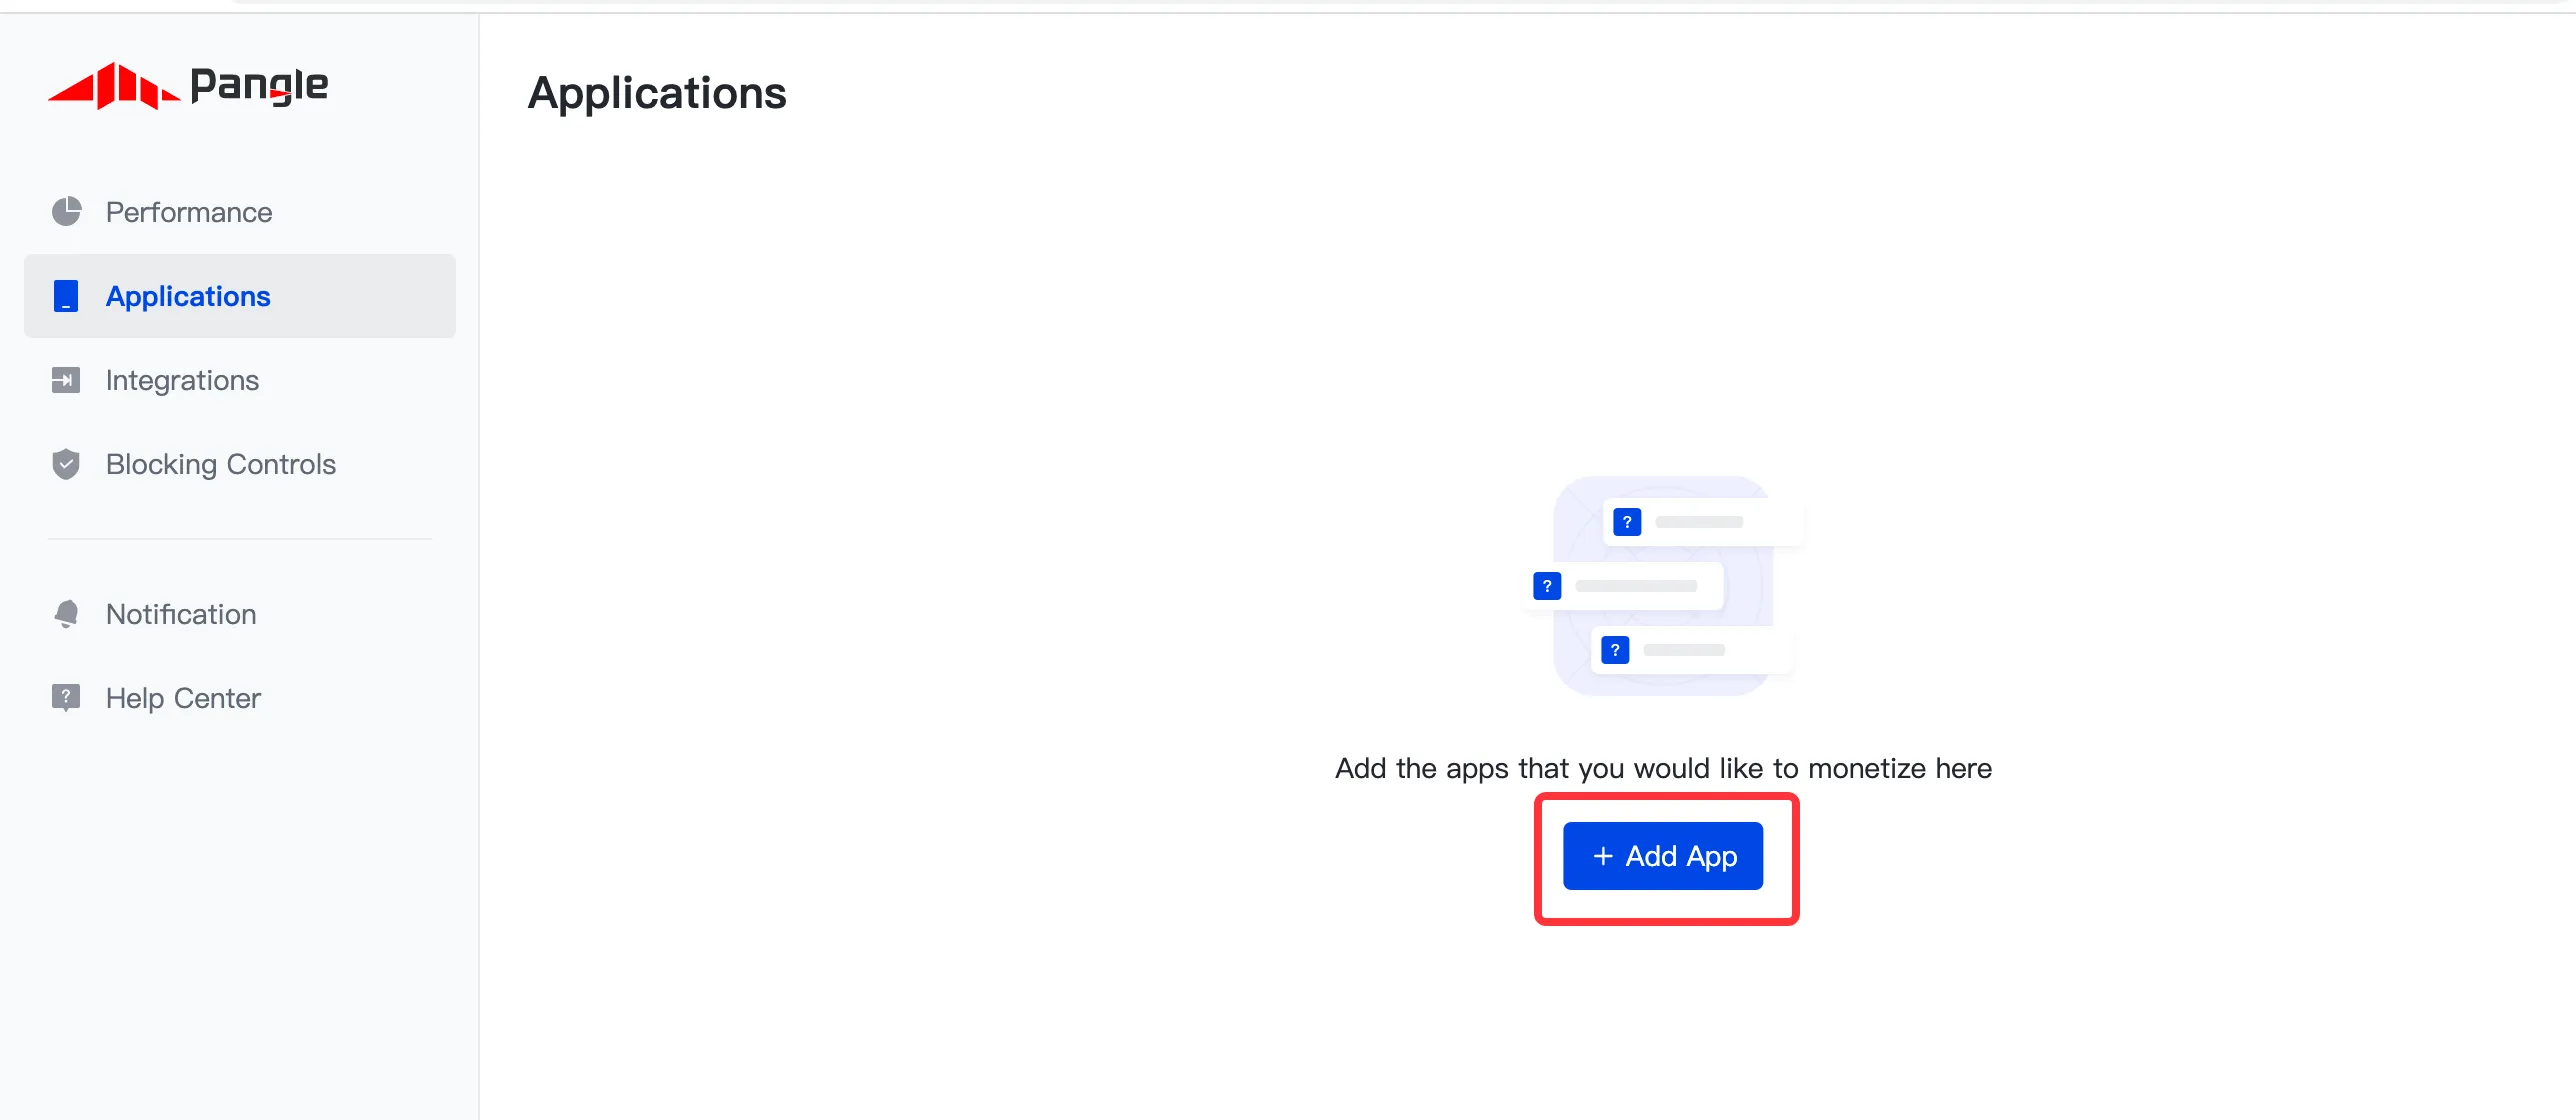
- Click + Add App.
- Enter the requested information for your application.
Create Ad Units
After you save your app, you can create Pangle ad units:
- Select Applications.
- Click + Add Ad Placement.
- Select the app and the desired ad format.
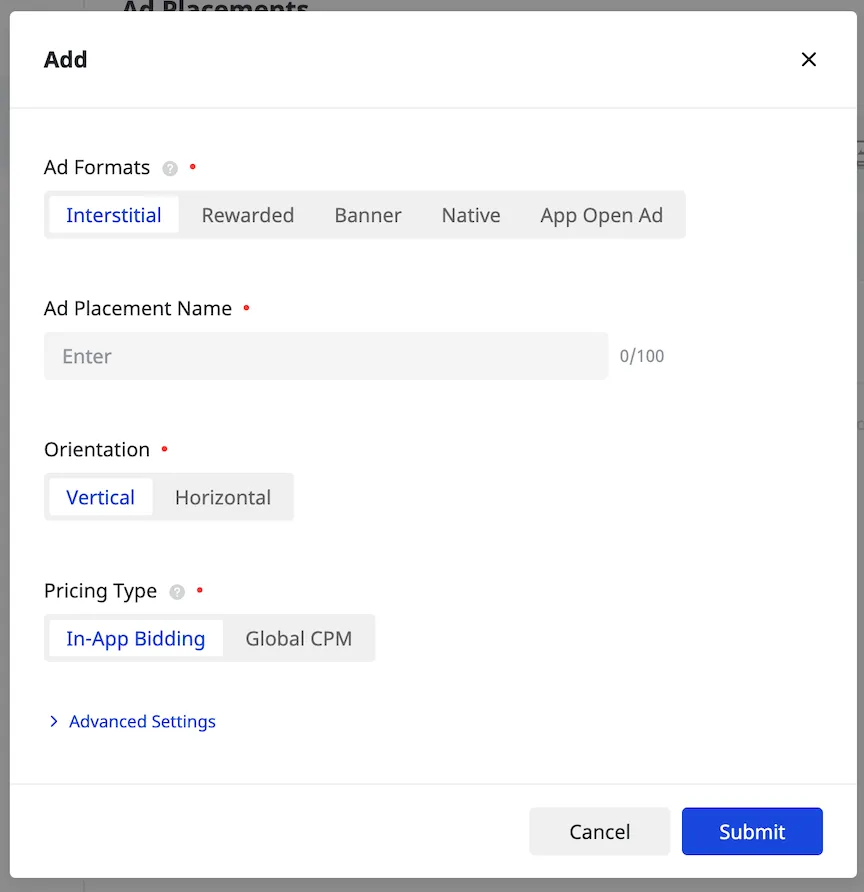
- To create a bidding placement, select In-App Bidding.
- Click Submit to save the placement. Note the placement ID as you need it when you enable Pangle in your MAX ad unit.
To enable Pangle in MAX Mediation, you need your Pangle App ID and the ad unit IDs that Pangle associates with the app you created. You can find the App ID by selecting Apps. You can find the Ad Placement ID by selecting Ad Placements.
Set up your payment details in the Account Information section. You must set up your payment details in order to receive fill from Pangle.
Step 3. Enable Pangle in Your MAX Account
- When you complete your Pangle setup, log in to your MAX account.
- Select MAX > Manage > Ad Units.
- Click the MAX ad unit placement on which you want to enable Pangle.
- Type the Pangle App ID and the Ad Placement ID values associated with the MAX ad unit you selected.
- Click the Status bar to activate the network.
- Click ✓ Save. This enables Pangle in the participating networks list for this ad unit.
PubMatic
Step 1. Create a PubMatic Account
To enable PubMatic OpenWrap ad inventory through MAX Mediation platform, you must have an monetization account with PubMatic. If you do not have an account, sign up here.
If you already have an account and ad units, skip to Step 3 and activate PubMatic OpenWrap in your MAX ad units.
Step 2. Create an Application and Ad Units in PubMatic
Add Your App
- Log in to the OpenWrap monetization dashboard.
- Select Apps from the Set Up menu.
- Click the Add App button.

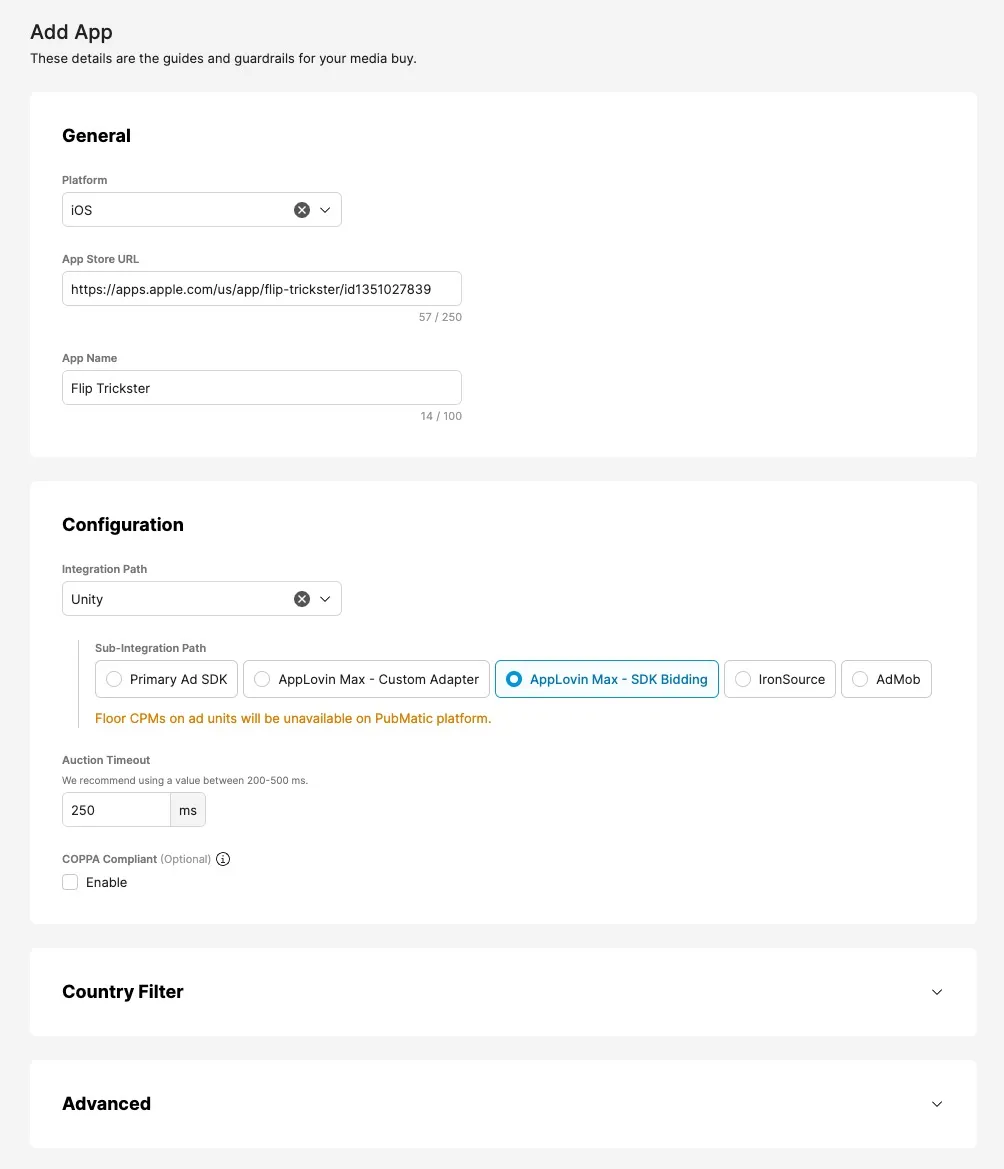
- In the General section:
- Select the Platform (iOS or Android).
- Enter a valid App Store URL.
- After entering a valid URL, the App Name field will appear and autofill. You may edit the name in this field.
- In the Configuration section:
- Select your Integration Path.
- Select AppLovin Max - SDK Bidding for your Sub-Integration Path.
- If necessary, fill out any additional options that appear based on your previous selections.
- In the Advanced section, ensure that the Currency is set to US Dollars.
- Click Add App.
Create Ad Units
- Select Ad Units from the Set Up menu.
- Select your app on the left side of the page.
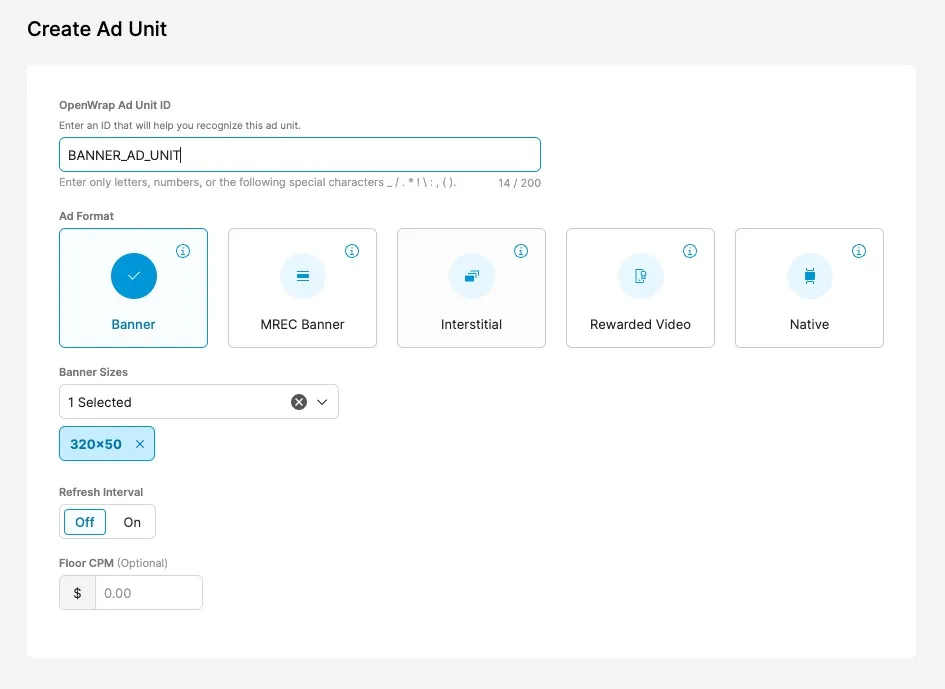
- Click the Create Ad Unit button.

- Enter an Ad Unit ID.
- Select an Ad Format. Fill out any additional options that appear based on your selected ad format.
- Click Save to save and exit, or Save & Create Another to create another Ad Unit for your app.
When you create an ad unit, PubMatic generates a corresponding ad unit ID. You can find it in the Ad Units section:

Step 3. Enable PubMatic OpenWrap in Your MAX Account
- When you complete your PubMatic OpenWrap setup, log in to your MAX account.
- Select MAX > Manage > Ad Units.
- Click the MAX ad unit placement on which you want to enable PubMatic OpenWrap.
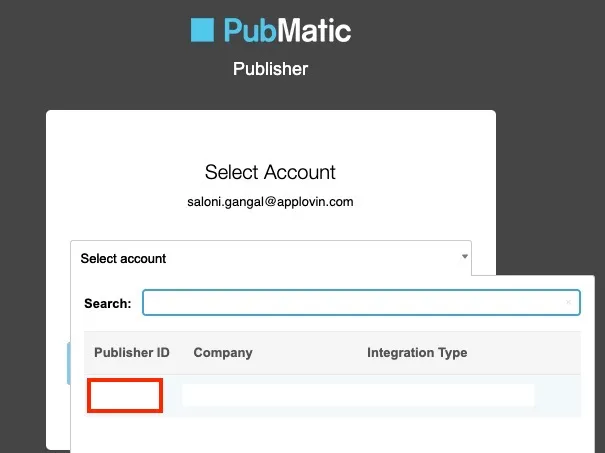
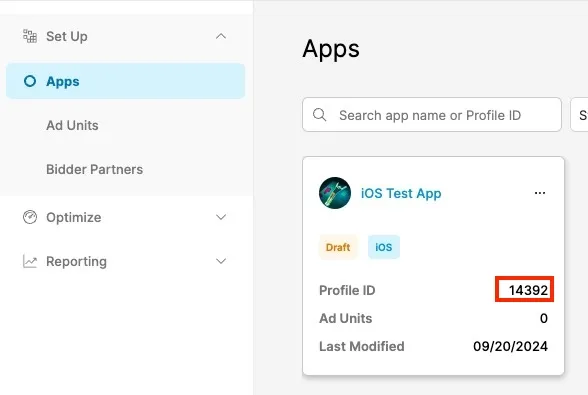
- Type the Publisher ID, Profile ID, and Ad Unit ID associated with the MAX ad unit you selected.
- Your Publisher ID can be found when you log in to your PubMatic publisher account:
- Your Profile ID can be found on the Apps page:
- Your Publisher ID can be found when you log in to your PubMatic publisher account:
- Click the Status bar to activate the network.
- Click ✓ Save. This enables PubMatic OpenWrap in the participating networks list for this ad unit.
Smaato
Step 1. Create a Smaato Ad Network Account
To enable Smaato ad inventory through MAX Mediation platform, you must have an approved monetization account with Smaato. If you do not have an account, sign up at the Smaato Publisher Platform.
If you have already created ad units in your Smaato dashboard, skip to Step 3 and activate Smaato in your MAX ad units.
Step 2. Create an Application and Placements in Smaato
To start monetizing your app with Smaato, add your app in the Smaato dashboard.
-
Log in to the Smaato dashboard.
-
Select Inventory > New App.
-
Fill in the requested information for your application.
-
You create placements in the Define Adspaces section. Create your Smaato placement IDs for each ad format and click Save.
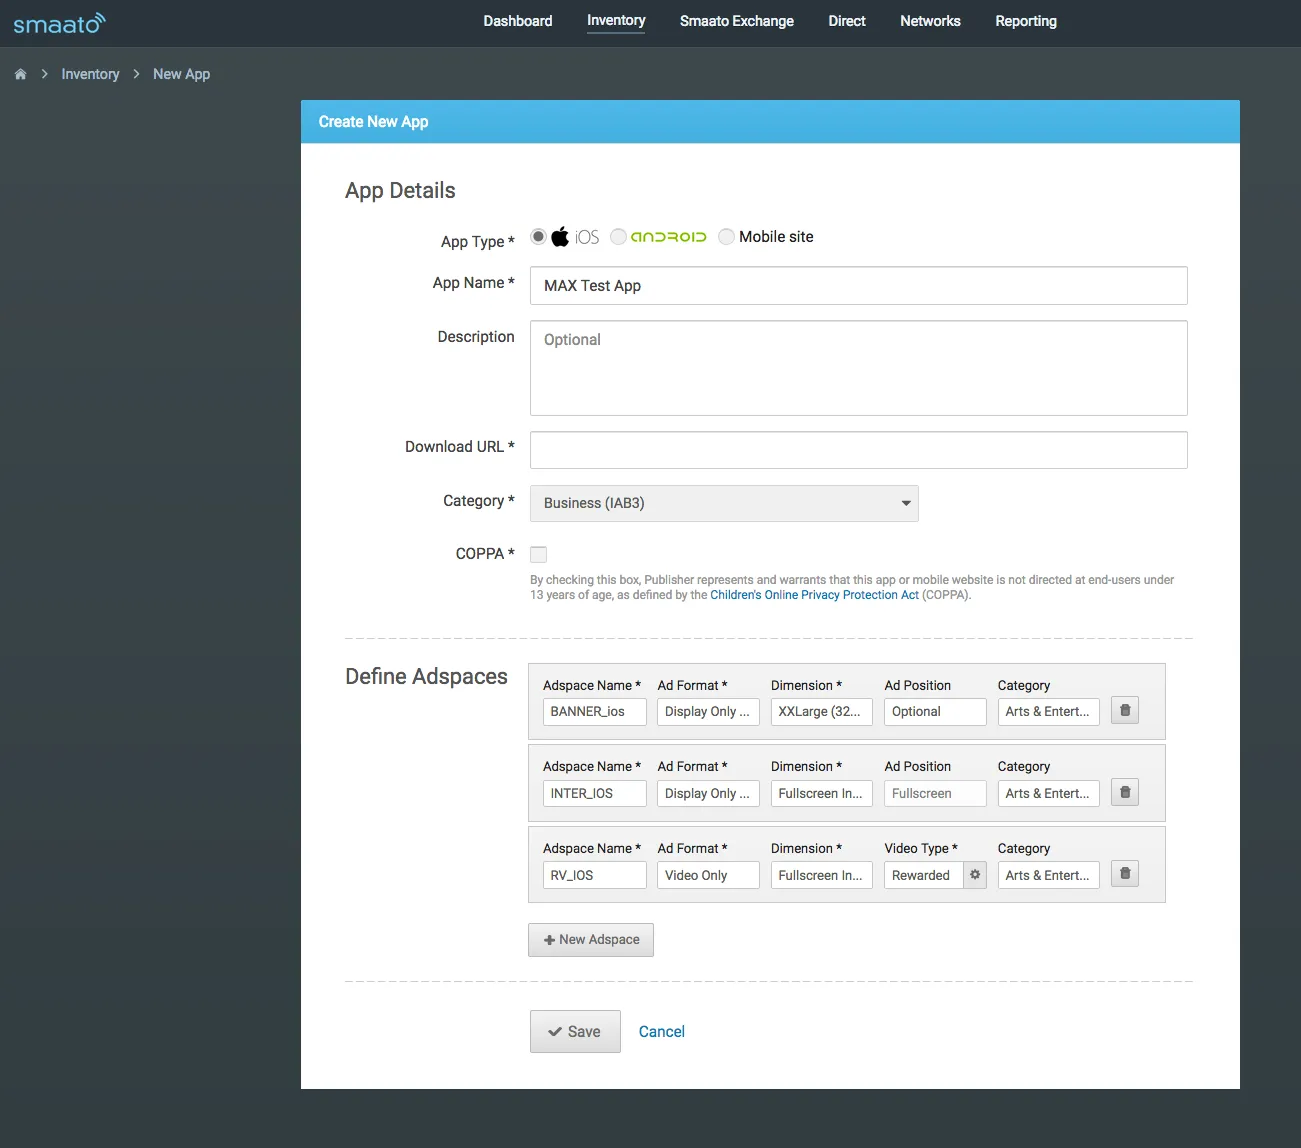 If you want to enable bidding, contact your Smaato account team.
When you save your app, Smaato lists your ad space IDs on the Inventory page. You use these IDs to enable Smaato in your MAX ad unit.
-
To enable Smaato in MAX Mediation, you need your Smaato Publisher ID and the ad space IDs that Smaato associated with the app you created. To find your Publisher ID, select Inventory. To find an Adspace ID, select your app and look in the Adspaces table.
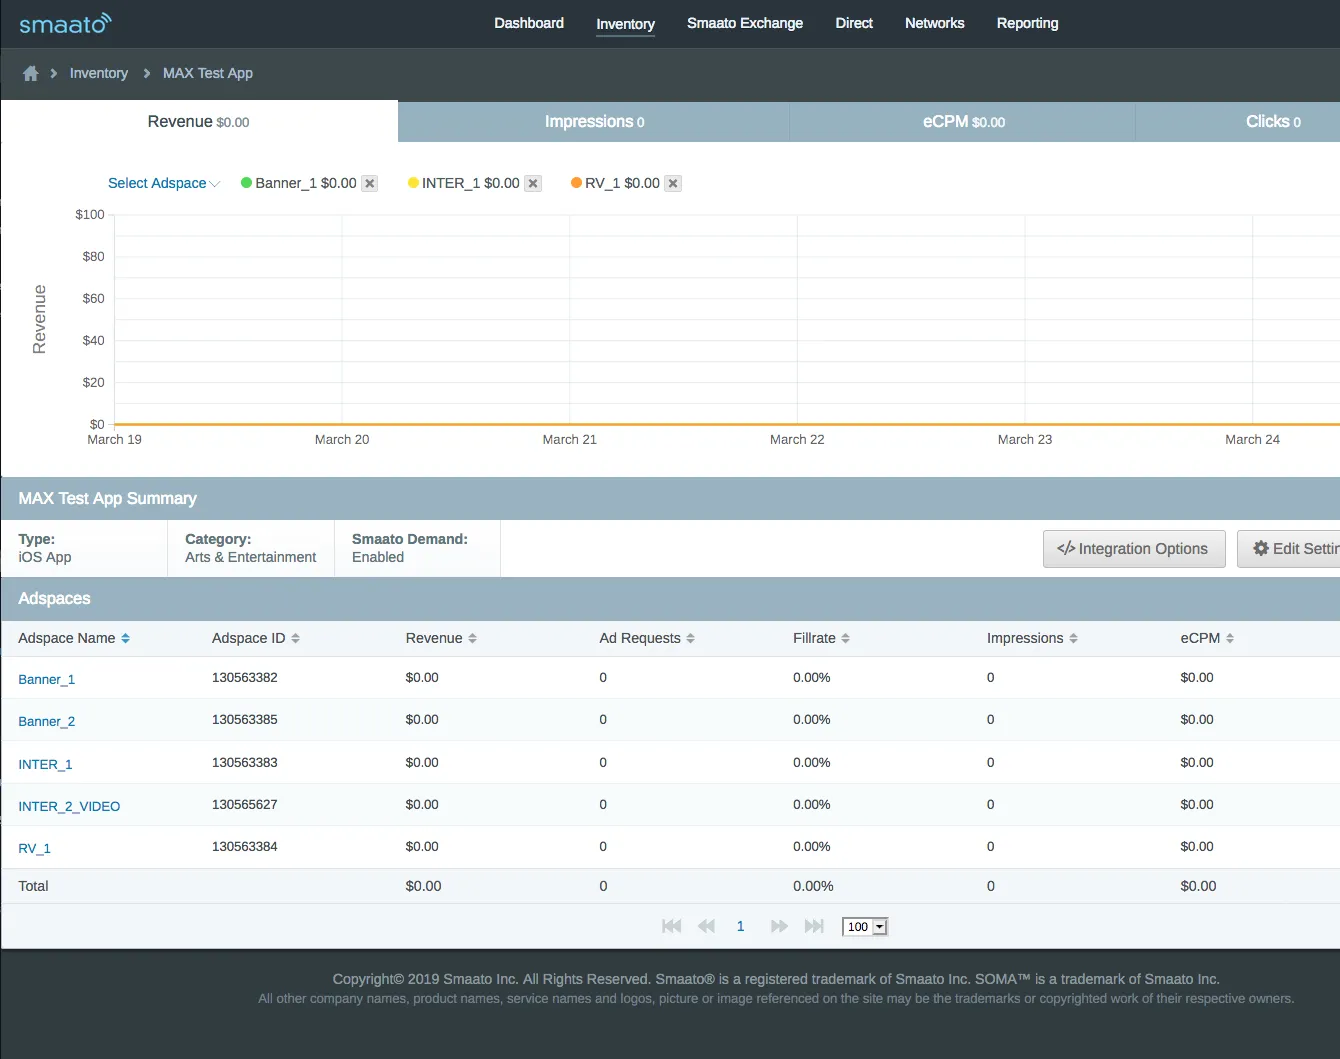
If you want to create placement IDs with price floors, contact your Smaato account team.
Set up your payment details in the Payment Information section. You must set up your payment details in order to receive fill from Smaato.
Step 3. Enable Smaato in Your MAX Account
- When you complete your Smaato setup, log in to your MAX account.
- Select MAX > Manage > Ad Units.
- Click the MAX ad unit placement on which you want to enable Smaato.
- Type the Smaato Publisher ID and the Ad Space ID values associated with the MAX ad unit you selected.
- Click the Status bar to activate the network.
- Click ✓ Save. This enables Smaato in the participating networks list for this ad unit.
Unity Ads
Step 1. Create a Unity Ads Account
To enable Unity Ads inventory through MAX Mediation platform, you must have an approved account with Unity Ads. If you do not have an account, create a Unity ID at the Unity site.
Step 2. Create an Application, Ad Unit, and Placements in Unity Ads
Create an Application
- Log in to Unity.
- Navigate to the Unity Ads Monetization tab in the left navigation bar.
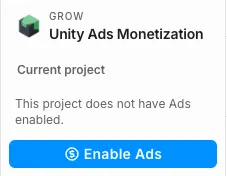
Enable ads for your project, if this is not already enabled.
- Select Organization overview.
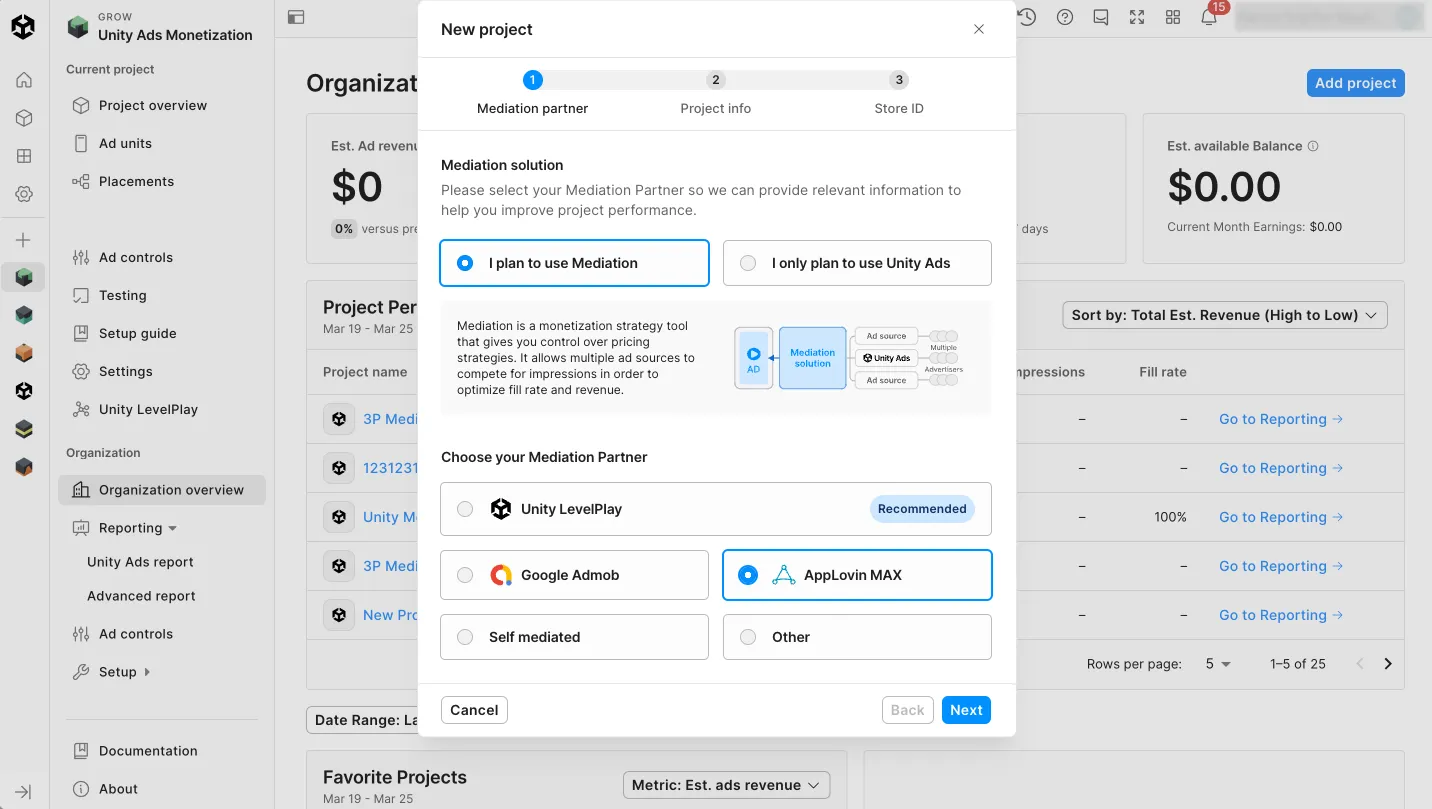
- Each app is a “Project” in Unity Ads. If you are creating an app for the first time, select Add Project. The New project dialog appears.
- Under Mediation solution, select I plan to use Mediation.
Under Choose your Mediation Partner, select AppLovin MAX.
Click Next.
- Fill in information about your project, then click Add project.
After you create your application (Project) in this way, you can create Unity Ad Units and Placements for your MAX ad units.
Create an Ad Unit and Bidding Placement
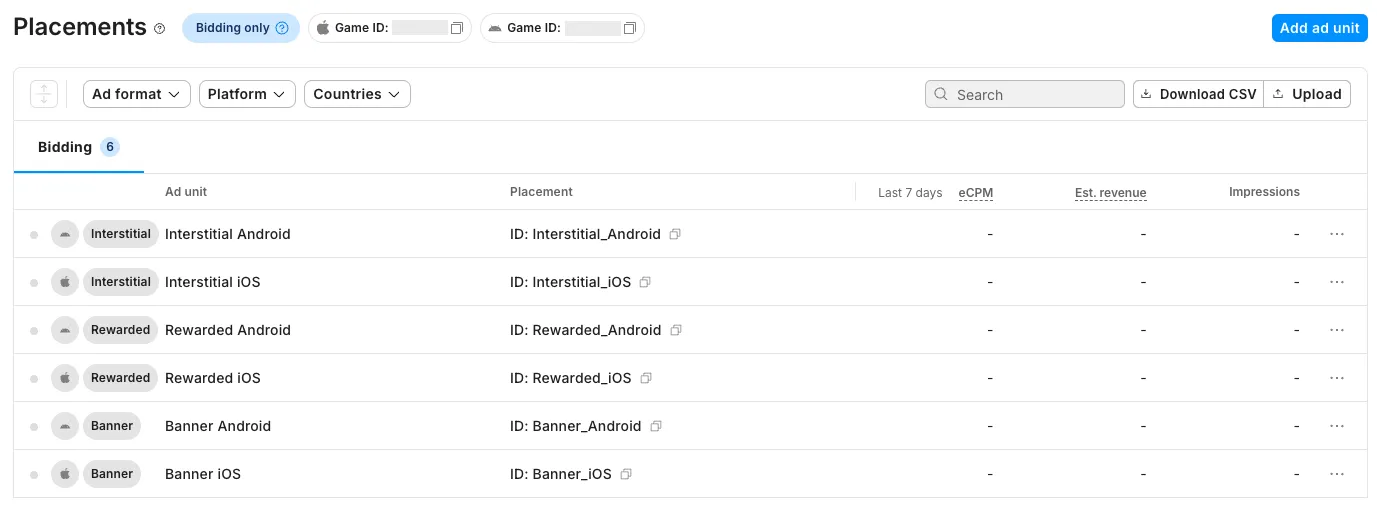
When you establish bidding in the Unity Ads Monetization dashboard, Unity Ads automatically creates Ad Units and Placements for each platform and ad format in your project. This results in six bidding placements: one interstitial, one rewarded, and one banner bidding placement each for Android and for iOS. New projects that use MAX mediation get these bidding placements automatically.
If you have an existing MAX project that is eligible to use bidding but that does not currently have bidding placements, you can generate these six bidding placements from the Unity Ads Monetization dashboard:
- Navigate to the Placements page by clicking Try bidding now > Add.
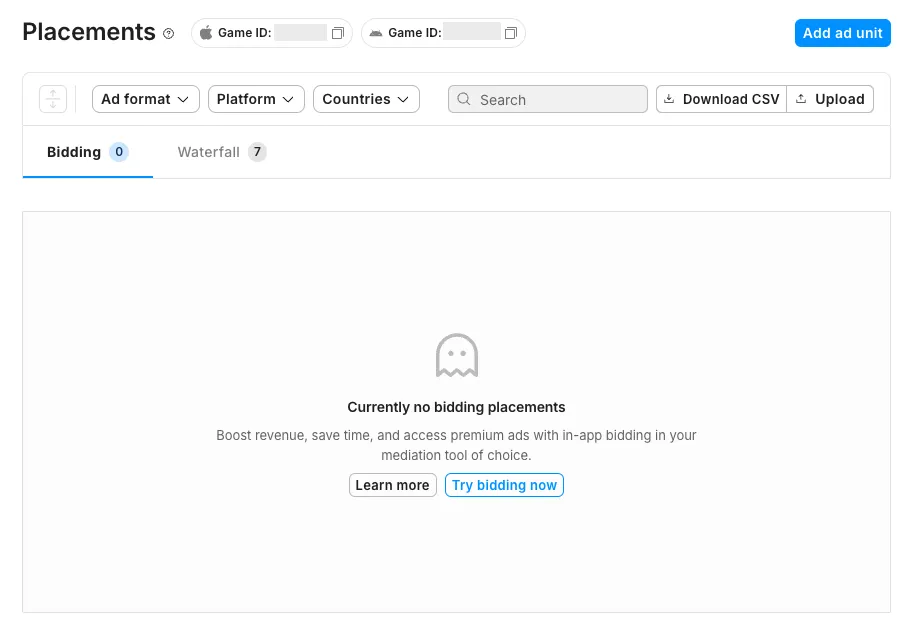
- To view your existing Ad Units, select the Project you created, then select Placements in the left navigation bar.
The dashboard displays your Ad Units for the Project, categorized as Bidding placements or Waterfall placements:
- Click Add ad unit.
- Type in the Ad Unit Name, select your application Platform, choose the Ad format, select Bidding, and define a Placement name.
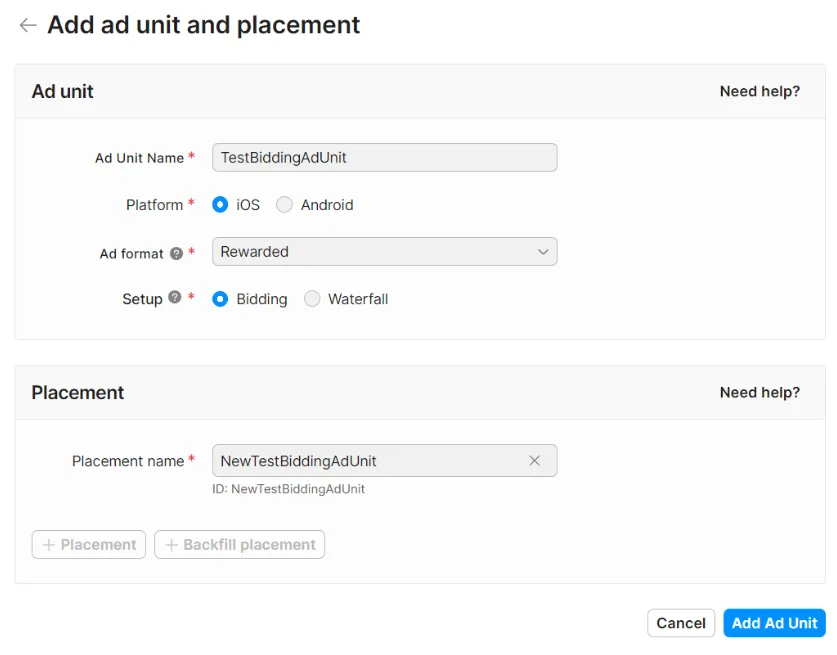 Click Add Ad Unit
To edit an existing Placement:
- Navigate to the Unity Ads Monetization tab in the left navigation bar, then select your Project.
- Select Placements from the left navigation bar. Your table of placements appears.
- Click the ⋯ to the right of the placement you want to edit. Select Manage ad unit & placement.
- Update the ad unit settings and placement name.
Step 3. Enable Unity Ads in Your MAX Account
You need your Unity Ads Game ID and Placement ID so that you can enable Unity Ads in your MAX account. To get these values:
- Navigate to the Unity Ads Monetization tab in the left navigation bar, then select your Project.
- Select Placements from the left navigation bar to see the Game ID and Placement IDs for your Project.
Then:
- Log in to your MAX account.
- Select MAX > Manage > Ad Units.
- Click the MAX ad unit placement on which you want to enable Unity Ads.
- Click the Status bar to activate the network. This enables Unity Ads in the participating networks list for this ad unit.
- Type the Unity Ads Game ID and Placement ID values associated with the MAX ad unit you selected.
- Click ✓ Save.
Verve
Step 1. Create a PubNative Publisher Account
To enable Verve ad inventory through MAX Mediation platform, you must have an approved PubNative Publisher account. If you do not have an account, contact Verve to learn how to obtain one.
Step 2. Activate Your Account
After you successfully complete the registration process, Verve Group sends you an email with which you can activate your account. After you activate your account, Verve Group sends you another email, which includes the following essential integration information:
- App Token
- Zone Reference
App-ads.txtList- SKAdNetwork ID (for iOS apps)
Step 3. Enable Verve in Your MAX Account
- When you have the Verve Zone Reference value you need, log in to your MAX account.
- Select MAX > Manage > Ad Units.
- Click the MAX ad unit placement on which you want to enable Verve.
- Type the Verve Zone Reference value associated with the MAX ad unit you selected.
- Click the Status bar to activate the network.
- Click ✓ Save. This enables Verve in the participating networks list for this ad unit.
VK Ad Network (formerly myTarget)
Step 1. Create a VK Ad Network Account
To enable VK Ad Network ad inventory through MAX Mediation platform, you must have a valid account with VK Ad Network. If you do not have an account, sign up at vk.com.
If you already have an VK Ad Network account, skip to Step 3 and activate VK Ad Network in your MAX ad units. AppLovin recommends that you create new placement IDs, as this improves the accuracy of what MAX reports.
If you want to create placements with price floors, contact your VK Ad Network account team to enable that feature.
Step 2. Create an Application and Placements in VK Ad Network
Add Your App
If you have already created your app in VK Ad Network, skip to the “Add a New Placement” section and create a Placement ID for your ad unit placement.
- Log in to VK Ad Network
- Select Add app.
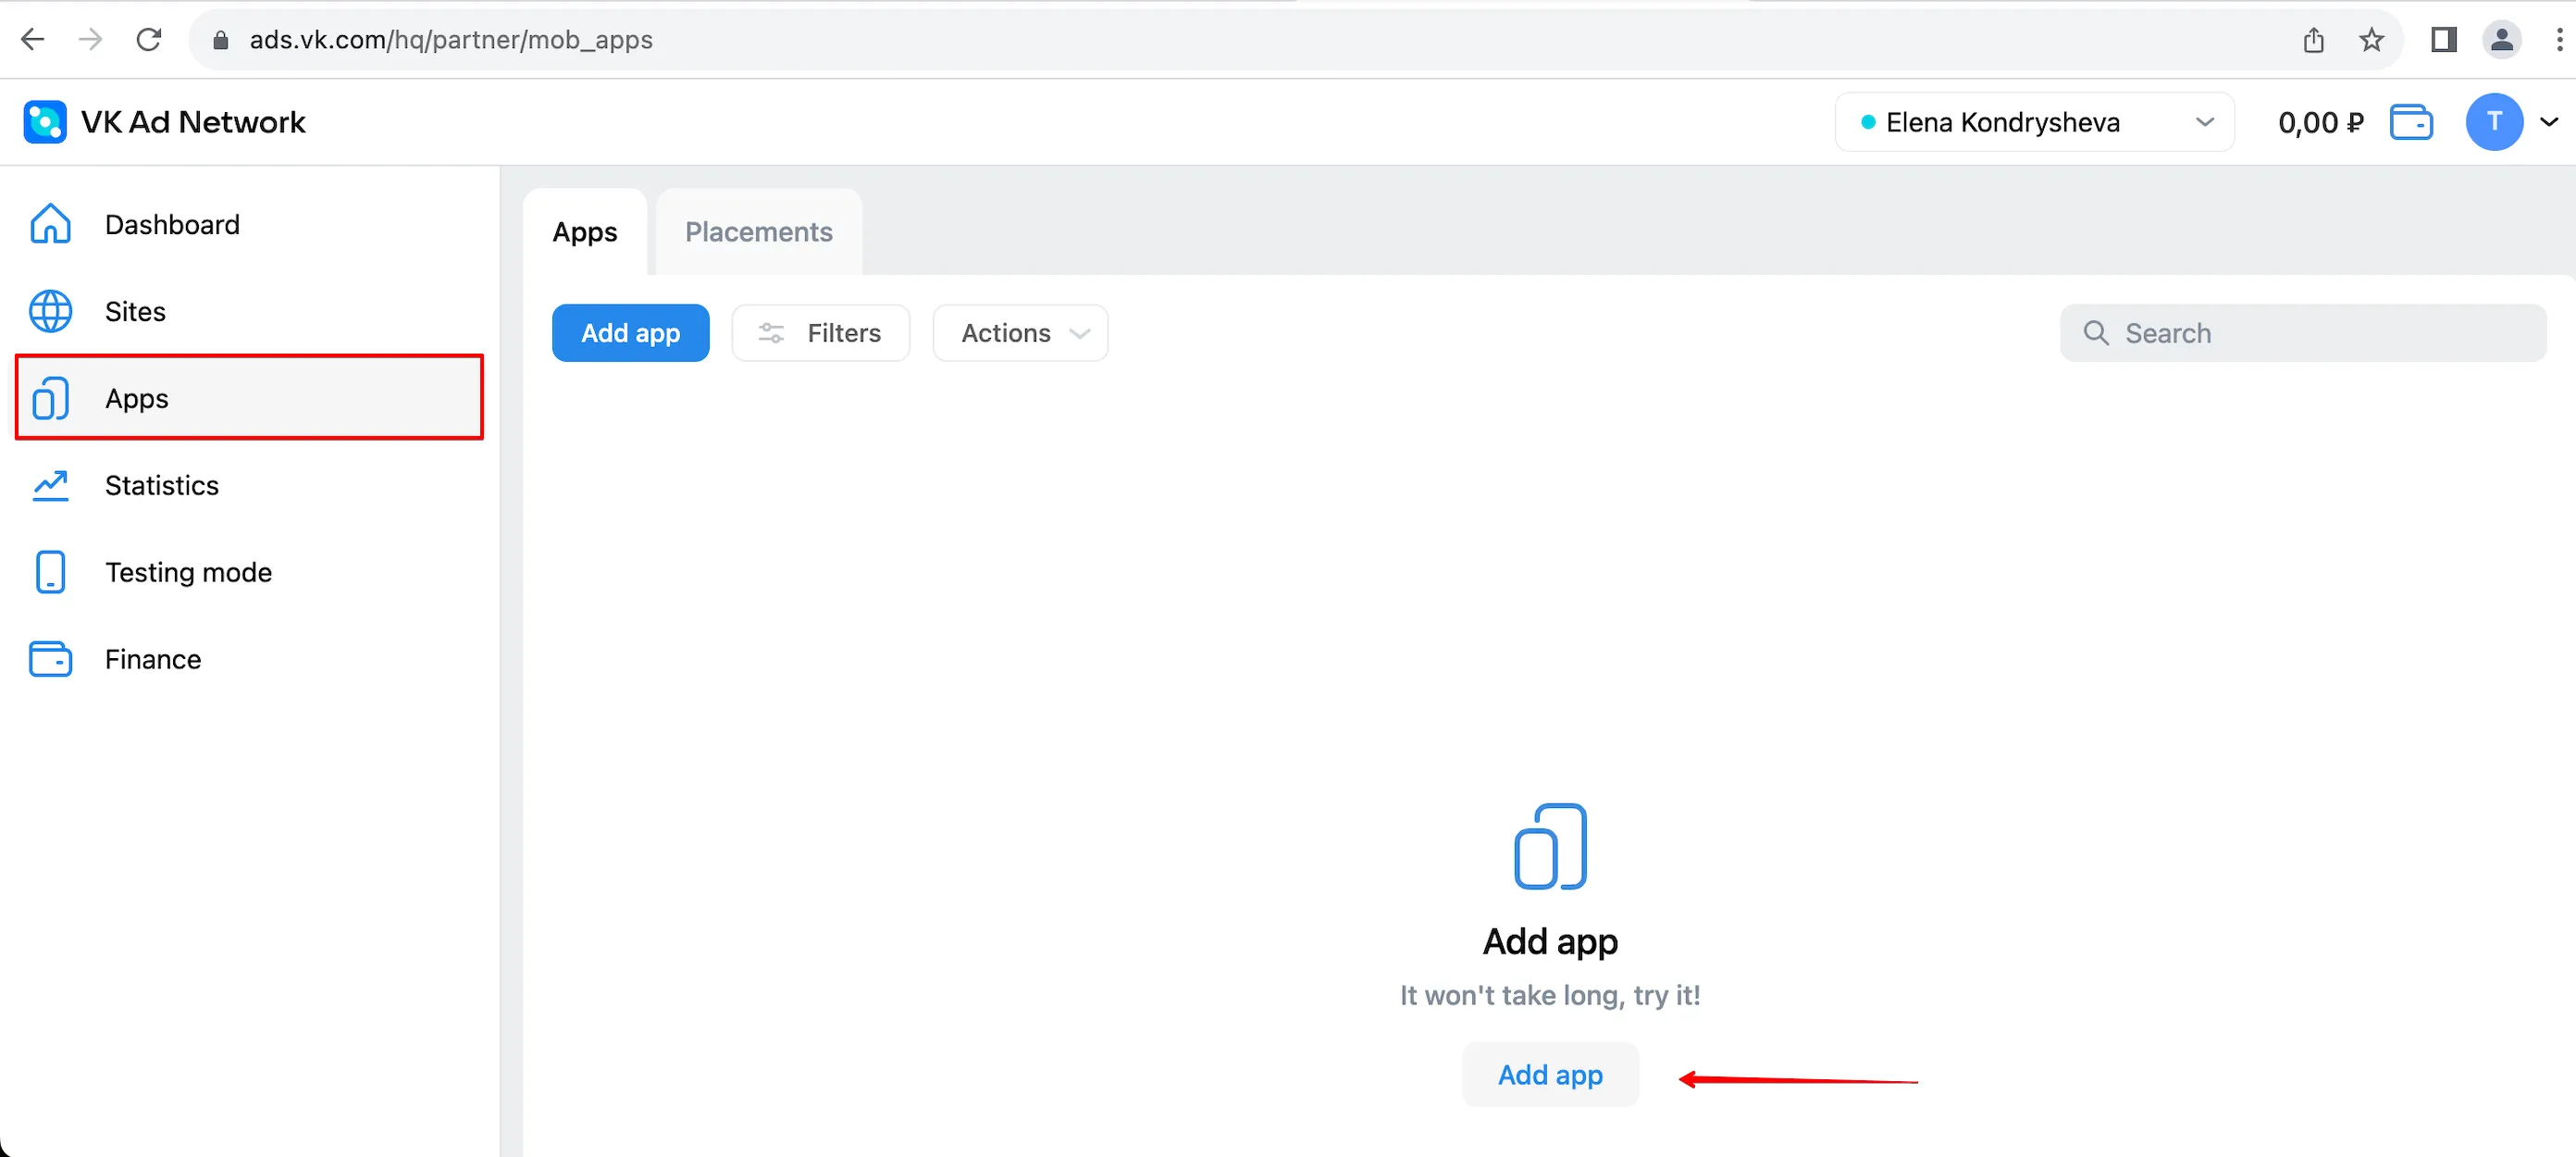
- Choose your App Settings:
- Site/app name: Type the name of your app.
- URL: Type the store URL of the app.
- Name of Ad Unit: Type a name for the Ad Unit.
- Ad Formats: Choose the ad formats you want to use.
- aCPM floor: Add a CPM floor for the ad unit.
- Click Add App to finish creating your app.
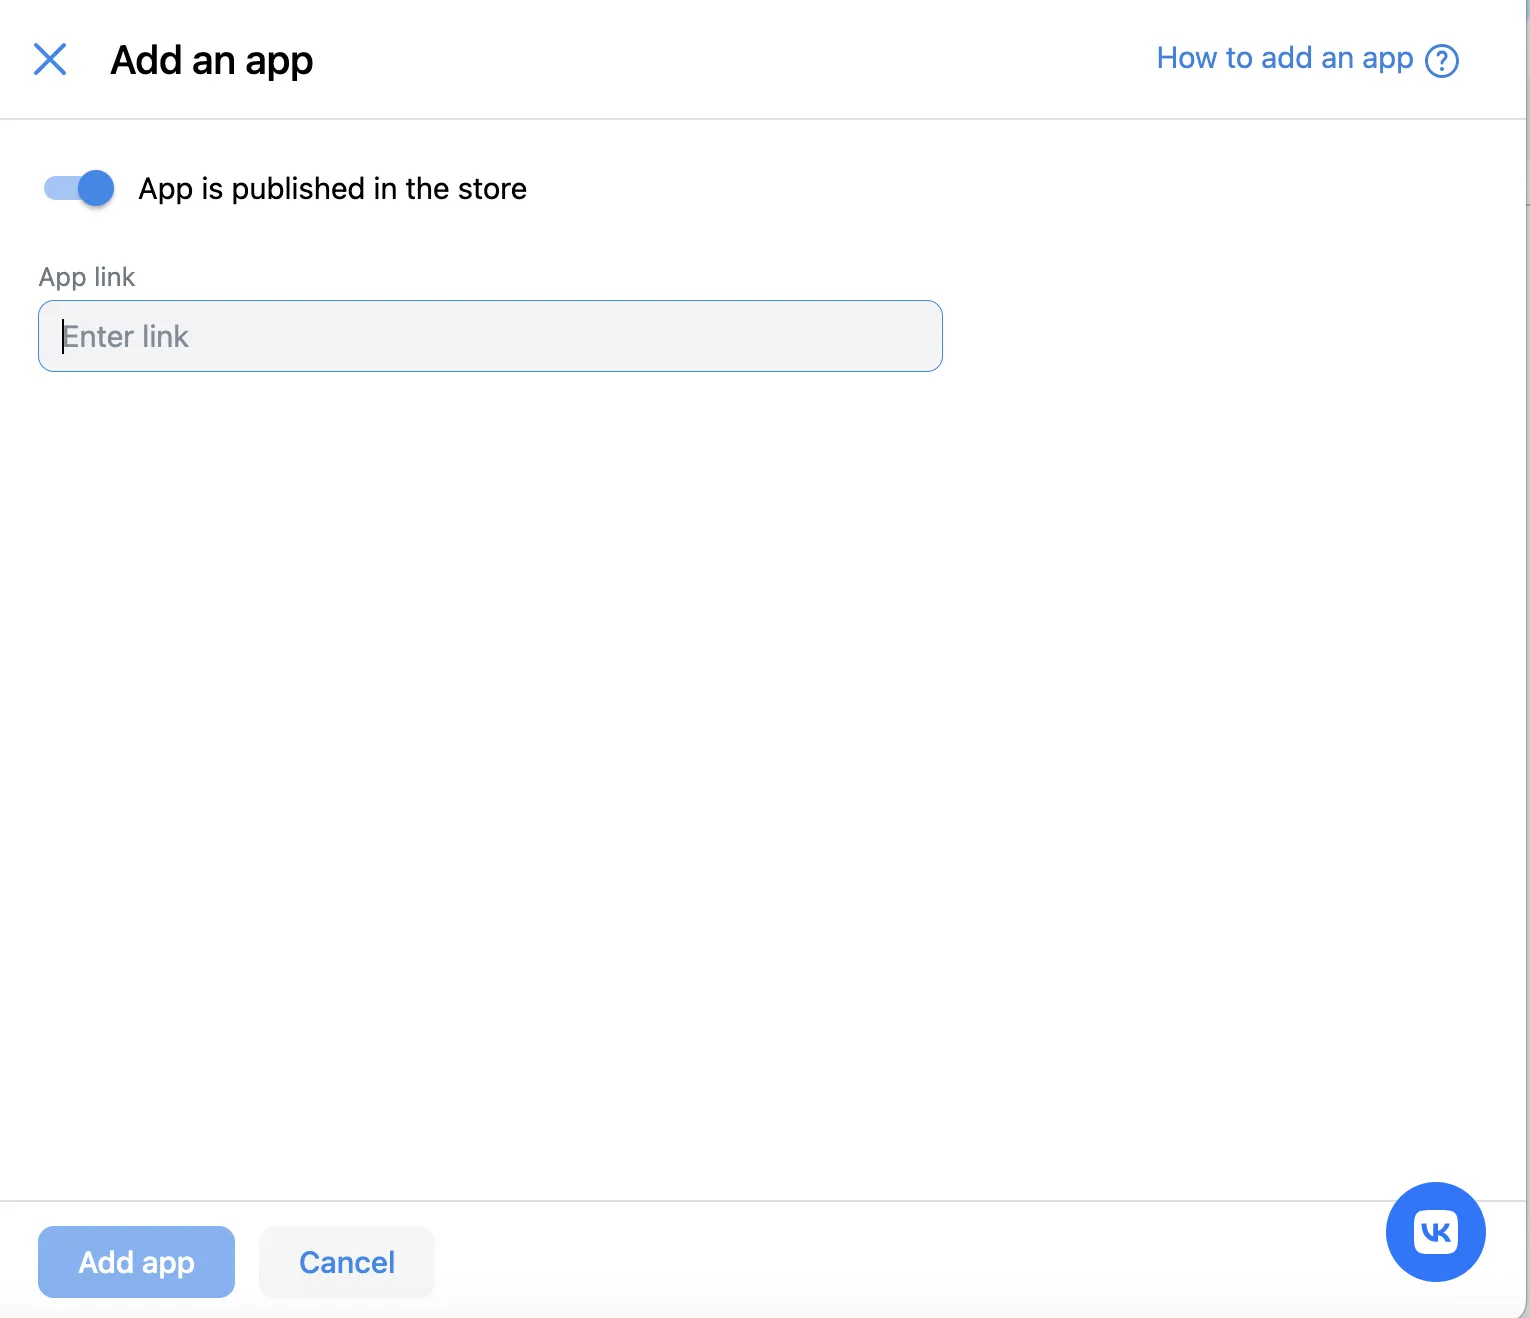
Add a New Placement
After you create your app, you can create new placements.
- Select your app for which you want to create a new placement.
- Click Add placement.
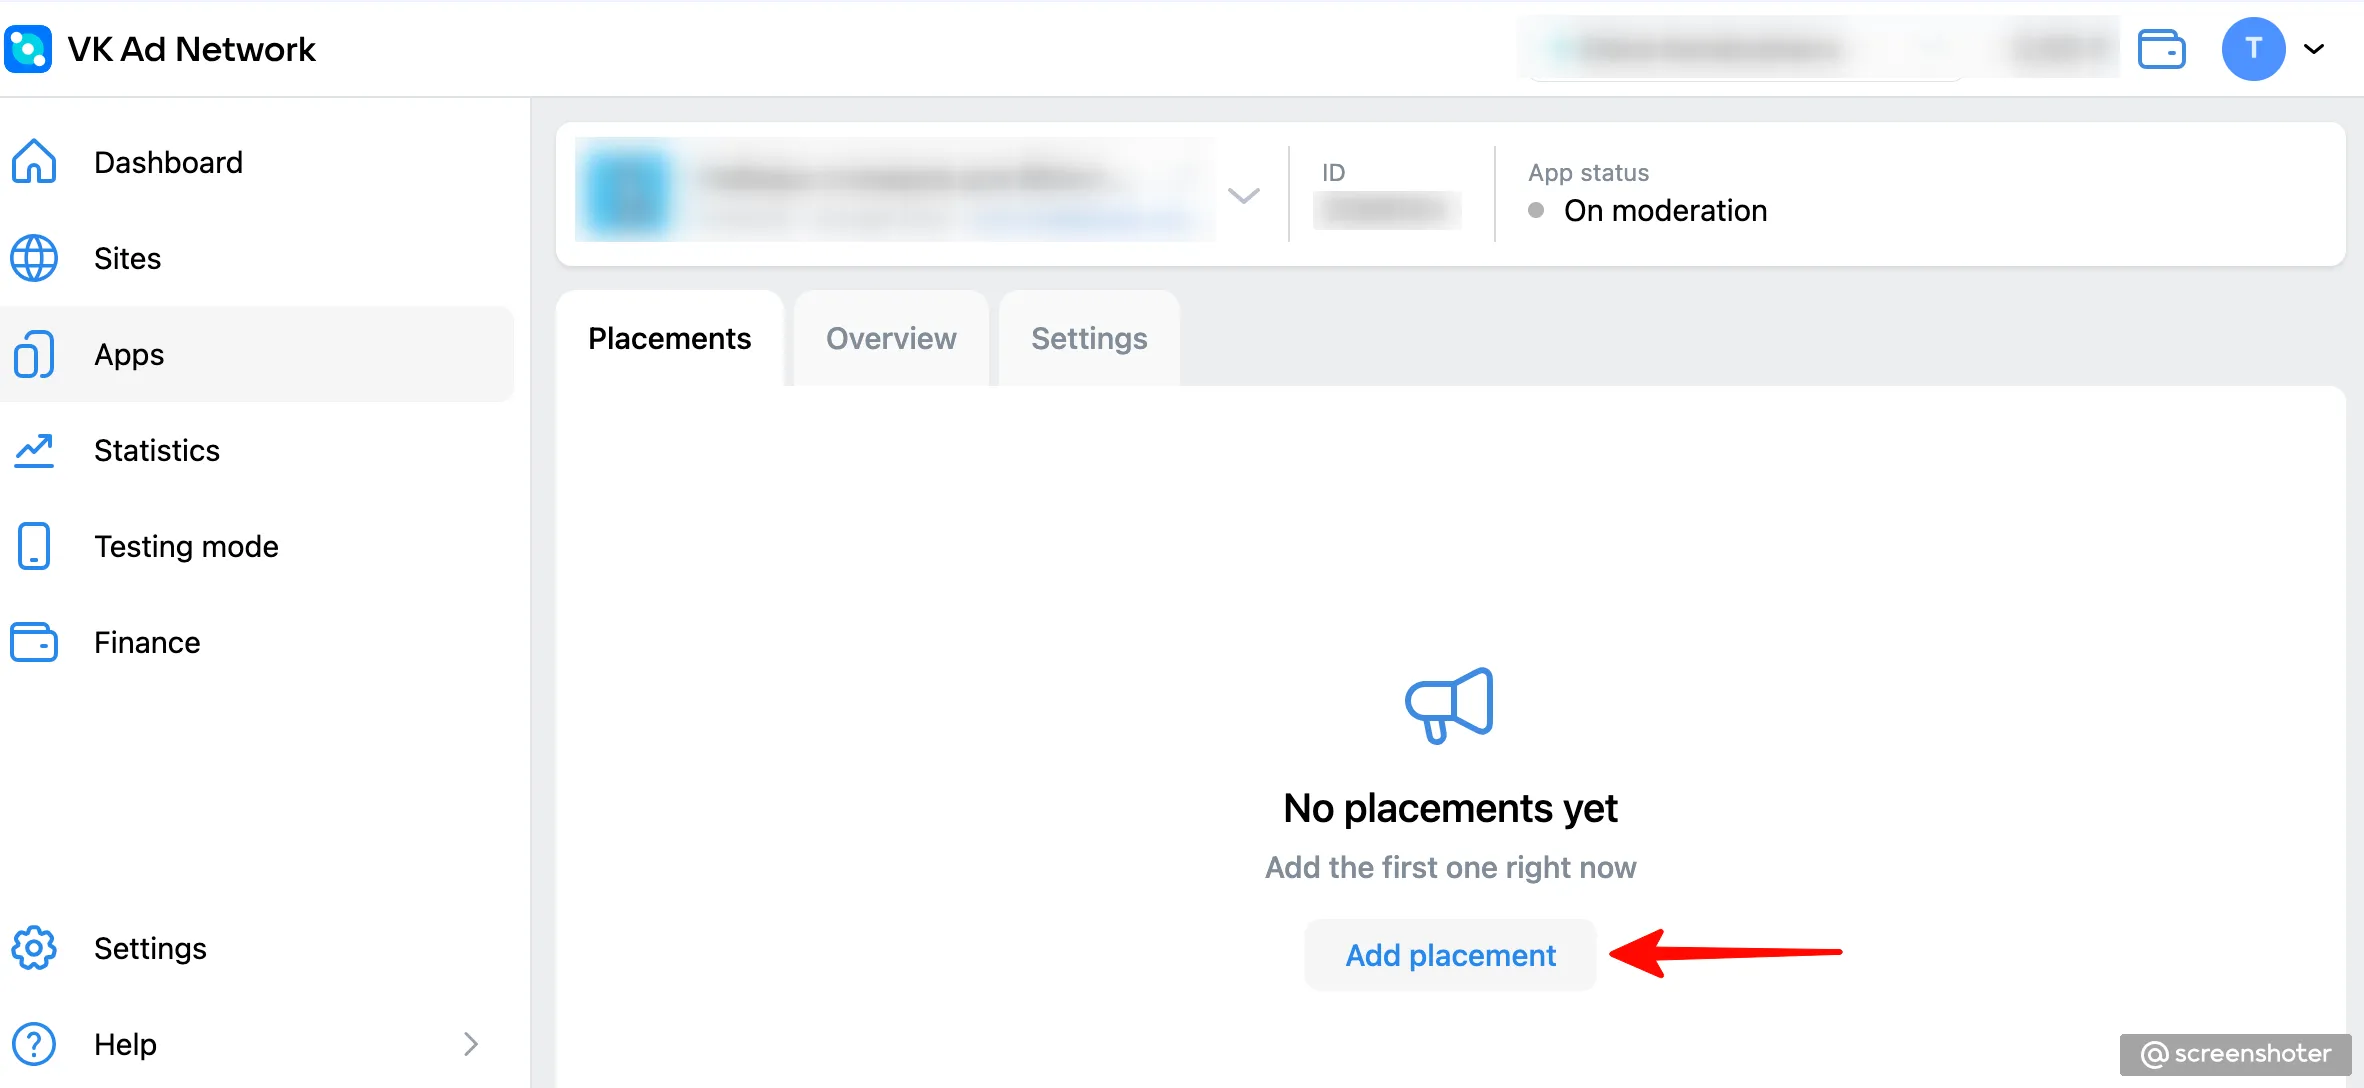
- Add the necessary details to create a VK Ad Network placement:
- Name of Ad Unit: Type in a name for the placement.
- Ad Formats: Choose the ad formats you want to use.
- Integration type: Choose in-app bidding to enable bidding.
- aCPM floor: Add a CPM floor for the ad unit.
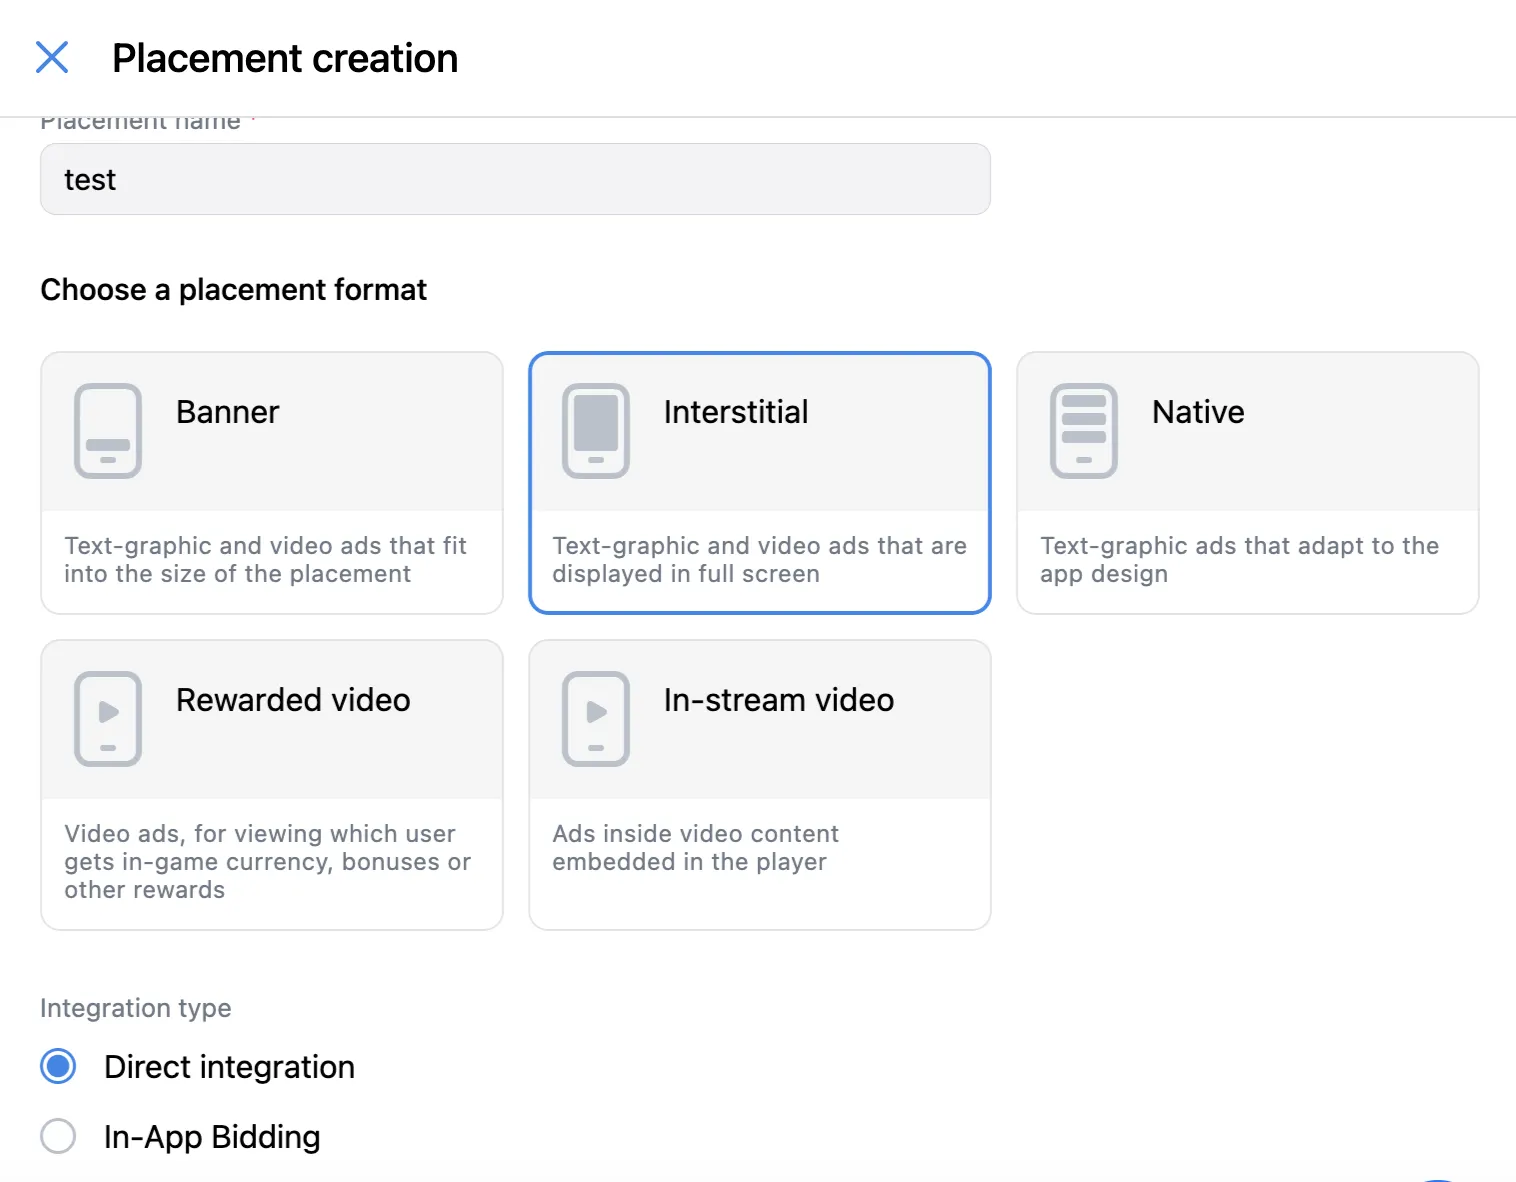
- Click Add ad unit to finish.
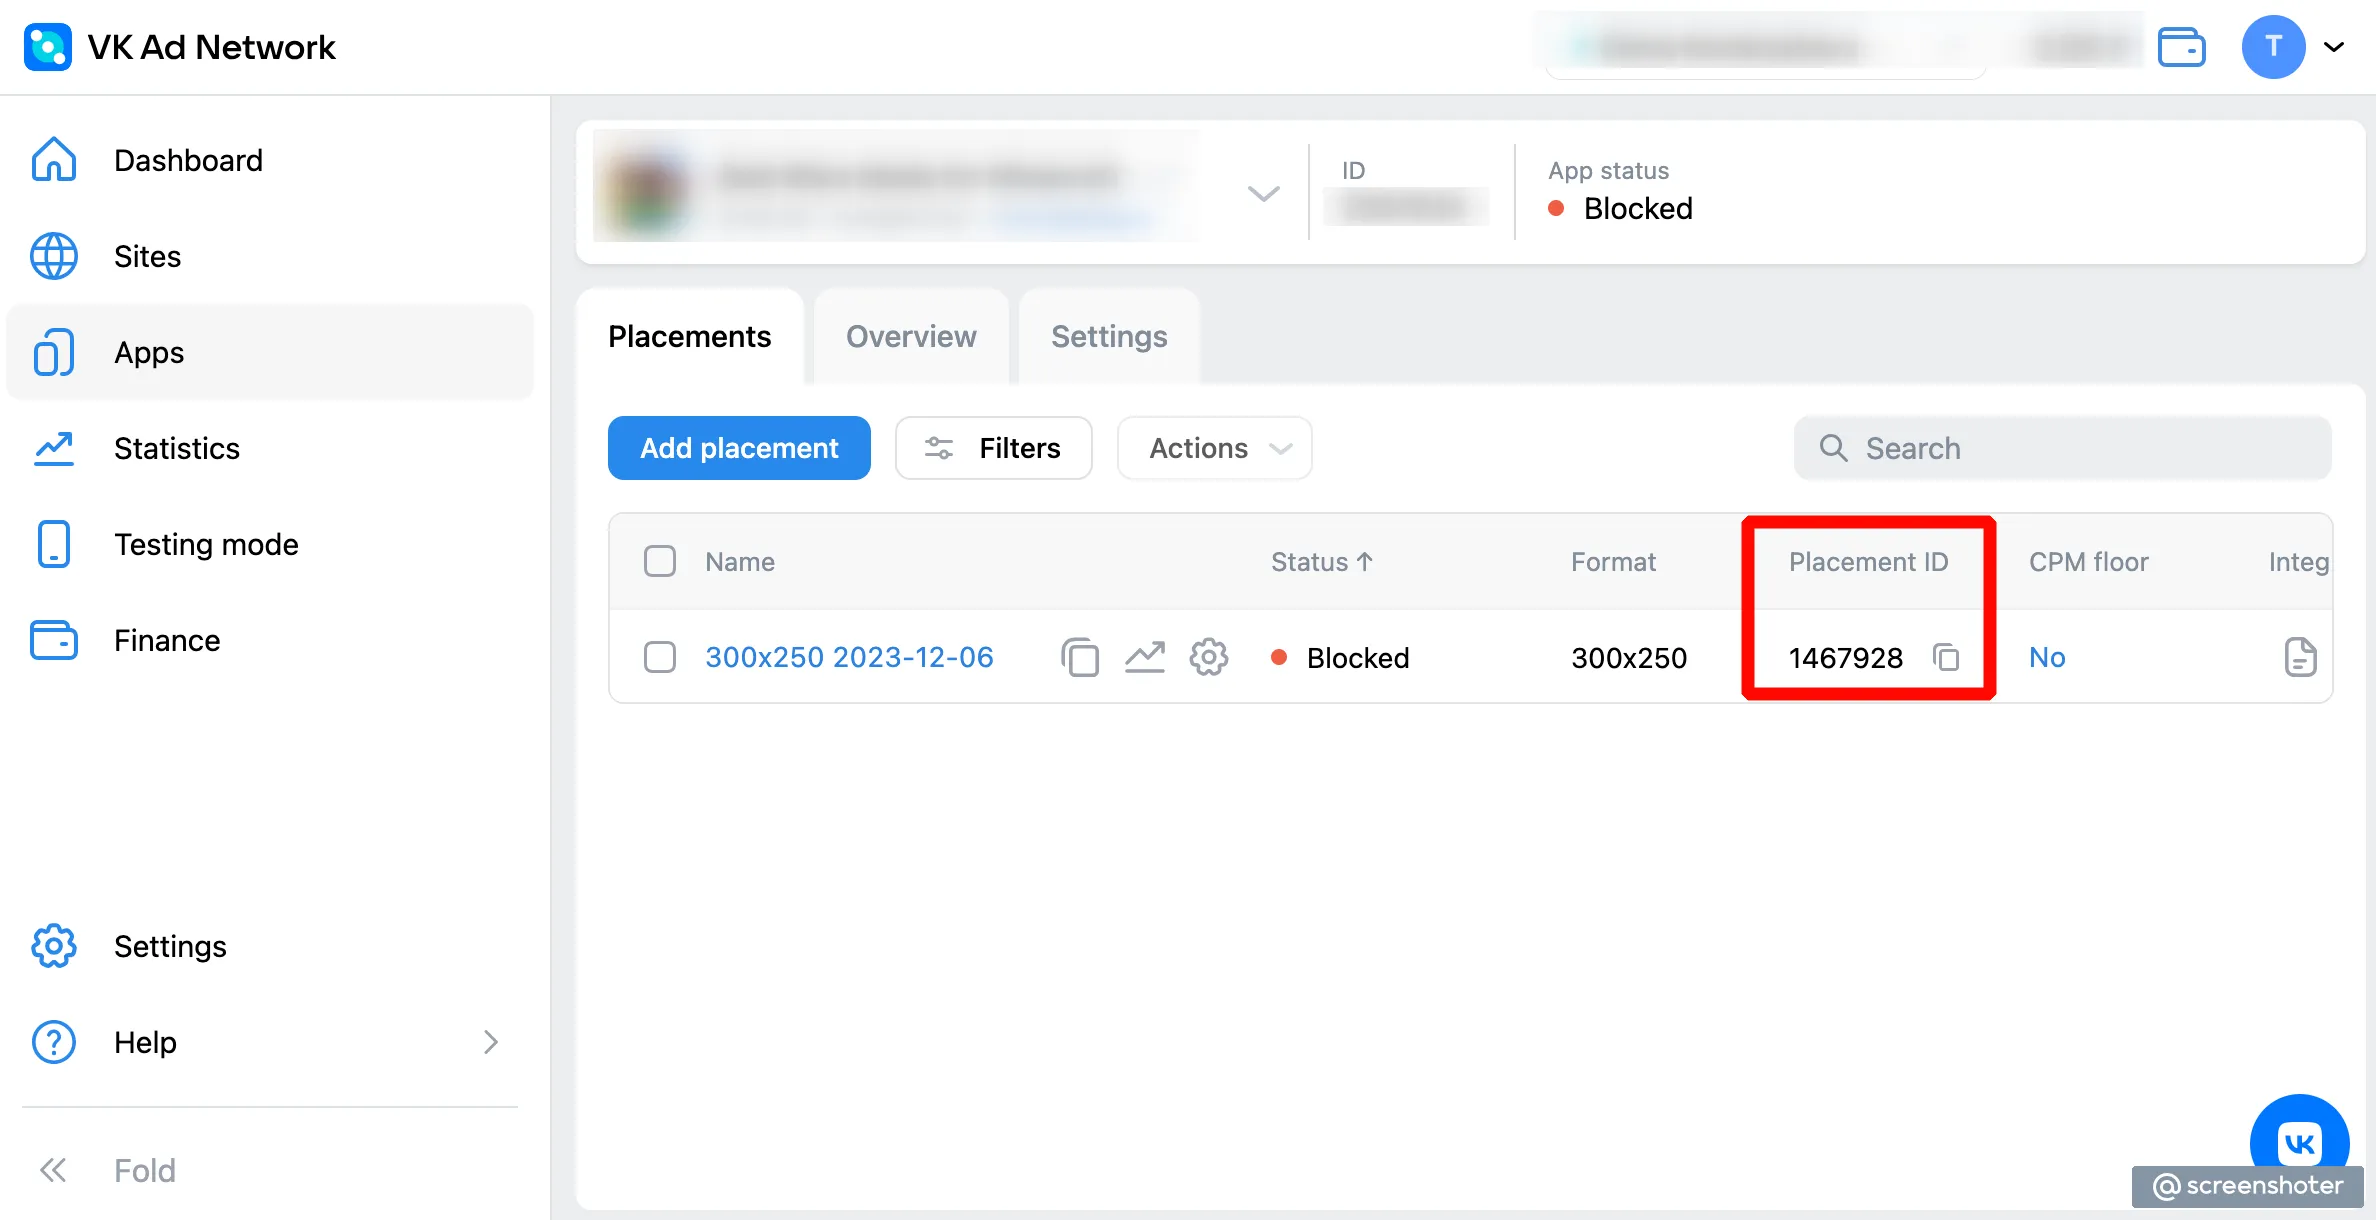
- Make note of the Placement ID of your placement.
You will use it in Step 3 to enable this placement on MAX.
Step 3. Enable VK Ad Network in Your MAX Account
- When you have the Placement ID you need, log in to your MAX account.
- Select MAX > Manage > Ad Units.
- Click the MAX ad unit placement on which you want to enable VK Ad Network.
- Type the Placement ID associated with the MAX ad unit you selected.
- Click the Status bar to activate the network.
- Click ✓ Save. This enables VK Ad Network in the participating networks list for this ad unit.
Yandex
Step 1. Create a Yandex Account
To enable Yandex ad inventory through MAX Mediation platform, you must have a valid account with Yandex. If you do not have an account, sign up at the Yandex site.
If you already have an Yandex account, skip to Step 3 and activate Yandex in your MAX ad units. AppLovin recommends that you create new placement IDs. This improves the accuracy of what MAX reports.
Step 2. Create an Application and Placements in Yandex
Add Your App
If you have already created an app, skip to the “Add a New Placement” section and create a Block ID.
- Log in to Yandex.
- Select Ads in apps > Applications from the menu on the left side.
- Click New app.
- Find your app by the link, name, or package in the official Google Play or App Store.
(If your app is not available in store, select one of the other options.)
Click Add.

- Verify your access to the app either by using a unique code or by means of
app-ads.txt.
Add a New Placement
After you create your app, you can create new placements:
- Log in to Yandex.
- Select Ads in apps > Applications from the menu on the left side of the page.
- Look for the application for which you would like to create an ad. Under the Ad Units column, select Add.
- Set the following:
- Ad format
- Name/title
- Define CPM settings. In the CPM strategy field, select Maximum revenue.
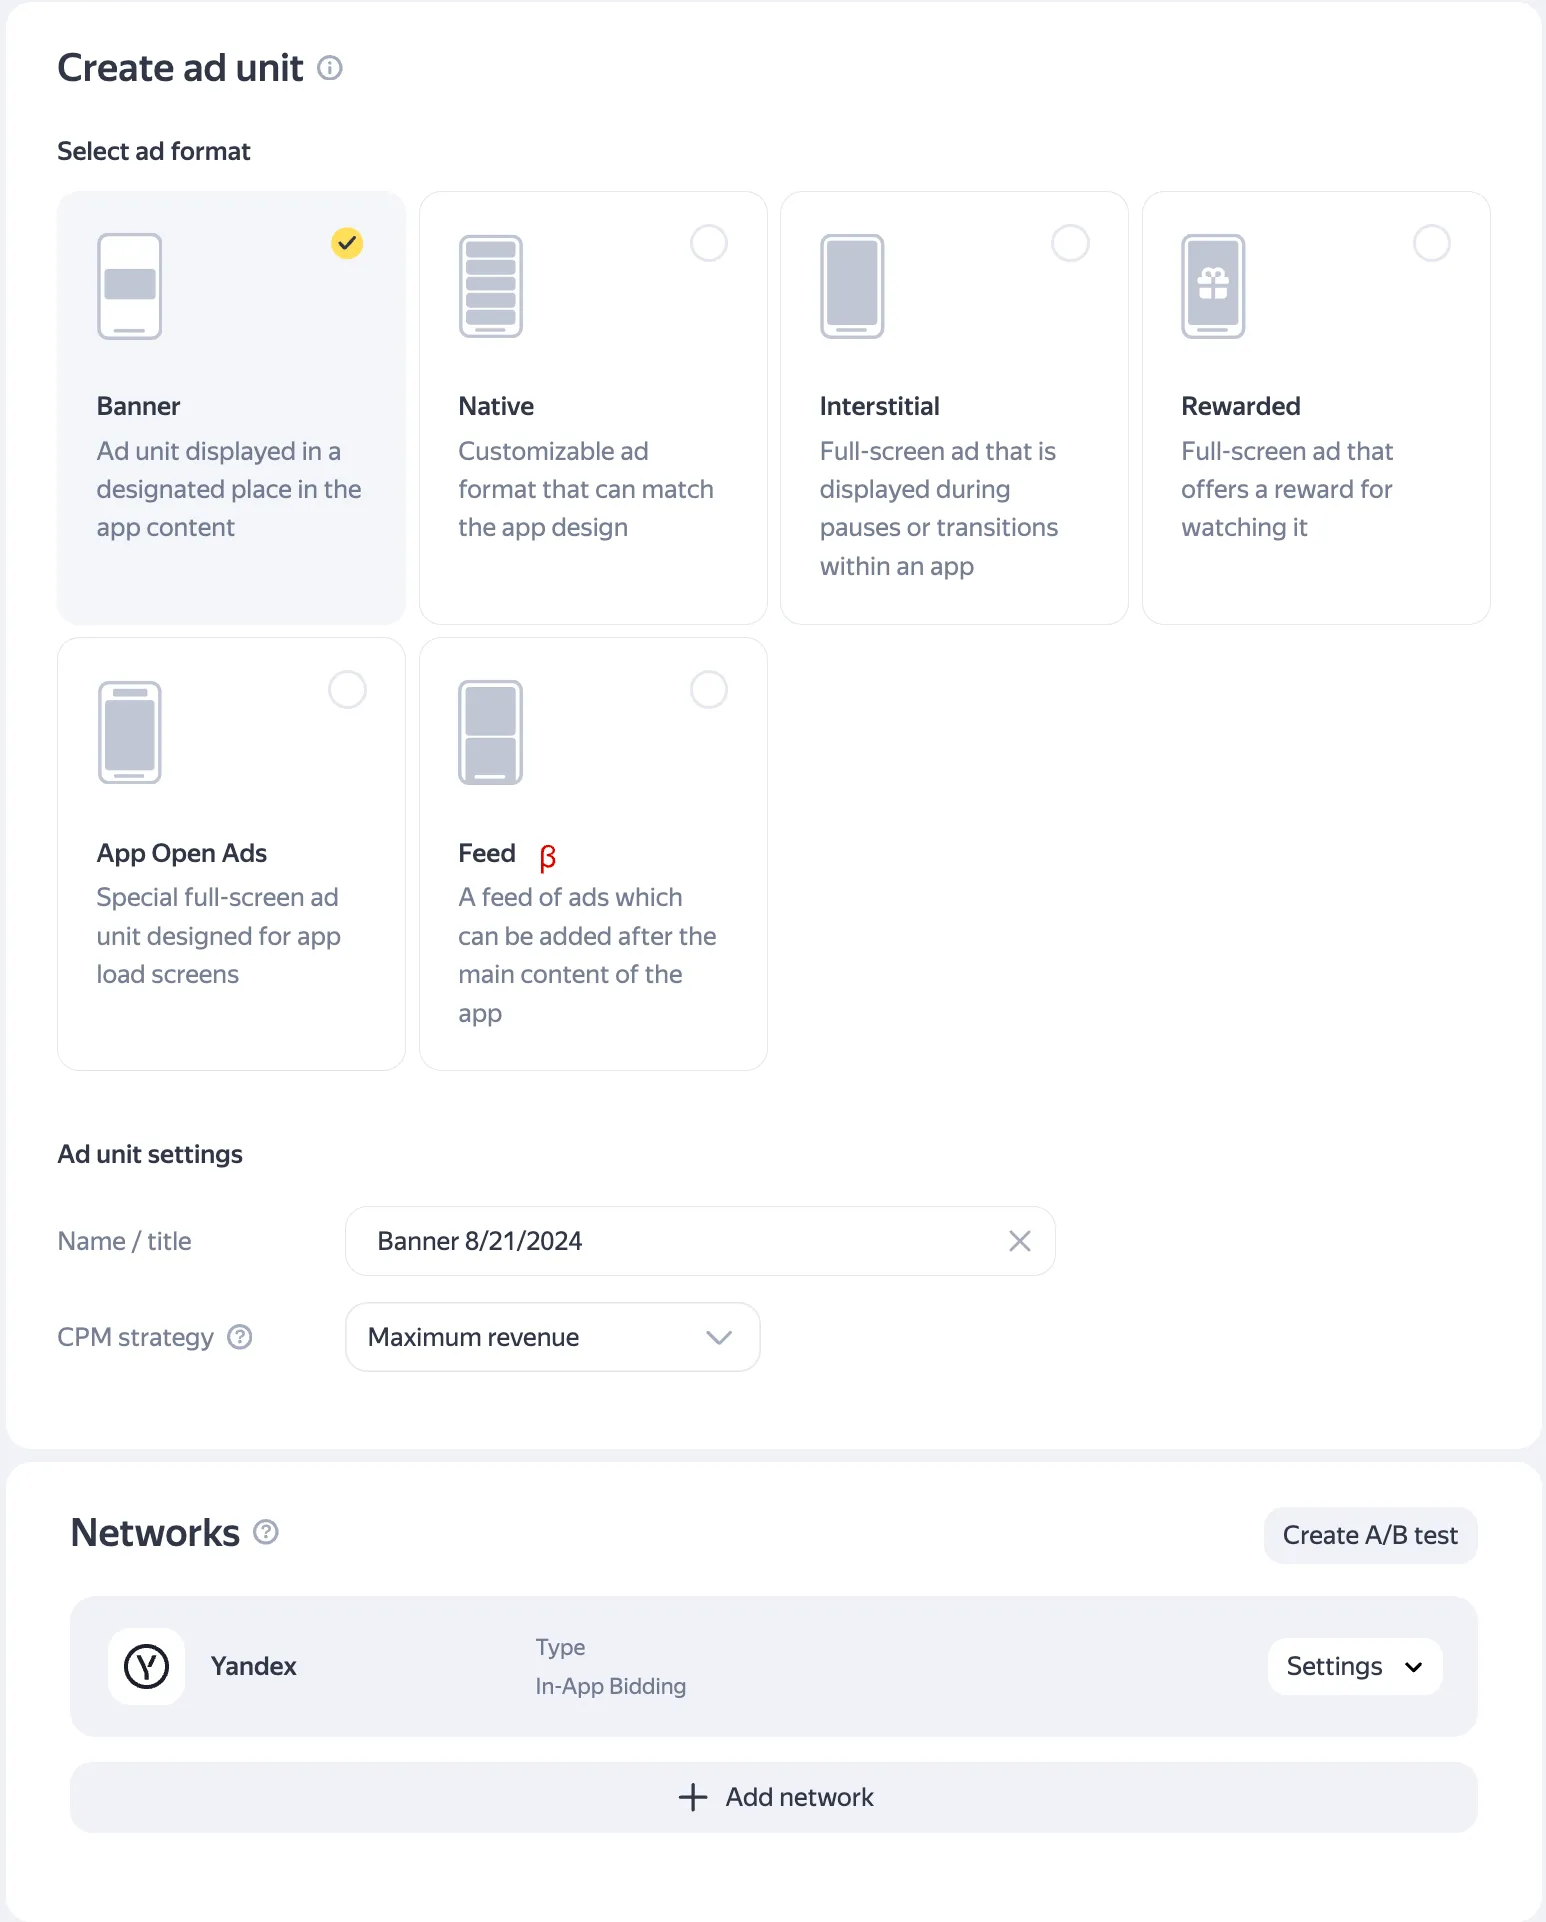
- Click Create.
Note the ID of your new ad unit. You need it in Step 3 to enable this ad unit on MAX.
Step 3. Enable Yandex in Your MAX Account
- When you have the Block ID you need, log in to your MAX account. You can find the Yandex Block ID in the Yandex dashboard under Adds in apps > Ad Units.
- Select MAX > Manage > Ad Units.
- Click the MAX ad unit placement on which you want to enable Yandex.
- Type the Block ID associated with the MAX ad unit you selected.
- Click the Status bar to activate the network.
- Click ✓ Save. This enables Yandex in the participating networks list for this ad unit.
YSO Network
Step 1. Create a YSO Network Account
To enable YSO Network ad inventory through MAX Mediation platform, you must have an approved account with YSO Network. If you do not have an account, sign up at the YSO Network website.
If you already have an account and placements, skip to step 3 below to activate YSO Network in your MAX ad units.
Step 2. Create an Application and Placements in YSO Network
To start monetizing your app with YSO Network, add your app on the YSO Network dashboard.
- Log in to the YSO Network dashboard.
- Select Applications in the top menu bar. The Applications page appears.
- Click the plus (⊕) button to begin adding your app.
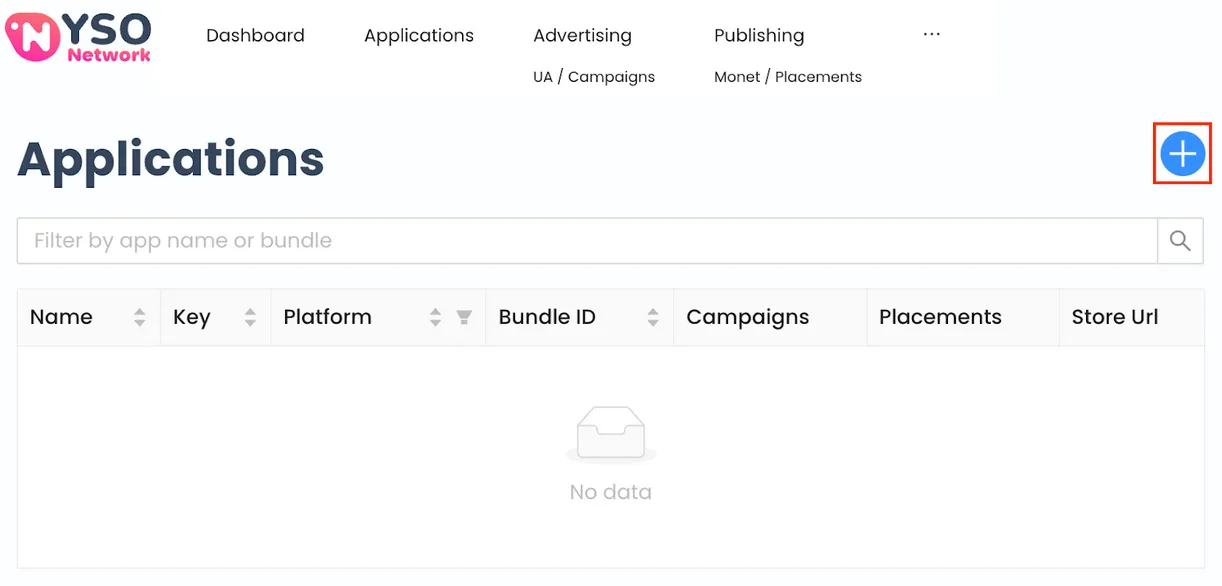
- In the Applications > New page that appears, fill in your app information.
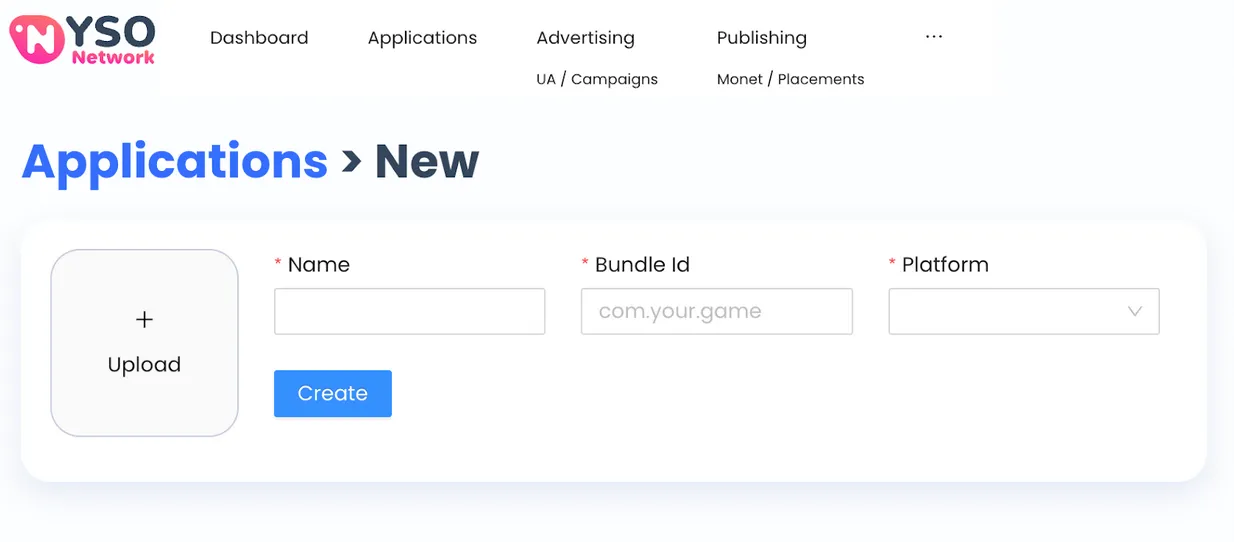
- Click Create.
Create Ad Placements
Follow these steps to create a placement:
- Select Publishing in the YSO dashboard.
- Click the plus (⊕) button.
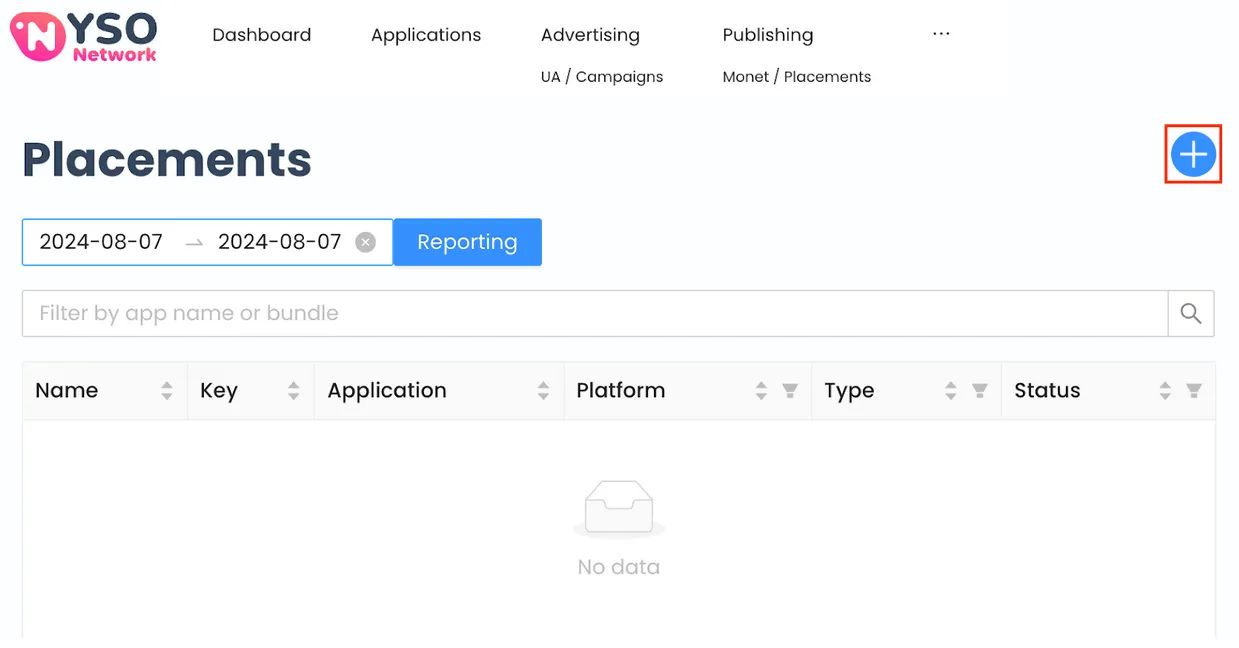
- Type a placement Name, and select your Application and the ad Type.
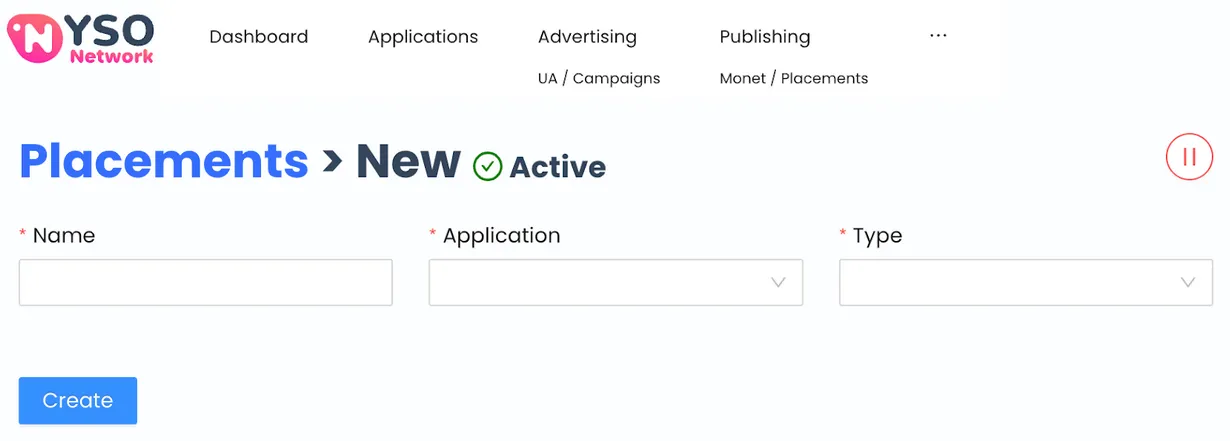
- Click Create.
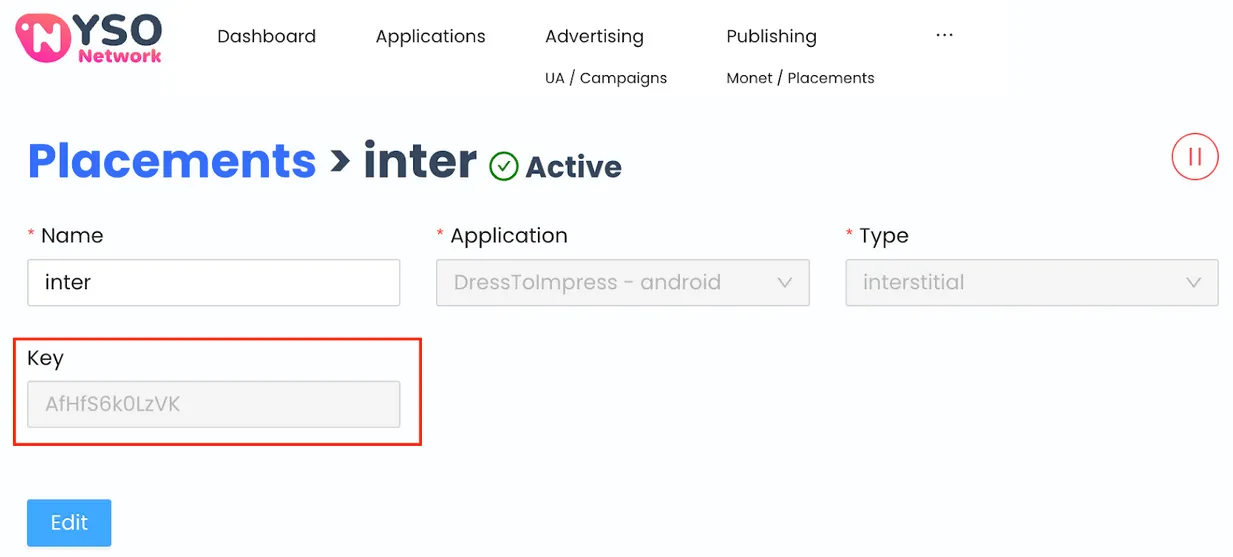
When you create a placement, YSO Network generates a corresponding placement Key. You can find it in the YSO Network dashboard Publishing section:
Step 3. Enable YSO Network in Your MAX Account
- When you have the YSO Network placement Key(s) you need, log in to your MAX account.
- Select MAX > Manage > Ad Units.
- Click the MAX ad unit placement on which you want to enable YSO Network.
- Type the YSO network placement Key associated with the MAX ad unit you selected in the Placement ID section.
- Click the Status bar to activate the network.
- Click ✓ Save. This enables YSO Network in the participating networks list for this ad unit.